More recently, protective grounding was equipped only at industrial enterprises and other facilities where powerful electrical installations are used. To protect their employees from accidental breakdown to the case, each installation and device was grounded without fail. But time does not stand still. Today, our homes are crammed with powerful household appliances: refrigerators, freezers, microwave ovens, induction cookers, underfloor heating systems and much more. But all this is a source of increased danger. If their isolation is violated, "close communication" with powerful devices can be fatal. That is why, in order to protect all the inhabitants of the home, in country houses it is imperative to equip electrical grounding. Its arrangement can be entrusted to professionals, or you can do it yourself.
Why is protective grounding necessary?
Professional literature indicates that protective grounding is a connection of non-current-carrying parts of electrical installations to the ground (soil), which is performed intentionally. At the same time, in the normal state, these parts of electrical appliances and installations are not energized. But if a partial destruction of the insulating layer suddenly occurs, the metal case of the device may be energized.
If you explain in a more accessible language, you will have to remember the school physics course. As we know from this, the current tends to flow in the direction where there is the least resistance. When the insulation is broken on the current-carrying parts of electrical appliances, the current begins to look for a place where the resistance is lowest. So it reaches the body of the device, as a result of which the body is energized. This situation is called "breakdown on the hull". In addition to the fact that the current on the case can harm the device itself or disrupt its functionality, if at such a moment a person or animal touches the device case, they will receive an electric shock. This can have dire consequences.

Protective grounding is performed in order to divert current to the ground (ground). At the same time, it is extremely important to make a ground loop with such low resistance that the current, which is distributed in inverse proportion between a person and a grounding device, passes through a person in the maximum permissible norms, and most of it is redirected to the ground.
What is a ground loop
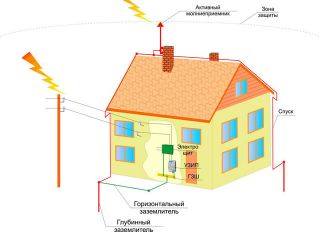
The most common variant of the ground loop is electrodes buried in the ground, connected to each other in a loop, which can be any geometric figure - a triangle, a square or another, but the connection can also be made in one row. The arrangement option depends on how convenient it is for installation, and on the size of the territory that can be used for the circuit. Sometimes the ground loop is performed along the perimeter of the building. The resulting design is attached to the shield, for which a ground cable is used.
The distance from the ground loop to the house should not be too large, 4-6 m is considered optimal. You cannot place the loop closer than 1 m to the house, it is undesirable to go further than 10 m.
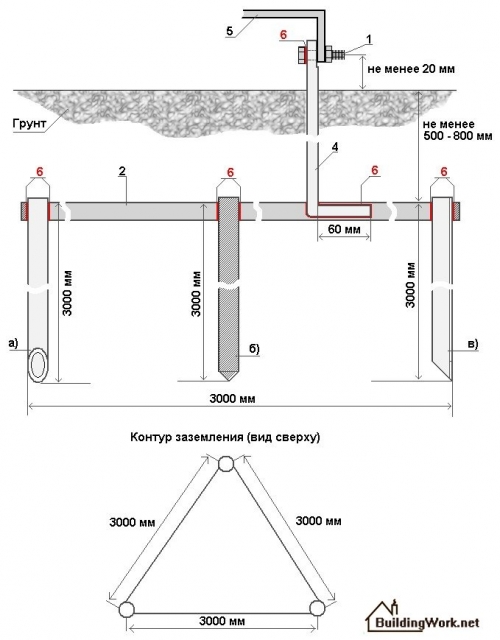
Important! The ground loop must be equipped below the freezing level of the soil, i.e. at a depth of at least 0.8 m.
The depth to which it is necessary to bury the electrodes depends on the structure of the soil and its saturation with water and can range from 1.5 m to 3 m or more. If groundwater is close to the soil surface, the soil is saturated with water, then the depth will be shallow. Otherwise, you will have to drive the rods deep into the ground or equip another version of the grounding system.
Ground loop from black rolled metal
Any ferrous metal rods can be used as ground electrodes. It can be a steel corner (most often used), a pipe, an I-beam, fittings with a smooth structure. The principle of choice is simple - the convenience of driving into the ground. Those. you can choose any shape, the main thing is that the cross section of the metal is at least 1.5 cm2.
The number of rods - electrodes can be determined empirically or made calculations, but the most common is a triangular ground loop with electrodes at the vertices of the triangle. Between themselves, the rods are connected by metal strips, the same strip leads to the switchboard.
The distance between the rods can be from 1.2 m to 3 m or more. It depends on the resistance of the soil.
Important! Before doing grounding in your home, check with regular electricians in your area. Ask them what are the most common designs, and with what characteristics they equip in your area. At what depth to put the electrodes, how far to take out from the house, what distance to make between the rods. This will make your task much easier.
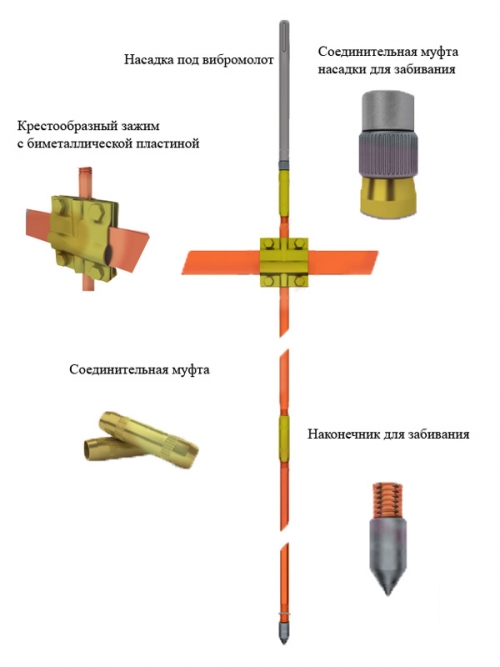
In addition to the fact that it is possible to equip a ground loop from improvised material, ready-made modular grounding systems have appeared on the market.
The set includes rods made of high-quality steel, they are covered with copper on top. The diameter of the rods is about 14 mm, the length is up to 1.5 m. There is a copper-plated thread on both sides of the rod. The elements are interconnected by means of brass couplings. To deepen the rods into the ground, there are tips that are screwed onto the threaded connection. There are several types of such tips for different soils. The kit also includes clamps for connecting vertical (rods) and horizontal (strips) elements. To protect the structure from corrosion, a special paste is used, which processes all elements of the system.
Ready-made modular grounding systems have several significant advantages:
- By connecting vertical elements, a depth of 50 m can be carried out;
- The rods are not very susceptible to corrosion due to copper plating and stainless steel;
- No welding required;
- Arrangement can save space, because. the whole system can be equipped on 1 m2;
- Installation does not require special equipment;
- Durable.
The choice of grounding system, homemade or ready-made modular, depends only on the financial budget and personal preferences. But in any case, before arranging, it is necessary to make grounding calculations.
How to calculate grounding
For those who do not like unnecessary complications, there is an option to perform grounding empirically. You can equip a triangular circuit at the optimal distance from the house, use metal rods 3 m long, make the distance between the rods from 1.5 to 2 m, connect them together and measure the resistance of the circuit. The requirements for grounding are as follows: the resistance of the ground loop must be in the range from 4 to 10 ohms. As a general rule, the lower the resistance value, the better. If the measurement result of our circuit does not meet the requirements, then we add more electrodes and connect them with those already installed. We take measurements again. And so we repeat until our circuit has a resistance of 4 ohms.
A more correct solution would still be to make all the necessary calculations before starting the installation of the circuit. The most important thing is to determine the number of required electrodes and the length of the horizontal ground electrode (strip). All this directly depends on the properties of the soil, or rather its resistance.
First of all, we determine the resistance of one rod.
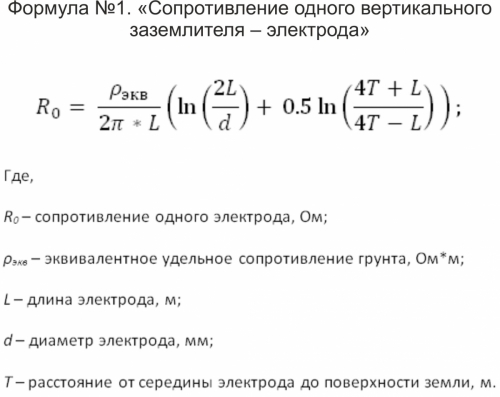
The value of soil resistivity for calculations can be taken from the table.
If the soil is heterogeneous, then its resistance is calculated by the formula:
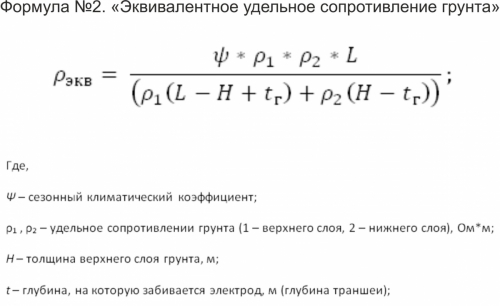
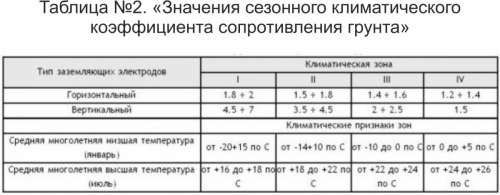
The value of the seasonal climate coefficient can be taken from the table:
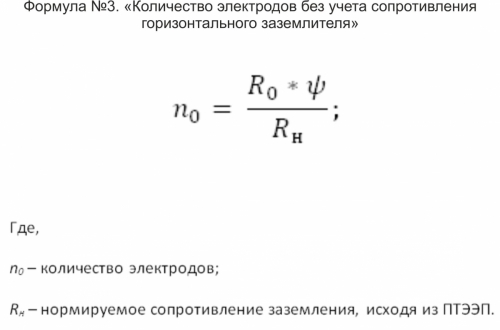
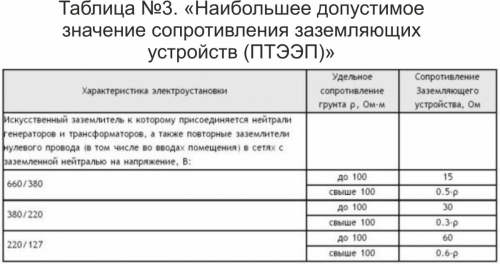
If we do not take into account the resistance of the horizontal ground electrode (strip), then the number of electrodes can be found by the formula:
We find the resistance of spreading horizon. ground electrode:
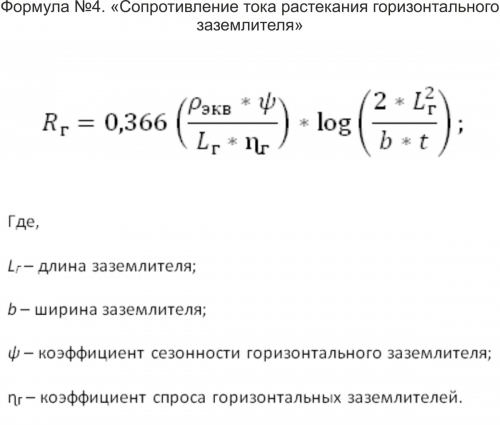
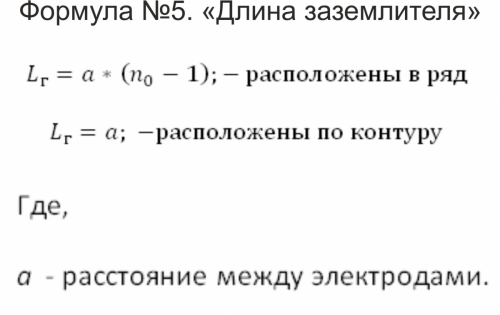
The length of the grounding conductor is found by the following formulas:
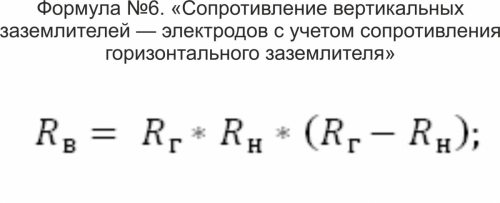
Final number of electrodes:
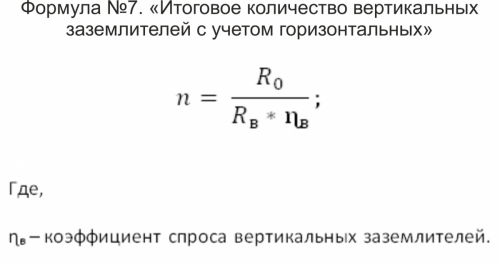
The demand coefficient can be found from the table:
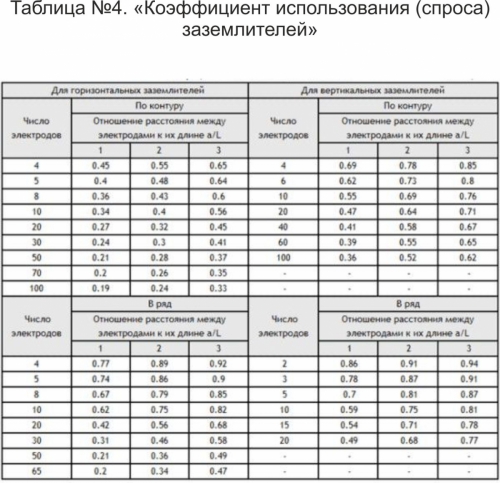
The utilization factor indicates the influence of currents on each other, which depends on the location of the vertical ground electrodes. When the electrodes are connected in parallel, the currents passing through them affect each other. The smaller the distance between the vertical electrodes, the greater the resistance of the entire circuit. That is why it is sometimes advised to space the rods from each other at a distance equal to their length, for example, 3m.
The value of the number of electrodes obtained in the course of calculations is rounded up to a whole number. The calculations are ready, you can proceed with the installation.
How to make grounding in a private house with your own hands
Installation of grounding is recommended to start in the warm season. Firstly, it is easier to carry out excavation work. Secondly, the value of soil resistance will be more accurate and maximum. This is very important for good grounding. And then you can make grounding when the soil is temporarily saturated with water, and its resistance will be 4 ohms, and then drought will come and its resistance will increase to 20 ohms. It is better to immediately take into account the maximum value.
We will consider the arrangement of a ground loop made of rolled metal in the form of a triangle:
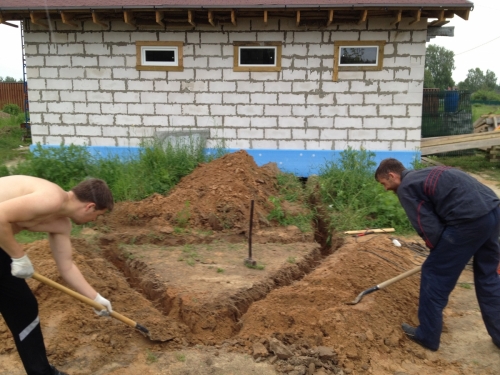
- First of all, choose a convenient place. We dig a trench in the form of a triangle. The optimal depth is from 0.7 to 1 m, width is 0.5 - 0.7 m. The length of each line is the same as we determined in the course of calculations (the length of the horizontal ground electrode).
- From one of the corners (any) we dig a trench leading to the power shield near the house.
- Vertical grounding - we drive the electrodes into the vertices of the triangle. You can use a steel corner 50 * 50 or any other rod metal. For the convenience of driving into the ground, we sharpen the end of the rod with a grinder. If the soil is too hard to hammer electrodes into it, then we drill wells.
- We deepen the rods so that their top sticks out of the ground. If we had to drill wells, then inserting electrodes into them, we fill them with soil mixed with salt.
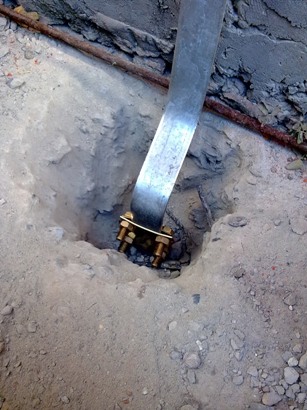
- We weld a steel strip (at least 40 * 5 mm) to the rods so that a triangle forms. We lead one lane along the trench to the power cabinet.
- In a private house, we start grounding through a shield. To do this, we attach the strip to the ground wire or directly to the power shield with a 10 mm bolt. The bolt must be welded to the strip.
- The next step is to check the grounding. To do this, you need the device "Ohmmeter", it costs a lot. In order to check the resistance once or twice in a lifetime, it is expensive to buy it. Therefore, we invite specialists from the energy department to check the resistance of the circuit. In addition to taking measurements, they will also fill out a ground loop passport. If the resistance indicators are normal, then you can bury the circuit. If not, then we drive in additional electrodes.
- We fill up the trench. We use for this homogeneous soil without impurities of crushed stone or construction waste.
Important! In dry weather, it is recommended to water the ground loop with water from a hose, so its resistance decreases.
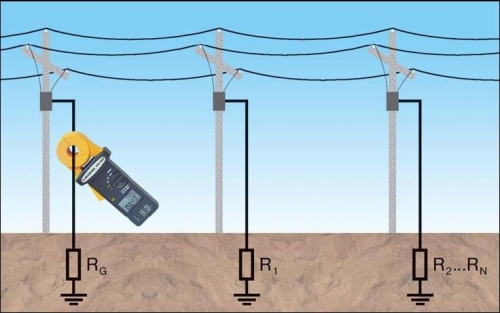
For better operation of the circuit breaker, neutral grounding is also performed. At the entrance to the building, the neutral is connected to re-grounding. The fact is that electricity comes to private homes through the air. For power transmission towers of 6 - 10 kW, the neutral is re-grounded, but for power lines of 0.4 kW, power companies almost never do this. In order for the load to be distributed correctly, it is necessary to re-ground the support near the house (it is desirable that all neighbors are also grounded). And this grounding should not be combined with the circuit.
If you are not sure that you will do everything correctly, you can contact specialized organizations that will perform all the necessary calculations and installation with skill. If you are an ardent business executive who is used to doing everything with his own hands, well, go for it. Just remember - your creation is designed to protect the whole family.


