Crown - this is one row of a log house of 4 or more logs connected by cuttings.
Nog Is a round wooden rod that vertically links two or three adjacent logs.
Dowel - the same as the dowel, but it can be rectangular.
Types of felling
There are only two types of felling of log cabins: the first, with logs protruding beyond the plane of the wall, that is, chopped with the remainder, and, the second, when the logs are stacked in the corners of the log, butt to butt, that is, chopped without a remainder. The corners of log cabins, chopped with the remainder, are less blown through and, therefore, cutting without residue is used much less often, and its use is justified by only one thing - saving on cubic capacity of wall material.
Indeed, with the same cubic capacity, the useful internal area of \u200b\u200bthe log house will be larger in the log house, chopped without a remainder, and it will be the less, the more the log goes beyond the wall plane.
Types of felling
There are more than a hundred types of corner cuts, some of them are very exotic, more or less laborious in execution. The fantasy of people knows no boundaries anywhere. However, among all the variety, there are only a few commonly used and wave of effective types of corner cuts.
We will only consider them.
Types of felling with the remainder of logs or carriage
Let us describe the felling of the corners of the log house, called "in oblo" or, in other words, "into the bowl". The name "oblo" came from the old word "obliy", which meant round. Across the log, along the upper edge, a simple rounded bowl is cut into which a transverse log is placed on top. The most common are three configurations of the bowl: a simple half-tree with a longitudinal groove cut on the same edge of the log as the bowl, bowl and longitudinal groove from above; the oval ridge and “into a fat tail”, both with a longitudinal groove cut out on the opposite side of the log face, a bowl on top, a longitudinal groove on the bottom (Fig. 1). The oval ridge is made as a protrusion in the bowl in the form of a longitudinal groove of a transverse log. To create the most windproof corner, the fat-tail felling is best suited, which in its essence has become a separate type of felling. One more rectangular protrusion and the same rectangular groove on the opposite side, but already across the log, are added to the oval ridge across it and along the log. Simple felling in half a tree has long been and is actually supplanted by the latter two, with a longitudinal groove on the lower side of the log, such connections are much better protected from water.
We go further, the chopping cut (see Fig. 2, 3) is completely identical to the chopping cut, but the bowl is turned downward by 180 ° and is cut down on the opposite lower side of the log, the upper log now slaps the lower one, hence the name is chopped ... The direction of the bowl and longitudinal grooves downward excludes the ingress of water from the lock, this is the main advantage of this type of felling. There are also types of chopping, when the longitudinal groove runs along the upper edge of the log.

The final type of felling will be chopping, when on top and bottom of the log, by a quarter of its diameter, transverse rectangular equal notches are made with a depth of a quarter of the diameter of the log and a width of two-thirds of the diameter of the log and, further, the lateral edges are constrained to the plane or they are laden, up to to the end of the transverse recess. Learns a pretty nice, not blown corner.

All the described types of felling can also be used for felling from a conventional four-edged bar or solid profiled bar, only for them all grooves and bowls will be rectangular shape... Other types of felling used only for timber will be described below.
Manufacturers of profiled products, and especially the house of sets of them, often determine all the necessary types of cuts themselves.
Cutting types without residue from logs or carriage
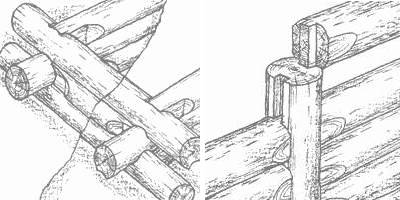
For the manufacture of frame structures from wood, the type of felling is used in a post or, otherwise, in a pick. In the center of the ends of the log, a vertical rectangular spike is made one third of the diameter of the log and a longitudinal groove is selected from below, then the logs are rolled onto each other, inserting them into a vertical log, into a post, into a rectangular groove selected along the entire log to its entire height (cm Fig. 4). This type of felling is used at corners and to extend the length of the walls. Poles can be made from anything: wood, brick, concrete, stone.

The last we will consider the type of felling into the paw, joint to joint, without protruding ends (see Fig. 5). One could just cut off the protruding ends of the logs and get what you want, but such a knitting would turn out to be extremely unreliable and blown through. Therefore, the horizontal planes of the cut are made at an angle on both sides, getting a dovetail in the shape, calling such a felling a cut with an undercut.

Thus, we have considered all the most widely used types of felling for logs and carriages.
Types of felling from a bar
The types of felling from a bar did not receive their names, because in fact the locks are all the same felling in the oblo, in the fat tail, in the ochryap and in the paw (see Fig. 6). The profiled beam structurally already has a longitudinal spike and a groove, and for a conventional edged beam, longitudinal grooves are not made at all.

However, timber has its own type of felling. This is a felling on root, cut in a bar, and plug-in tenons. Spike marking methods are shown in Fig. 7.

Nageli
All logs and beams in a log house must be bound vertically on a dowel. You need to tie 2-3 adjacent logs or beams.
Clearances
For all types of felling, the gaps in the bowl and in the paw should not be more than 5 mm, and in the longitudinal groove no more than 10-15 mm.
All spike-to-groove connections must be made with a mandatory vertical gap to compensate for the shrinkage of the frame.
Chopping logs with your own hands means cutting out or cutting out corner joints and longitudinal grooves on logs or on a bar. There are several ways to do this.
Into the hook
The hook-type felling technology is divided into 2 types:
- the bowl is selected exclusively to the middle of the processed log, on one side of the log axis. A semicircular groove is made in the upper part of the logs to the unselected remainder of the prepared bowl;
- the inner side of the log is cut off. When assembling a log house, a flat wall is obtained, right angles. The inner part of the logs is combed by ¼ of the diameter. The lock is fastened with a thorn that clings to the area that is not hewn away.
From the gun carriage
The carriage deckhouse is also called "Norwegian". A semi-oval log, two-edged beam is used.
The locks of the Norwegian felling are wedge-shaped. When dry, they become denser, eliminating the appearance of large gaps, retaining heat. The cost of the insulating material is reduced.
This method of making the lock prevents twisting of the logs laid in the crowns.
Canadian cabin
Canadian felling is popular due to the preservation of a valuable piece of wood - sapwood. With other technologies for preparing wood for laying in crowns this layer is lost.
Sapwood, which is only 3-4 cm, is removed by skewing, scouring, rounding. The preservation of the sapwood guarantees the protection of the soft inner structure of the tree.
The Canadian bowl is trapezoidal.
Benefits of Canadian felling:
- increase in the service life of wood;
- minimization of heat loss;
- a room built of wood with a preserved sapwood layer retains the microclimate for a long time;
- moisture protection of internal corners;
- mezhventsovy insulation "hides" in a special insulating channel.
IMPORTANT! Canadian felling is completely manual.
Caulking is not required after the shrinkage of the log house, driven out using the Canadian felling.
Finnish cabin
For Finnish felling, coniferous round timber and prepared timber are used. The Finnish cabin is similar to the traditional Russian one.
The grooves are made concave, completely closed, the edges fit tightly. The insulation in the Finnish cabin is hidden.
Into the bowl
The simplest method of making log cabins, actively used by builders, is "into the bowl" cutting.
The advantages of the technology are:
- structural stability;
- speed, ease of assembly;
- the ability of the structure to keep warm.
Disadvantages:
- loss of "useful" length of wood about 1m. When cutting "into the bowl", the ends protrude beyond the corners of the building up to 30 cm.
Such cutting can be done with the bowl down or with the bowl up. Log assembly technology can get complicated additional installation thorns.
Cutting markings are applied with a special, simple tool - a line. You can make your own carpenter's compasses.
In addition to the bowls, longitudinal oval grooves are made. Mezhventsovy insulation is laid in the grooves.
Caulking is required before and after the shrinkage of the log house.
Log felling from a bar
The technology of felling log cabins erected from wooden beams differs in simplicity. Prepared timber is easier to mark than round wood.
The diagram shows options for cutting a bar, allowing you to consider how corners and joints are cut.
Scheme 2 - Scheme of felling in the paw
After assembly using this technology, you can carry out exterior decoration log cabins with facade siding.
In order to use the “in the paw” felling, careful log / bar marking is required. It is advisable to use a previously prepared template in order to perform the markup on all material in the same way.
Photo 7 - Finishing the log house with siding
Log felling video
The video shows how the felling is carried out with a chainsaw using the "in the paw" technology.
Log cabin video
Traditional hook-type felling is the simplest and it looks like this.
$ Felling price
The felling of a log house is distinguished by technology, the level of complexity. The price of the main types of felling for 1m 2 today is:
- chopping into a bowl - from $ 100;
- norwegian felling - from $ 170;
- canadian felling - from $ 120.
Increasing the diameter of the logs / beams increases the cost of work.
The simplest is the "bowl" technology. And the most labor-intensive is the Canadian felling.
- Felling into a paw
- Dovetail felling technology
- The technology of building a log house in a bowl
Retro style has become quite popular nowadays. Antique fashion quickly spread to homes. Construction of wooden country houses and baths becomes a sign of good taste and high income, because the construction of such houses is more expensive than brick houses, and their appearance is ideal.
Material for construction can be purchased anywhere, it is presented in a wide range. However, the felling technology is not familiar to everyone, so many novice builders are wondering if it is possible to do it yourself.
Advantages and disadvantages of wooden buildings

Despite the fact that wooden houses without the use of nails were built from time immemorial, technologies have changed over time, new methods of wood processing have appeared, requiring certain skills. Before starting construction, it is necessary to make calculations and familiarize yourself with the approximate cost of work. Don't forget to purchase necessary materials and tools:
- logs;
- bars;
- ax;
- chisel;
- saw.
Log felling is a rather lengthy process, especially when using undried lumber (drying of logs takes about a year). It is worth taking into account all the advantages and disadvantages wooden houses... The advantages include environmental friendliness, attractive appearance, lack of high humidity in the premises (with properly performed waterproofing) and good thermal insulation of the house.

Interior construction and finishing work is also easy: any opening or hole for pipes and electrical wiring can be made in a tree. The small weight of the tree due to the reduction of the loads on the foundation allows the construction of cheaper options for bases, for example, columnar. Small log cabins can be built without a foundation.
The disadvantages include the high cost of logs, the short service life of the house (50-90 years, depending on the method of wood processing).
In order to build, certain knowledge and skills are required. It is impossible to make an extension to such houses; moreover, the house is practically not resistant to fire. Over time, logs can dry out, which worsens the general condition of the building. Timely repairs help to solve this problem. you can't do it alone.
The first thing to do before starting construction works, - decide what type of foundation you will build: ordinary or pile. The preferred option is the pile foundation - it can be built quickly, easily and inexpensively. There are several ways to cut a log house, which will be discussed below.
Back to the table of contents
Felling into a paw
This is the easiest way to build a log house with a simplified process of forming grooves.
With this cutting technology, you can use the entire length of the timber, while saving on materials.

However, this design requires additional insulation due to poorly protected corners. The log house does not have a sufficiently aesthetic appearance and is less reliable. It has a regular shape without the ends of the logs protruding beyond the walls. For felling a log house using this technology, it is desirable to use lumber of the same size. The thicker the logs, the better - the house will be warmer.
At the first stage, the surface of the log is leveled with a plane on one side - this will inner wall houses. On the opposite side, you need to process a part of the log equal to 2-2.5 of its diameters. The remaining sides are processed at a distance of 1-1.5 diameters. Now you can move on to the next step.
On the plot allocated for construction, two logs are placed opposite each other. 2 more logs are placed on top. The resulting square is leveled and the log is marked on all sides. In this case, it should be taken into account that the cut for planting a log should be no more than half of its thickness. Another log is placed in the prepared recess, the upper part of the paw is leveled, preparing for laying the next log.
If there is a gap between the legs, and it is no longer possible to fix this, you can insert a wedge of the required width. However, such connections should not be made too often. Now you need to decide on the method of fastening the logs. The grip between the bars must be strong so that the bar does not “walk”.

The first option, called a straight tenon, involves drilling a small vertical hole in the paws of the logs into which you need to drive a stake of a larger diameter. The holes are made in a checkerboard pattern so that the next stake does not fall into the previous one. To strengthen the structure, you can drive in straight spikes along the entire length of the bar, this will protect it from deformation.
The second method is more complicated, but also more reliable. It is suitable for experienced timber house builders. When marking the paws, a spike is provided that protrudes a few centimeters up. The protrusion should have an area equal to a quarter of the area of \u200b\u200bthe paw. In the next log, a corresponding hole is cut out, the paws are placed on top of each other like a LEGO set. The ledge should be near the inner corner of the house. Logging in this way is a long and laborious process.
To eliminate cracks and gaps in the joints, it is necessary to use tow or other similar material. When joining logs into a paw, additional interior decoration is required.
"Faith is good in business"
In Russia, knowledge was never kept secret, passed on to everyone. The desire to know, to be able to be encouraged in every possible way: "if there is patience - there will be skill", "superfluous craft does not hang over the shoulders", "caught on the tip, got to the point. Young people knew "they don't pat them on the head for lack of skill." Passing on experience - parents to children, elders to juniors, master to apprentice-apprentice - for decades, and the nation for centuries cultivated a sense of deep respect for elders and gratitude for the knowledge and skills passed on. It was generally accepted that “the young works, the old mind gives” ... And how much wisdom is in the instructions: "they beat them for the cause - obey, but bow down below", "eat what they set, do what they force."
If these words sank into the soul in time, for a person for life the only excuse and purpose of his existence was creativity and skill. And the table at the hardworking and free artisan is always covered with a tablecloth, and there is something to treat a good guest with.
In addition to the method of cutting walls "into a bowl" described in the previous chapter, many other types of felling were practiced in Russia. And they were all used in accordance with the type of construction and the level of skill of the carpenters.
One of the most simple ways joining logs - this is cutting "in an ochryapok". Here, as well as in the "bowl" felling, bypasses are left - the remnants from the outer side of the corners Departing from the ends on the lower log, two rectangular grooves-cuttings are made with a depth of a little less than a quarter of the diameter and a width for the size of the same cutting in the log stacked on top. Place the top log on the prepared place. Check how the cuttings from above and below coincide. Determine the size of the gutter. The dash marks its boundaries. It is immediately possible to mark the location of the cokes. As far as the log goes down after cutting the gutter, it is necessary to deepen the clearings, adjusting their width in this position. With these clearings, each log firmly holds on to the adjacent one - the upper and lower corners are strong. However, due to the lack of tightness of such a connection, it was usually used in the construction of sheds and simple buildings. Often, the casing of the houses is connected to the ogryapka, since there are no special requirements for tightness to them. In this felling, moss is also laid between the logs and the logs are fixed in the walls with coke. The sequence and set of operations for all types of felling are approximately the same.
Another way - cutting "in the paw", appeared in the 16th century. Apparently, it began to be used because of the increased aesthetic tastes of people in power. At about this time, Tsar Alexei Mikhailovich was building a terem palace in Kolomenskoye near Moscow with the help of Vologda carpenters. It stood for almost two centuries. It was disassembled due to dilapidation, as it was decided that no masters of this level could be found for restoration. The model of the reconstructed wonder-palace made of wood can be viewed in Moscow, in the Kolomenskoye museum.

This deckhouse provides a clean corner with no residue. It is much colder. Despite this, in the cities by the end of the 19th - the beginning of the 20th century, the connection "in the paw" became widespread. (The sovereign, however, could afford to supply more stoves, and they did not spare firewood in the mansion). Handbooks of that time on housing construction recommend that the corners from the inside in such houses be insulated with felt, and only the top should be stuffed with shit and plaster along with the entire surface of the walls. This sophistication was adopted in other Pomor villages near Arkhangelsk. The owners of such houses had constant contacts with foreigners, and they themselves, as usual, were in overseas countries, saw a lot of outlandish things on the side. In the once large village of Konetsdvorie, which is at the mouth of the Dvina, there are still well-preserved houses, chopped “in the paw” and plastered inside, with rich stucco ceilings - bas-reliefs, fillets and rosettes. But for most of the northern regions, this type is still not typical.
The corners of the log house are sewn up with overhead boards to close the access of wind and moisture to the capillaries of the logs. For building a house in this way, two-edged beams are often used. The gutter is selected in the upper log.
Slanting cutting requires the highest qualifications from the master. All connection planes are flat. However, the lower and upper planes alternate the angle of inclination. Thanks to this, each log is interlocked with the neighboring ones - the upper and lower ones so that they do not allow it to turn outward. To increase the strength of the connection, a small spike is left on the upper plane of the lower log, and a socket of the same size is hollowed out on the lower plane of the upper log. Moreover, the thorn is always located at the inner corner of the frame. This connection is called "undercut paw". In houses, it is better to make a paw with an undercut, but in well and mine log cabins, a thorn is not made, because the earth squeezes the logs from the outside and does not allow the crowns to disperse.

For making the paws, depending on the average diameter of the logs, determine the appropriate size of the joint. From the sides of the log at the end, they make vertical beads, slightly longer in length than the connection. At the end in the middle, they outline a square, divide the sides into eight parts, draw horizontals from its tops. The sides of the square are transferred further - by the thickness of the joint. They also divide into eight parts and connect certain points. Vertical cuts are made from above and below. The sawn-off areas are cut down, but not completely. They leave, by eye, a certain thickness above and below, sufficient to mark the gutter, without putting anything in the corners. The illustration shows a template that can speed up paw marking. You need a lot of patience to learn this method, but your interest and skillful actions of the elder help here. He will prompt: "To do quickly - to alter".
The name of the connection "in a straight paw" speaks for itself. It is reminiscent of the "in an ochryap" cut, but without bypasses. Cutting "in a chill" almost completely resembles the technology of the angle "in the bowl" or "in the blow-off". The only difference is that the bowl is selected in the upper log. At the beginning, such a depth that the drains only touch each other - the upper being adjusted and the lower one already installed. Then the border of the gutter is marked with a line. As far as the log should sit after cutting it down, the bowl will have to be finished. This felling is called so because the upper log slams the lower one with a bowl. When everything fits well, the log, when installed in place, makes a sound: "Clap!" However, such work requires skill. This is most likely the most practical connection, since due to the position of the bowl, moisture does not get there and the log lasts longer. The connection is used for cutting houses, barns and baths.
The hook connection is considered the best in terms of strength and warmth. It runs with the remainder. Its forms are borrowed from logging "in the chuck" and from the logging "in the bowl". Half of the bowl is selected here in the lower log (sawn down along the axis and cut with an ax) and the outer half in the upper one, here you need to help with a chisel or chisel. The gutter is also made in it. This compound is original, these days it is extremely rare, although tinkering with it is a pleasure and honor for a craftsman.

The connection described here should not be confused with another "hook" wall cut. This difference can be seen from the description of V.A. Grechukhina in the book "On the River Sit". “… The dwelling was cut into a simple bowl. There were, as it were, two subspecies of this method. For little money, they cut down the house "in the old days." The hewn logs in front of the corner itself were left round, with a gradual transition from flat to round. The plastic expressiveness of such an interior is great!
For those who are richer, they were already chopped into a "hook", when the logs were cut from the inside to the very corner, and the corners turned out smooth, like in a city brick house... The “hooked” felling is difficult and not accessible, but the frame is dense and inside the house is almost a master's ”.
When a house is cut into the igloo, the joints in the corners alternate. On the one hand, the end of the log to be laid (upper) is connected to the lower “simple bowl” with the remainder, and on the other, it is inserted end-to-end into a vertical groove made on the side of the log, which is laid perpendicular to this. This end only needs to be hewn to the size of the groove. The gutter is selected in the upper log. Logs between themselves must be fixed with coke. The method is good in that a shorter forest can be used for a log house, but its strength is inferior to those already described. This is probably why it fell out of use.
Cutting "in epaulet" is a person. The hewn ends of one log, which is shorter, are inserted into the grooves of the long logs of the adjacent walls. On the next crown, the corner joints should be tied, that is, long logs will fall on short logs and vice versa. In addition to the fact that in the corners of all types of felling, the butt to the butt and the top to the top are alternately placed in order to maintain the conditional horizontality of the crowns and the verticality of the corners, they tend to bandage and alternate paired joints.
When cutting "in line", the vertical strength of the walls is provided by cokes, in the Yaroslavl region they were called shkany. These are the familiar rectangular wooden nails without heads. This type of felling was used by craftsmen of carpentry, known for this out-of-the-box trade, and by the Sitskari during construction in the Tver province. Of all the methods, it is considered the most economical, but the most short-lived and less durable.
"In a zabir", or "in a post", "in a rack" they erect outbuildings or build up the walls of the entryway, courtyard buildings located under a common roof. Support pillars are dug into the ground, four in the corners. If the structure is long, then the number of pillars is increased. The ends are insulated using known methods: they are treated with pitch, fired or covered with insulating material. The gaps between them are filled with logs that form the walls. They are placed horizontally. All logs in the interval are the same length. Vertical thorns are cut out from both ends. They fit into grooves selected in the posts along their entire length above the ground. Gutters are selected in each upper log, moss is laid.
In the North, wooden pillars were replaced by stone pillars of a large cross-section and whole logs were inserted into the grooves. This is how they built large cattle yards and warehouses.

There are several more types of felling. For example, unpretentious - "in the corner" when there are gaps between the logs. In the corners, each upper log is stacked in a simple bowl of the lower one. It is used for cutting ryazh in bridge structures, dams; in the Mezen in this way they cut the foundations for barns or baths.
"In a bandage", "in a thorn" and "in a half-tree" - connections from a bar, but I do not recommend building houses from a bar. Wood in our time is already thoroughly weakened by chemistry, even if it grows far from industrial enterprises. The very atmosphere has changed the structure of the wood. The wood has become loose like a sponge, with open pores it easily absorbs water. Therefore, a solid log is preferable.
There are connections that are clearly borrowed in the West. Here is one of them - a faceted corner of the Mezen sophistication ... So, everything is very wise: "To build a house - don't put a hat on your head!"
Advice:
Above the frame are debarked and seasoned straight-grained logs made of condo pine (condo - dense, fine-grained wood)
In order for you to be able to choose the most optimal option for making a log house, you need to know what types of felling exist in general and what are their differences from each other.
All felling methods are divided into 2 main ones:
I. without a trace - "in the paw"
II. with the remainder - "into the bowl"
Paw felling
Appeared in Russia only in the 16th century. This deckhouse provides a clean corner with no residue. It is much colder. Despite this, in the cities by the end of the 19th - the beginning of the 20th century, the connection "in the paw" became widespread. Reference books of that time on the construction of housing recommend the corners from the inside in such houses to be insulated with felt, and only to fill the top with shit and plaster along with the entire surface of the walls. This sophistication was adopted in other Pomor villages near Arkhangelsk. The owners of such houses had constant contacts with foreigners, and they themselves, as usual, were in overseas countries, saw a lot of outlandish things on the side. In the once large village of Konetsdvorie, which is at the mouth of the Dvina, there are still well-preserved houses, chopped into the paw and plastered inside, with rich stucco ceilings - bas-reliefs, fillets and rosettes. But for most of the northern regions, this type of felling is still not typical.
The corners of the log house are sewn up with overhead boards to close the access of wind and moisture to the capillaries of the logs.
At present, houses are being cut into the paws, which are subsequently covered with bricks or sheathed with clapboard. Baths "in the paw" are built by the owners who want to save on the cost of the log house.
There are several types of felling "in the paw"
1) "Dovetail"
2) Rectangular share "with root spine"
Bowl chopping has many varieties:
1) The traditional Russian cutting of the bowl “in the chill” (“in the chuckle”) is the most practical combination, because due to the fact that the bowl and the groove are located at the bottom of the log, moisture does not get there and the log lasts longer. Felling was used in the construction of churches, princely chambers, houses and baths.
The bowl is selected in the upper log. At the beginning, such a depth that the logs only come into contact with each other - the upper being adjusted and the lower one already installed. Then the groove border is marked with a line. As far as the log should sit after cutting it down, the bowl will have to be finished.
This felling is called so because the upper log slams the lower one with a bowl. When everything fits well, the log, when installed in place, emits a characteristic sound: "Clap!" In some sources, such a felling is called Siberian. Such felling can only be done by carpenters with the proper skill level.
2) Cutting the bowl "in the field" can be performed in the same way in different ways
3) Hook felling - performed with the remainder. Its forms are borrowed from logging.
Half of the bowl is selected here in the lower log (sawn down along the axis and cut with an ax) and the outer half in the upper one, here you need to help with a chisel or chisel.
4) When cutting a log house “into the needle”, the joints in the corners alternate.
On the one hand, the end of the log to be laid (upper) is connected to the lower “simple bowl” with the remainder, and on the other, it is inserted end-to-end into a vertical groove made on the side of the log, which is laid perpendicular to this. This end only needs to be hewn into the size of the groove, which is chosen in the upper log. The logs between themselves must be fixed with coke (rectangular wooden nails without hats). The method is good in that a shorter forest can be used for a log house, but its strength is inferior to those already described. This is probably why it fell out of use.
5) The "in shoulder" - a person. The hewn ends of one log, which is shorter, are inserted into the grooves of the long logs of the adjacent walls.
On the next crown, the corner joints should be tied, that is, long logs will fall on short logs and vice versa. In addition to the fact that in the corners of all types of felling, the butt to the butt and the top to the top are alternately placed in order to maintain the conditional horizontality of the crowns and the verticality of the corners, they tend to bandage and alternate paired joints.
When cutting "in line", the vertical strength of the walls is provided by cokes. This type of felling is considered the most economical, but the most short-lived and less durable.
6) Chopping a bowl "into an ochr" ("into an ochr") is "... a quick, but bad way: the ends of the logs are cut off on both sides, then each upper log is cut in half into the underwear" (Dal V.I .. Explanatory Dictionary , 1863-1866).
Due to the lack of tightness of such a connection in Russia, it was usually used for the construction of sheds and the simplest buildings. However, nowadays not all log house manufacturers know how to cut in some other way and can offer you a choice of felling method.
Having departed from the ends on the lower log, two rectangular grooves-cuttings are made with a depth of a little less than a quarter of the diameter and a width to match the size of the same cutting in the log laid on top. Place the top log on the prepared place. Check how the cuttings from above and below coincide. Determine the size of the groove. The devil denotes its boundaries. As far as the log will go down after cutting the groove, so far it is necessary to deepen the clearings, adjusting their width in this position. With these cuttings, each log firmly holds onto the neighboring one - the upper and lower. The corners are solid. Often, the casing of the houses was connected "in an okhryapka", since no special requirements for tightness were imposed on them due to the subsequent arrangement of the dam.
Below is information that should be read by everyone who wants to save money on buying a log house, believing that practically nothing depends on the felling method.
CHEAP HOUSE
You set out to find yourself a contractor for the manufacture of a log house. But the question is: why are the prices for the log buildings themselves different in different companies? Call one - a log house costs 300 thousand, in another - 450, in the third - 180 thousand, and even in the kit they offer: beams, logs, rafters! This declaration looks like this:
“We quickly and efficiently cut log houses of any size and configuration. Cutting into a paw or a bowl, depending on the wishes of the Customer. Selling:
1) The blockhouse of a bathhouse, size 3x4, price - 45800r.
2) The frame of the house made of pine, size 10x10, height 3m. Chopped down "into the bowl". Price - 180t.r.
All log cabins are cut into a bowl and equipped with a butt: beams, rafters, cuttings (floor logs).
Tel: 8-9XX-XXX-XX-XX. Ivan Ivanov ".
This suits us, you think, but for 300 and even more for 450 thousand let the fools order! Call, make an appointment (or generally solve all issues only by phone), come to the contractor, look (with the eyes of an understanding person) at the finished log cabins, discuss the details, make an order for a log house for 180 thousand and calmly go home and wait for a call and they will say that the blockhouse is ready, you can come to pick it up (or we will bring it then).
1) If you decide to assemble a log house on your own, the following series of questions arises:
Why does the lower crown of the log house "hang" over the foundation? Or rather, short logs that go across the long ones just "hang"? And what's even worse, if the long logs are not edged from below and between them and the foundation are the same holes, and what to do with this ???

What to do with the butt to the felling (?), Because the beams, logs, rafters turned out to be just some kind of unrooted logs, and some of them are not even !? How do I use them? It is good if you have a bathhouse (or you are building it), they will then fit there as firewood.

When assembling a log house, you are very poorly guided in the logs and for a very long and confused twist and turn it to put it in its place, but at the contractor's site you seemed to look very carefully at how the log house was marked and you thought you would make it on the foundation of "special mind" is not necessary.
Let's imagine that with God's help (and with the help of your assistants and special equipment) you, having lost a lot of time (nerves and money), almost made a log house! It remains to put in place only the ceiling beams (if they were debarked and cut in by the contractor at the base, then 100% out of level), or cut them in. But how can this be done from unbarked logs? Let's say you somehow coped with this task.


How can you make the rafters and the entire system even out of these uneven, unrooted logs (sticks), which were given in the set with the log house, so that later roofing material lay down correctly and the whole roof became even?
Experts came, confirmed your thoughts, saying out loud that your whole butt is just firewood! How to make floor logs out of round timber, so that the floor is then even? And to the ceiling beams it is not at all clear how you were going to fix the ceiling exactly !? And from these sticks rafters will not work. Then the following happens: you consider with them what kind of lumber you need and in what quantity. Go to the market and buy everything there. The guys start working, and in the end you already count your REAL EXPENSES.
2) If you decided to initially assemble a log house by hiring a third-party team of specialists (if they are not drunks or, God forbid, not guests from Central Asia, but really specialists), the same series of questions arises as mentioned above, only they will be added to them the following:
I. Why is the corner joint of the bowl made "in an okhryapka", because this method of cutting is not the best option for building a house or a bath? Such a bowl will need to be constantly caulked in the future (or use polyurethane foam for sealing)! Experts will surely ask why the carpenters did not offer you any more options for making a bowl, or did they offer, but you decided to save money? In ancient times, in Russia, only log cabins of non-residential buildings were chopped down "into an okhryapka": stables, mills, wood logs, chicken coops. To this you answer them that you see the blockhouse for the second time in your life and you simply did not know about such nuances, and the so-called "carpenters" most likely simply do not know how to work differently.
II. This is no longer a question, but most likely a fact. Why are the grooves sloppy triangular (sawn with a saw)? Poorly cut, they will say, the grooves should be semicircular, made with an ax and an adze, where the saw is an auxiliary tool, and not the main one. They will call such work - trash! This is exactly how the brigades of shabashniks work, who just “rip off” money and “do not care” about quality.
Cons of triangular grooves sawn with a saw:


1. When the grooves are made with a saw, then at the slightest deviation of the saw, a large gap is formed;
2. The logs are loose against each other;
3. A house or bathhouse is most susceptible to drafts;
The maximum costs for mezhventsovy insulation (moss, jute, tow, flax, ribbon tow, etc.);
4. When the logs shrink, a gap is formed in this corner, which leads to the rupture of the log along its entire length and the loss of the tightness of the grooves;
5. It is necessary to constantly heal the log house.
In the photo, the log house of the bathhouse with sawn out triangular grooves. Such a blockhouse (but it would be more correct to say not a blockhouse, but "saw cut") will need to be constantly caulked, or even insulated, and inside you will have to sheathe linden clapboard.
It is a fact that the owners of such baths are tired of constantly plugging more and more cracks, sooner or later they begin to use polyurethane foam for insulation. About aesthetic appearance wooden structure you can forget.
Advantages of semicircular grooves made with an adze and an ax, where the saw is an auxiliary tool:

1. The cost of a mezhventsovy heater is reduced by one and a half to two times.
2. There are no air corridors (holes) between the logs;
3. The logs are as close to each other as possible along their entire length;
4. The blockhouse must be caulked after installation on the foundation, and then repeated high-quality caulking after the blockhouse gives the main shrinkage (after a year). Constant caulking is not required;
If the frame is made according to the Canadian technology, then the undercut technology is used in the manufacture of the groove.

You can learn more about this technology by hovering the mouse cursor over the CANADIAN TECHNOLOGY heading in the main menu of the site, and in the additional menu that appears, select “Undercut groove”.
Cooperating with us, you have the opportunity to choose the quality of the log house at the initial stage!
And this is how the above ad should have looked in a truthful execution:
“We quickly cut logs of any size and configuration. The file of the corner joint in the paw or in the ochr. Log grooves - sawn (triangular). Selling:
1) The blockhouse of a bathhouse made of pine of the 3rd grade, the size "by logs" 3x4, (the size inside is 2.25x3.25); Well, or: I will sell a blockhouse for a bathhouse made of pine (because it is cheap because we sawed down this blockhouse from the remains, that is, from a small meter (grade 3), and even because the pine blockhouse of the bathhouse inside will need to be sheathed with linden or aspen clapboard, unless of course you are afraid of getting burned).
2) Log house made of burnt pine, i.e. made of wood after the fire, size "by logs" 10x10, (size inside 9x9). If the blockhouse was cut not from burnt, but from normal pine, then it would cost us 1.5 times more expensive.
All the log cabins are cut down "into an okhryapka" (because we do not know how to cut in any other way and do not want to be able to!), Equipped with a butt made of unbarked logs, which you can somehow still be able to use as rafters, log and beams. We do not have a sawmill, so we cannot equip the log house with normal sawn timber ”.
Dear ladies and gentlemen, if you want to build a really hot Russian bath, or a beautiful log house for your family, then DO NOT TRUST the construction to shabashniki! Save economically!
The author of the article about cheap log cabins is me, Vladimir Alexandrovich Averin. Everything that is written in the article does not claim to be "the ultimate truth". It's just short description facts from real stories of construction. After reading it, you are warned, which means "armed".
Each person makes his choice based on his idea of \u200b\u200bbeauty, as well as from his allocated budget for construction.
I wish you to make the right choice!


