There is practically nothing impossible in this game. Whatever the character needs, it can all be built. Minecraft mechanisms play an important role in the manufacture of various things. They are used to automate a character's daily routine, for example, to automate a car or a house.
To use them, you must open the “Inventory” tab. Press the "E" key.
Red dust
Red dust (redstone) is a mechanism that provides electricity to other devices. Redstone can be obtained by breaking a block of red ore. It is mined with a pickaxe.
The lever can be used as a button. Can also be used as a switch. To craft it, you need to have a cobblestone and a stick. We place the cobblestone and stick on the workbench - and the lever is ready. 
Red torch
It is used to enable various mechanisms. It is also a weak light source.
A red torch is made using a stick and red dust. 
Mechanical doors
A regular door opens by clicking on the right mouse button. But in the game it is possible to build a mechanical door that can only be opened by using certain mechanisms. You can also craft automatic doors. To do this you will need wires, levers, and various buttons. These items will need to be installed where the door opens.
It can be stone or wood. Serve to give a signal when a mob, player, etc. is detected. How to do it - see the diagram. The stones must be placed horizontally. 
A repeater is used in creating or using electrical circuits. To make a repeater, you will need stones, red torches and red dust. 
Piston
The piston plays a very important role in the game, since without it it will not be possible to make some mechanisms. The main function of the piston is to set various mechanisms in motion. The piston is used to make traps, elevators, doors and more. It can be regular or sticky. Sticky not only can push an object like simple pistons, but also return the object back.
To make a regular piston you will need an iron ingot, cobblestones, boards and red dust. If you add mucus to this set, you get a sticky piston.
We arrange the components in the required order: 
We make a sticky piston (we place the mucus at the top): 
Otherwise called trinitrotoluene or TNT. This is a good thing to blow things up in the game. Explodes approximately 4 blocks away from itself. A huge number of blocks fly apart at the epicenter of the explosion. It is very convenient to use it when clearing various areas of foreign objects. How to do it - see the diagram. 
Dispenser
The dispenser is used when there is a need to dispense a huge number of different items at once. In order to make a dispenser, you will need onions, cobblestones and red dust.
The described technologies for manufacturing these useful mechanisms will help make the game even more vibrant and similar to real life.
Many different mechanisms that will help make your character's life easier. To use them, you need to go to the inventory tab.
How to make red dust in Minecraft
One of the most useful mechanisms in the game is red dust. It is needed to supply electricity to other mechanisms. To make red dust, you need to mine and destroy red ore blocks. It can be taken from the witch or bought.
How to make a lever in Minecraft
An important mechanism is the lever. He is the game switch. To make this mechanism in Minecraft, you need to place on a workbench a cobblestone obtained by processing an ordinary stone with a pickaxe, and a stick made from two boards.
How to make a red torch in Minecraft
The red dust torch is needed to activate the red wires, it turns on various mechanisms. It can be used as a light source, but it is not bright enough.
To make a red torch in Minecraft, you will need a stick and red dust.

Mechanical doors in Minecraft
An ordinary door in the game can be opened by clicking the right mouse button. However, here you can also make an iron door, which cannot be opened without the use of additional mechanisms. Doors can also be made automatic. To set doors in Minecraft in motion, you may need wires, buttons, levers that are installed at the opening location.
How to make a pressure plate in Minecraft
In Minecraft you can make a mechanism called a pressure plate. She is another type of switch in the game. Electricity is supplied to the mechanism if a mob or player is standing on it; when the plate remains empty, the energy supply stops.
To make a pressure plate in Minecraft, you need to place two stones or two boards on a workbench. A wooden plate can be turned on not only by a living entity, but also by an object thrown at it or an arrow fired.

How to make a repeater in Minecraft
Repeaters are used to create electrical circuits in the game. They can delay, amplify, or direct the signal in one direction. To make a repeater you need stones, red torches and red dust. To make a repeater in Minecraft for making mechanisms, you need to arrange all the objects as shown in the picture.

How to make a piston in Minecraft
Many mechanisms in Minecraft cannot be made without pistons. These useful objects move blocks in various complex designs. Without a piston it is almost impossible to make a trap, an elevator, automatic doors, or a farm. Pistons can be regular or sticky, with the former being able to push objects and the latter being able to return.
To make a piston in Minecraft, you need boards, cobblestones, red dust and an iron ingot. The craft of the piston can be seen in the photo.
To make a sticky piston from a regular piston, you need to place it on a workbench and add mucus to it, which can be obtained from slugs.

How to make dynamite in Minecraft
Using dynamite in Minecraft, you can make ingenious traps, a TNT cannon, and a structure for destroying a large number of blocks. To make TNT you need sand and gunpowder. To activate dynamite, you need to use fire, any mechanism with a red stone, or an explosion nearby.

How to make a dispenser in Minecraft
Another useful mechanism in the game is the dispenser. It is needed for throwing out or dispensing a large number of items. To craft a dispenser, you need to put cobblestones, onions and red dust on the workbench.

Thanks to all the items described, you can make mechanisms in Minecraft that are used in everyday life. Such things make the game much more realistic and more interesting.
The role of mechanisms in the Minecraft game is to perform a wide variety of useful work and actions as a result of influencing them. The crafting system makes it possible, during the course of the game, to create completely ready-made and effective mechanisms and those materials that are available to your game character. The main types of mechanisms are valve units, pistons, as well as rails and switches. To activate most mechanisms, a red stone is required.
Features of simple and complex mechanisms
As soon as you start playing Minecraft, you will immediately be faced with the need to have simple mechanisms, since you cannot do without them. For example, you will need at a minimum windows and doors, as well as gates and various hatches. You can make doors from the usual material - wood or iron. But keep in mind that you cannot open iron doors with a regular right-click. To activate such doors, you will need a certain signal, you can give it from a button, using a lever or using a pressure plate.
Switches
Another simple mechanism - switches - serve as a way to transmit a red stone signal over a distance. So, it is the red stone and the switches themselves that in Minecraft are the main elements of more complex mechanisms that cannot be crafted. This means that you have only one option - to make such mechanisms yourself. But don’t worry: on the Internet you can easily find a huge number of diagrams for constructing complex mechanisms. The diagrams are posted on the relevant thematic sites.
The purpose of the main mechanisms in the game minecraft

Rails
- this is the most important mechanism, which is simply impossible to do without, since it is through them that the extracted resources are transported. Of course, theoretically, you can carry resources “over the hump” from the mine to the house - and so many times, wasting energy and time. But why? Your character will simply lay rails from the mine to your home and send resources along them when you have extracted a large enough volume. Resources are transported in trolleys. When laying rails in the mines, remain extremely careful: monsters will do everything possible to prevent trolleys from moving along the rails and block the tracks.Pistons
- another important and necessary mechanism. There are two types of pistons: sticky and regular. The latter serve to move the blocks, but the sticky ones not only move them, but also subsequently return each one to its place. Both types of pistons are very often used in various mechanisms. They are indispensable for traps and, of course, on farms, where they serve as an integral element of an automatic harvesting system.
Know that at the beginning of the game it will be somewhat difficult for you to understand the nuances and features of the work and functioning of each of the mechanisms. It will be difficult to navigate their interaction. However, very soon you will learn to use the mechanisms for their intended purpose and will begin to operate them with ease.
Self-propelled machine up and down.
Next time I will tell you how to combine our two parts of the elevator into one.
So, we will need:
1. Redstone (as without it)
2. Repeaters (a lot)
3. Any non-loose block
4. Button
The tutorial will be divided into two parts:
1. Signal
2. Construction of the elevator itself
Let's start with the most difficult thing - the signal.
We need to split the signal from the button to 10001010001
Let's begin.
So, let's build a signal limiter
It looks like this:
(Repeater on second delay)
Next we connect it to the button: 
Exactly this way!
(repeater on fourth delay)
The next step is to connect another limiter: 
The signal is almost ready, it remains to install a few repeaters: 
You can congratulate yourself and start dancing, because the hardest part is over!
Now let's move on to the second part:
We are building a serpentine, yes, a serpentine, it’s New Year)
One edge of our spiral - 6 blocks 
There are 4 repeaters for each edge.
We do this until the height you need, your elevator is ready!
We install the pistons: 
The bottom is a regular piston, the top is sticky.
In order for the pistons to move down, you need to give a signal from top to bottom, and turn all the delays over. The pistons will also need to be turned over: at the top is a regular piston, at the bottom is a sticky one.
Prototype of an elevator that moves up and down: 
Thank you everyone, WhiteStripes was with you, this is my first tutorial. Bye!

Hello everyone, 5opka is here and today I will present to your attention a secret door with the help of which you can hide things on those servers where there is no private... Of course, unless the griefer demolishes everything in its path... but it will save you 100% from ICSREY !
For those who don't understand:
sand falling down for some reason is not even considered a block, this is very easy to prove
just make a hole 1 block wide and 3 deep and fill it one by one with lava/water sources from below and pour sand on top and you will see that only the lower source will disappear. This means that the sand did not destroy other sources in flight. It’s the same with a person when sand falls and does not harm him. Well, to get to the secret room at the top you will have to sacrifice half of your heart..... although I would give this half to some damn attractive person!
The article is taken from an open source. If you are against posting an article, contact the site administrator.
In this tutorial I will show you how you can increase and customize the delay of a button.
Perhaps someone has already talked about this design, but I didn’t find anything like it.
So, we will need:
A little redstone
5 red torches
2 simple pistons
1 sticky plunger (optional)
At least two repeaters
Several solid blocks
Button
Let's start:
I installed an inverter at the signal output, so it will be clearer.
Let's build the following mechanism: (It will give the button the function of a lever) 
We place the button and move the redstone away from it in two directions: towards the signal output and towards the mechanism: 
Now we connect the button to the mechanism, draw redstone from it to the output, as in the picture, then install repeaters. 
At the end of the line of repeaters we place a redstone and lead it to another mechanism (a repeater is required there, the delay is maximum), which will take away the lever function from the button, and we close the chain by passing the redstone to the first mechanism. 
Ready! But if you use this design in public areas, then someone will probably think of pressing the button several times in a row, thereby breaking everything. If you need to protect yourself from such a “flood” with impulses, we will install a sticky piston and connect it to the signal output and the button, as in screenshot 
Now everything is completely ready!
Tell me if something is wrong or unclear, or if you know the names of the mechanisms I used, I myself have forgotten them
If everything can be made simpler, tell me how.
The article is taken from an open source. If you are against posting an article, contact the site administrator.
I recently saw an article about increasing button delay, but the author did not explain the principle of operation, and his system is quite complex. Everything is very simple here. The fact is that first the signal passes through the 1st “level” of repeaters, then through the second, etc.
Therefore, the more levels we set, the longer the signal will persist.
I - systems:
She's simple
+ It will never break, thanks to repeaters that create a “one-way” signal
+ Quite compact, although not always
+ Quickly built
Quite expensive
Here is her creation:
1) First we build a simple chain 
2) Next we install 2nd “level” of repeaters like this 

3) Check - voila! 
4) You can make one more level (Thus, the signal length can be made VERY long, but you will have to spend money D:) 
5) Thank you for your attention, I was with you... 
The article is taken from an open source. If you are against posting an article, contact the site administrator.

Hello comrades.
Last year, a user under the nickname lavandik asked me to make him a couple of mechanisms for buttons. Just today I was going to post them as an article.
In addition to them, I wrote down a charge extension for the button, although thanks to the user
ZnW this is no longer relevant.
The textures in the video are Obicraft x64.
Don't complain about your voice, speak to the point.
Thank you in advance.
Bumbr.
The article is taken from an open source. If you are against posting an article, contact the site administrator.

So, Sinlucefer is with you and today I will show DrCreeperLab's tutorial on Russian Roulette.
Enjoy watching!
The article is taken from an open source. If you are against posting an article, contact the site administrator.
Today I want to show you how to most economically increase the length of a button signal.
Need to:
- two red torches
- a little red dust
- button
- repeaters (as many as you want: 3)
pros
1. the signal is given instantly
2. With this circuit, the signal can be either lengthened or shortened.
I didn’t find any cons
Scheme 
The article is taken from an open source. If you are against posting an article, contact the site administrator.

Hello everyone, Mishkun is with you and I’ll tell you about the D-trigger - something very useful in building multi-level logic. Sit back and watch the video tutorial
More about the D-trigger (a.k.a. “why should I watch this video?”):
A D-trigger is a mechanism that saves the current state of the signal when a button is pressed and makes changes there when it is pressed again, if any.
Mishkun was with you! Happy and good luck to everyone!
The article is taken from an open source. If you are against posting an article, contact the site administrator.
A list of all simple mechanisms in Minecraft can be seen in creative mode, in the “Mechanisms” tab of the inventory. More complex mechanisms can be made using red dust, we will not describe them in detail in this post, here you can read a brief description of simple mechanisms. Here we call mechanisms everything that can be influenced with the help of red dust.
List of Minecraft mechanics
Red dust is used as wires to conduct electricity to other machines. Red dust is mined underground and immediately falls out of the ore in finished form. The installed red dust can be easily collected with one blow of the hand or any object. In the screenshot, the lamp is activated by a lever using red dust, this is the simplest use of mechanisms.
Doors
There are two types of doors - wooden and iron. A wooden door can be opened by clicking on it with the left or right mouse button or using red dust; an iron door cannot be opened by hand; you need to use other mechanisms, such as a lever or a button.

Lever and button
The lever and button are used to activate other mechanisms. The lever acts like a switch and can be in two states - off/on, and the button activates the mechanism and after a few seconds goes into the off state.

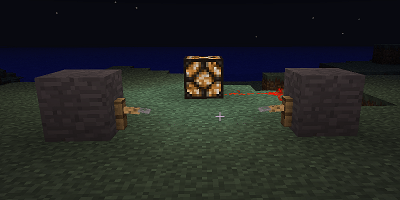
Pressure plates are used as a button that activates the mechanisms when stepped on. Pressure plates can be used to create traps or to activate mechanisms without extra steps (you just need to walk on the plate instead of pressing a lever or button). In the picture there are pressure plates, one of them turns on the lamp, the second opens the wooden door.
This item is very often used in complex mechanisms that are built from red dust. The redstone torch serves as a source of current for electrical circuits.

Repeater
The repeater is used to build long circuits of red dust, to delay the signal, and also as a diode (passes the signal in one direction only).

Hook
The hook is used to create a stretch. By pulling a thread (web) between two hooks, you can receive a signal when someone (a mob or a player) walks along the stretch. Using a tripwire, you can create a trap (by activating pistons or a dispenser) or an alarm (by turning on a lamp or music box) that notifies you of approaching enemies.
Piston and sticky piston
Pistons can move blocks, this property is used to create traps and trusses. A sticky piston attracts and pushes blocks out, while a regular piston only pushes them out. The simplest example is cutting reeds using a piston, red dust and a button, thus increasing the number of pistons and connecting them with red dust, installing repeaters, you can create a reed farm that will cut 28 reeds at once by pressing one button.

When dynamite explodes, it destroys blocks around it, except obsidian and adminium. Can be used to create traps, explode mines, griefing. Dynamite explosions are often disabled on multiplayer servers. Dynamite is activated by a button, lever, pressure plate, tripwire and red dust and explodes after a few seconds; when it explodes, the dynamite will activate other dynamites that are nearby.

Dispenser
Can give the player items, activated by mechanisms. If you put arrows in the dispenser, you can build a “machine gun”. 
When conducting electricity, it makes a sound that can be adjusted using the right button. Using note blocks you can create entire musical compositions. 
Luke
Used as a vertical door. It opens both with a mouse click and with the help of mechanisms. 
Gate
Used as a door on animal farms.