Recycled craft ideas are extremely popular right now. They ceased to be only the subject of children's creativity: in addition to school competitions, various gizmos made of plastic elements began to conquer exhibition galleries. They even came up with a special name for them: recycling. This term includes handicrafts, ranging from jewelry to furniture, made from used items. One of these crafts is in front of you. This is a lamp shade made from plastic spoons and a regular bottle! Such an interior item can easily decorate your kitchen or summer cottage, because no special materials are needed for it!
Look at this cute creation off and on. This is truly a work item that can illuminate a room! If you pick up spoons made of darkened or very durable plastic, this lampshade will turn the lamp into a night light.
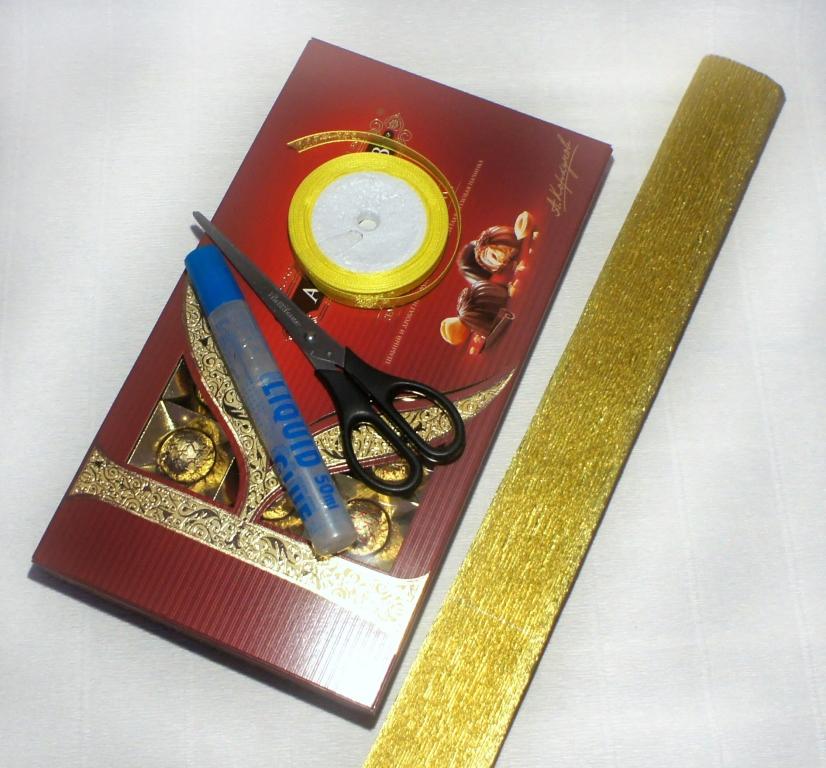
To create a lampshade, take: a base for a lamp (with a leg and a stand), a plastic bottle of the desired size (if you want a small night light, take a half-liter bottle, well, a 6-liter bottle is suitable for a large lamp), scissors, a stationery knife, hot glue, green plastic or durable colored paper, yellow acrylic paint, paintbrush, disposable plastic spoons.
How to make a plastic spoon lampshade? Work description.
1. Place the lamp stand in front of you. Naturally, we are talking about a working element, because the lamp inside the lampshade will have to glow.
2. Lay the plastic bottle on its side, cut off the throat and bottom with a knife or utility knife.
3. Clean the middle part of the bottle: remove the label, wash this part.
4. Place what remains of the bottle on top of the shade base. You don't need to turn the bottle over: put it so that the lower part is at the bottom.

5. Prepare all prepared spoons for use: cut off the handle, leaving only the oval part.
6. Paint the raised side of the spoons with yellow acrylic paint. If you wish, you can additionally cover them with acrylic varnish.
7. Use hot glue from your glue gun to glue the spoons to the bottom of the bottle. It is worth placing plastic elements so that they do not cover each other and are turned with the concave side towards the center of the bottle.
8. Apply a second layer of yellow pieces that will lightly cover the bottom row. It turns out something like fish scales, but in the end it will be pineapple particles. Step by step, glue several layers of spoons to the bottle to completely cover the entire plastic base.

9. Add spoons to the very top of the bottle.
10. Cut green pineapple leaves out of colored paper, plastic or oilcloth. It can be separate parts or such a circle with carved edges.
11. Bend the carved edges slightly so that they are down.
12. Place the leaf on the top of the pineapple and glue it with hot glue.

13. Cut out individual green leaves and stick them into the top of the bottle, securing with glue.
14. For a full pineapple forelock, make a lot of these leaves on top.

Now you can safely put this lampshade on the base for the lamp and attach it with glue. If you do not plan to use this original part for a long time, you do not need to glue it: then the lampshade can always be removed and put on another one. Lampshade made of plastic spoons - great idea interior decoration and "disposal" of a large number of disposable spoons left after a picnic or party.

According to statistics, one inhabitant of the Earth creates on average 500 g of garbage per day. This is 182.5 kg per year. Think about it!
Creative people create ALWAYS, ANYWHERE and FROM EVERYTHING. There are no unnecessary things for them. They know how to amazingly quickly turn unnecessary things into necessary and, most importantly, beautiful! So do not rush to throw away plastic bottles, jars of shampoos and creams, old disks and read newspapers ... They may be useful to you!
I hope that my recycled products will inspire your own creativity and your children. Give things a second life and a chance to serve people in a new guise.
IDEA 1. Binoculars from yogurt bottles

Drink yogurt (yum-yum!), Wash the bottles, remove the labels. Cut off the bottom carefully. Process the cut with colored tape or tape and decorate the bottles, fastening them together. From the side of the neck of the bottle, pierce the holes with an awl, insert the lace and secure with a knot.

Binoculars can now be worn around your neck! Come on, come on, what's on the horizon?
IDEA 2. A machine-house from a bottle of rinse aid


Wash the bottle, remove the labels. Decorate with strips of colored tape or tape on both sides.

Attach details from the children's designer, bottle caps.
IDEA 3. Stand for markers from a bottle of shampoo


Wash the bottle, remove the labels. Cut, as shown in the photo, glue the "legs" from the corks. Make a flower and leaves from colored plastic bottles by melting the edges on fire. Decorate the stand.

The school of craftswomen recruits teachers of any age and education, creating in any technique. The main requirement is a desire to teach and a positive mood. If you want to get into our "teacher's room", send your applications to the tv @ site.
You can follow the new master classes
Photos, in my opinion, do not need comments. Everything is clear, easy and it turns out very beautiful!


almost every person has empty plastic bottles in their home. They take up a lot of space in the trash can, so most often they are stored in some kind of cabinet. Few people know that from this trash you can make different crafts with your own hands. This article will describe the ideas of various DIY crafts from plastic bottles, as well as the technique for making them.
With your own hands, fakes from plastic bottles can be made quickly and easily, the main thing is a great mood, a desire to create and imagination. If you have a child, then you can also involve him in this interesting activity. So what can be done from such simple material? From unnecessary plastic bottles you can make:
toys;
children's crafts;
vases;
flowers;
decorations;
boxes.
Thus, unnecessary waste can come to life in the form of fun toys and functional household items.
Crafts from plastic bottles do it yourself photo:
How to make toys from plastic bottles?
Using plastic bottles, you can make bright and interesting toys for your child. For example, a catamaran will come out of two bottles, previously connected with tape, in which you can carry dolls. In the upper part of the bottles it is necessary to cut holes in which the child will then plant his toys. Cut out foam plastic can be attached to the bottom of the catamaran with the help of a wire - with it, the swimming structure will keep better on the water.
DIY fountain
A plastic bottle fountain will become an unusual and fun toy. In addition, playing with water is the favorite pastime of all children, especially in summer. Such a fountain will be great fun on the beach, in the yard of your house or in the country.
To make a fountain, 5-6 holes must be made in a plastic bottle around the circumference. To use the maximum amount of water in the bottle, holes should be made at a height of 1 to 2 centimeters from the bottom. You can make the fountain bright and cheerful with the help of paints. For example, paint a bottle of different colors on a bottle to make it look like a rainbow. You can also use colored tape. Close the holes in the bottle with your palm and draw water into it. Then screw the cap back on. When you remove your hand from the holes, no water will flow out. To activate the fountain, you need to slightly unscrew the lid. The air that enters the bottle through the neck will displace the water, and it will gradually pour out, thereby creating a semblance of a small fountain. Using this technology, you can make a small washstand in the country.
Papier-mâché toys
For boys, you can make an airplane from plastic bottles, and girls can assemble a whole zoo of animals made from bottles.
All toys are made according to the same principle. First, from whole and cut bottles, you need to make a frame and connect them with adhesive tape. Next, the necessary parts are cut out of the cardboard (for an aircraft, for example, wings and a tail), which must be attached to the frame with electrical tape or tape.
Now you need to take special kids craft paper or regular printer paper and cut it into small pieces. Dissolve PVA glue with water (1: 1 ratio). After that, glue the bottle frame with pieces of paper, first dipping them in diluted glue. There should be about 4-6 such layers of paper on the frame. When the pasted paper is completely dry, you can start painting and decorating your hand-made craft.
Using this technology, you can also make different animals: a crocodile, tropical fish, a cow, etc.
Vases from plastic bottles
The easiest way is to make a vase from a plastic bottle. To do this, you need to cut off the top of the bottle and round off the cut with an iron (this way you protect yourself from cuts and scratches).
How to round off the edges of a plastic bottle? Take a piece of paper and place it on top of the vase. Heat the iron and bring it to the cut-off part of the bottle. This must be done through the paper, otherwise the plastic will stick to the sole of the iron. The edges of the bottle from a hot iron will be rounded. Bring the iron to the bottle for a short time and periodically look at the result.
Now to your attention another version of a vase from a plastic bottle. This will require several bottles (preferably different sizes). Take one one and a half liter bottle and four small half liter bottles. In addition to bottles, you will need a glue gun or special glue for plastic. From small bottles, we will only need the upper part (about 5 centimeters). On a 1.5-liter bottle, in a chaotic manner (the main thing is not to go below the middle), we cut out round holes, the size of the neck of a 0.5-liter bottle. We insert the cut small bottles with the neck into the cut holes, having previously rounded the cuts with an iron, and fix them with special glue. We collect water in the finished vase and put a flower in each hole.
Today, a very common hobby is making flowers from different materials... You can also make original flowers from a plastic bottle with your own hands. In order to make flowers you need:
plastic bottles of different colors;
special glue gun;
candle.
If you don't have a glue gun, you can simply replace it with glue. And do not forget about safety rules when working with fire, be extremely careful.
Now that you have all the materials ready, spiral the plastic bottle to create a thin strip of plastic. After that, gently twist the strip of plastic over the fire. This will make the stem. In order to make the flower itself, you need to draw the outline of the future flower with a marker on the wide and flat surface of the bottle (for this, prepare a template in advance). Next, according to the picture, cut out the required number of flowers and bend the leaves. To give the petals a wavy shape, hold them over a fire. It's important not to overdo it with fire. It remains to fasten the flower blanks in the center to each other, and connect to the stem. According to the technology of making petals, you can also make leaves on the stem.
DIY boxes and boxes
Making a box from bottles is very simple. Prepare two bottoms from plastic bottles. Connect their cuts with a zipper. You can attach the zipper with plastic glue or a glue gun. If you don't find anything like this at hand, just sew the zipper with a needle and strong thread.
From above, the box can be decorated with a flower from a plastic bottle, figures from polymer clay or lace.
Boxes for children's books made from plastic bottles will be very convenient and practical. If you know how to crochet, then the box will be more original. To do this, you need to cut out squares or rectangles (future walls of the box) from a plastic bottle, punch holes along the perimeter using a hole punch and tie them together using a hook and thread. The book storage box is ready!
Jewelry made from plastic bottles
It will be very interesting for your child to make decorations from bottles on their own. In addition, bright bracelets and delicate necklaces will come in handy on a sunny summer and will delight any little princess.
Making a bracelet from a plastic bottle is easy. It is necessary to cut a ring from a bottle of the required thickness and wrap it with colored tape, yarn, lace, fabric or thread. You can also use beads or beads, pre-stringing on the material used.
Make a necklace from a plastic bottle. The manufacturing principle is the same as for flowers. Only this time you need to cut out petals of different shapes, and then also hold them over the fire. Now the finished petals can be strung on the fishing line.
DIY crafts from plastic bottles for kindergarten
With a plastic bottle, you can make a beautiful drawing. Cut the bottom of a plastic bottle, dip it in paint and attach it to paper. The bottom of the bottle leaves a beautiful flower trace. In such an interesting way, you can draw a blossoming tree branch.
Making crafts from plastic bottles with your own hands is very interesting and exciting. Such activities will benefit not only you, but also your children. After all, they will witness how masterpieces appear from nothing thanks to creativity, imagination and skill.
Crafts from waste materialAre not only original, but also economical home decorations. You shouldn't spend extra money on material if unusual things can be made from recycled materials that are thrown away.
In the process of making crafts, you can safely involve children in order to develop their imagination and imagination.
More recently, a new direction has appeared in modern creativity called artdump. Literally with of English language "Dump" translates to "garbage". Many artists, sculptors and other craftsmen are working on the creation of works from recycled materials.
The newfangled trend is also spreading for the reason that it protects the environment. Tons of rubbish are used to create accessories instead of going to landfills and poisoning the atmosphere.

What kind of materials can be useful for creating peculiar trinkets? Most often used inorganic household waste:
- Paper - old magazines and newspapers, cardboard and cardboard products.
- Plastic - plastic bottles, cocktail tubes, caps, disposable dishes.
- Metal - tin cans, aluminum caps for beer or carbonated drinks.
- Pieces of fabric.
- Glass - cracked glasses, glasses, or unnecessary bottles.
- Old CDs.
- Burnt out light bulbs.
Interesting!In the West, there are a large number of recycling plants. In our country, similar enterprises are gradually starting to be created.
DIY plastic crafts
Products made of plastic can be used to decorate a house, a garden, a summer cottage, a vegetable garden and a playground.
An excellent material for manifesting imagination is plastic plates. Masquerade masks can be made from such recycled materials. To do this, you need to cut holes for the eyes and paint them to look like the animal you want to portray. It can be a tiger, cat, lion, ladybug and other animals. Additional elements (ears, mane) are cut out of plates and glued. Do not forget also about a string or elastic band.

Appliques can decorate any room. You can do anything on a plate: voluminous flowers, paper figures, animals cut out of felt. Here the flight of fantasy can be endless. You can make an interesting composition: glue the bird and felt eggs to the plate and arrange a nest of feathers and twigs around them.

A common material from which many crafts are made is the bottom of a plastic bottle. You can make from it:
- Plastic shade. Neatly cut bottoms of the same color or different shades are glued together to form a ball. From it comes the original plafond for the lamp.
- Plastic applications. The bottoms of the bottles produce beautiful flowers. By gluing such material to cardboard and decorating it, you can make an interesting decoration for your home. You can find photos showing similar applications.
- Funny pig. The whole bottle will be a decoration and toy for children. It is painted pink and the ears, legs and tail cut from plastic are glued.
Products made from plastic bottles, forks and spoons can be varied, you just have to show your imagination.
Crafts from old CDs
Various shiny crafts are made from discs. Unnecessary discs will be an excellent material for creating original crafts and accessories.

If old CDs are lying around at home, you shouldn't throw them away, but rather make interesting crafts:
- Candlestick. A disc is taken under the base, and decorative balls are glued along the edge using superglue. When one layer is completely completed, the next one is glued to it. The best option is 4 layers of balls.

- Christmas decorations. To prepare beautiful toys for the Christmas tree, you need to purchase transparent decorations. Cut the disc into small parts, and then glue it onto the toy. When it is filled with mosaic, you need to carefully unscrew the top fastener and put a golden brocade inside. You can make a lot of such toys, they will look great on the tree.
- Frame for mirrors or photographs. To do this, you need to cut a lot of small parts from CDs. Then a regular flat frame is pasted over with a mosaic.

- Coasters for cups. In this case, discs with an interesting image can be left in their original form, and the usual ones can be embellished. For this, a piece of fabric is taken, from which 2 identical parts are cut out around the disk. The CD is glued on both sides with double-sided tape, to which the fabric parts are then attached.
Idea!You can come up with a variety of compositions from CDs, for example, window decorations, animal figurines, chandeliers, bracelets. Australian Sean Avery decorates his yard and home with bizarre animals made from pieces of discs.
Crafts from cardboard for children
Various boxes of shoes, candy and household appliances are thrown out every day.
A regular cardboard box can be turned into a toy for children. You just need to show a little patience and give freedom to your imagination.
You can watch a master class on making a TV. To make the process even more interesting, it is worth involving the child in it and preparing the following materials:
- medium cardboard box;
- cellophane or cling film;
- scissors;
- scotch;
- drawing paper;
- felt-tip pens and pencils.
The top flaps of the box must be cut off and then turned upside down. A rectangle is drawn on the side surface and cut out. The hole is sealed with cellophane or cling film. The TV screen is ready. You can make a remote control from the remains. The homemade TV is ready, all that remains is to paint it.

For television "programs" you need to make puppets. To do this, take:
- cardboard or thick paper;
- scissors;
- felt-tip pens or pencils;
- ice cream sticks;
- scotch.
On cardboard or paper, you need to draw your favorite children's heroes, paint and cut them. On the back of the figures, an ice cream stick is glued with adhesive tape. The puppet is ready!

Aquarium with fish. You can make an aquarium from an ordinary medium box. To make it, you need the following materials:
- medium cardboard box;
- thick white paper;
- pencils or markers;
- threads and scissors;
- colored paper;
- shells;
- beads;
- plasticine;
- scotch;
- super glue.
Cut off one side of the box. From the inside, glue it over with blue or blue paper, and the bottom with yellow. Glue shells and algae made from plasticine to the bottom with superglue. Draw fish and other marine life on paper, paint and cut them out. Then strings are attached to the figures and glued with tape. Beads can be strung on threads and attached in the same way. The colorful aquarium is ready.

Many interesting items for children can be made from cardboard boxes: cribs for dolls, household appliances, airplanes, houses, cars.
Attention!Homemade toys are in some ways much better than ready-made ones, because they develop the child's imagination and imagination.
Children's crafts from waste material
Children must be involved in the process of making toys or crafts from household waste. So, the baby will learn to respect the surrounding objects and will develop his imagination. Interesting gizmos can come in handy in kindergarten, at school or to participate in a competition on the topic "Ecology".

Swimming turtle. It is easy to make such a toy, and the child will be able to bathe with it in the tub. Materials needed:
- flat wide sponge;
- plastic bottle (0.5 l);
- buttons;
- paper;
- strong thread and needle;
- marker.
The bottom of the bottle will serve as a shell, which must be carefully cut off. Then it must be attached to the sheet and circled with a marker. The legs and head of the future turtle are added to the resulting template. Along the contour, you need to cut the pattern of the animal, then attach it to the sponge and cut it out. The bottom of the bottle is placed on the base of the turtle and attached with a thread, stitching with a needle through a sponge. From above, the wrapped threads around the shell are connected with a small piece of thread and decorated with a button.

Hare. This craft made of fabric will appeal to any child. The following materials will come in handy:
- a piece of a sleeve from a children's sweater;
- scissors;
- cotton wool or synthetic winterizer;
- threads.
The bottom corner of the fabric must be tucked in such a way as to form a pointed top. It is cut into 2 parts - these will be bunny ears, which need to be tied with a thread. Then the top is stuffed with cotton wool (padding polyester), forming the head, and again tied with thread. Then they take a thread or a thin ribbon and tie the fabric crosswise, forming the legs of the animal. At the back, the thread (ribbon) is tied with a bow. The cute rabbit is ready.

Cotton pads can be bought in almost any supermarket or pharmacy, and almost every woman has them in their cosmetic bags. Have you ever wondered how else, apart from their direct purpose, they can be used? We are just thinking, and have prepared for you a small master class on the decorative functions of this inexpensive and affordable material.
A basic set of tools you will need anyway:
- Several packs of cotton pads
- Scissors
- Stapler
- Decorative elements (ribbons, beads, sequins, pendants, etc.)
In addition to this, stock up on heavy cardboard, foam, large beads, white thread, sewing pins, toothpicks and paints. All this will be useful to you at certain stages of work on different projects.
Autumn is in full swing, just around the corner New Year, and therefore our master class will be devoted to the most festive elements of decor - a Christmas tree and decorations. Let's start with the tree.
Step by step instructions with photos
So, first of all, you need to acquire blanks (you will need a lot of them). It is very easy to make them - just fold each cotton pad in four, as shown in the figure:

The corners can be stapled with a stapler or thread, whichever is more convenient for you.
Next, using thick cardboard, scissors and glue, we make a cone-shaped base. It is better to paint colored cardboard with white paint. The height of the cone can be any, at your discretion. The base must be very stable, therefore it is better to additionally strengthen the lower edge with a tape or a strip of cardboard glued along the inner circle.
When the "trunk" dries out properly, you need to glue the "needles" to it. We start at the bottom:

The finished tree can be decorated with glitter, beads and ribbons. At the top we have placed bright star made of cardboard:

You can make a star like this. We cut out the blank according to the template and then proceed in steps:


And here is our final version:

By the way, by placing the blanks at different angles, you can get such a Christmas tree:
![]()
Now that you already have a Christmas tree, perhaps you want to decorate your apartment or office with a few more original festive accessories? We will be happy to show you several ways to diversify the usual set of snowflakes and toys with something special.
Master class on creating crafts from cotton pads
Let's take a New Year (Christmas) wreath as a basis:

To do something like this, you first need a foam circle (you can also take a round synthetic insulation). You can look for a ready-made one in stores, or you can cut it out of a regular rectangular piece of Styrofoam and polish it so that there are no corners.

On the foam base, using sewing pins, attach the folded four-wadded discs. You can paste over only one side if the wreath will hang on the wall, or cover all the foam around it if you plan to hang it on, say, a chandelier:

Do not forget about the ribbon, which will serve as a loop for hanging the finished product:

When the base is ready, simply pin or carefully glue the appropriate decorations over the discs.

By the way, to support the theme, some of them can also be made from cotton wool. Let in our case it be an angel - a symbol of Christmas.
Making an angel with your own hands

To make such an angel, divide the cotton pad into two thinner ones:


For beauty, the edges can be cut in waves to resemble a flower.
Put a round bead in the center of one of the resulting discs, wrap it with thread and straighten the figure so that you get the head and wings:


Now we need a slightly denser torso on which all this will hold. We add the second disk as follows:

In the center of the body, you need to place a "leg" from an ordinary toothpick and secure it with a drop of glue. To make a hanging figurine, simply attach a thread loop to its head (you don't need a toothpick in this case). Then we glue both parts, and decorate the wings with a felt-tip pen:
![]()
Such an angel can be stuck into the foam base of the wreath or used as decoration for holiday baked goods.
Pictures of crafts
More crafts from cotton pads and sticks, get inspired!

Brooch

Flowers

Wood


Application


