So you either purchased a new site, and you can be congratulated, or existing fence no longer suits you for some reason - old, ugly, low, unreliable. In any case, the issue of installing a new fence should be approached seriously, having thought through everything to the smallest detail, so that the new fence will please the eye and serve faithfully long years.
A good contractor should have someone on the crew knowledgeable about sludge control to deal with the correct placement of sludge fences. The first goal is to create a storage area for drainage and filtration, the second is to store the largest amount of water without large overflows.
Or, "the sludge fence will not be effective here, we need to move it to another location." Placing a gambling fence on contours sounds good on paper, but it is very difficult in the field. Setting multiple smiles where you can plan for the accumulation and filtration of the drain is the best plan.
When to put a fence on a new site?
So, you have acquired a plot ... Some believe that the first thing on the plot is to build a house, and only then put up a fence, explaining this by the difficulties with the passage of construction equipment and the delivery of materials. However, having deployed a construction site on an unfenced site, you with all your activities will be in full view of your neighbors, passers-by, uninvited guests. The absence of a fence creates the effect of easy accessibility, makes it possible for anyone to go through, see, take what is “wrong”; tools and building materials will not be safe. It is better in advance, when designing a fence, to provide for the possibility of passage of equipment, because in the future such a need is possible. You can leave two gates - for the entry and exit of equipment. Or, in extreme cases, the first thing to do is to fill in the foundation, then put up a fence, and only then start construction.
The quantity belongs to the area of \u200b\u200bcontrol. Avoid long spans of the sludge fence. They usually concentrate runoff in one area and overflow the fence. Limit the length of the runs to less than 200 linear feet. Installation mainly refers to how it is installed in the ground. There are two common methods - traditional trenching and static cutting. The research-sponsored EPA has completed the slicing, which is a very consistent and reliable setup.
The mechanical installation does not dig out soil and does not leave dispersion, ensures consistent and reliable installation of the sludge fence and reduces many of the problems associated with operation. Compaction means an increase in soil density. Research has shown that there is a high correlation between efficiency and sludge compaction. Units with adequate compaction resisted erosion, while those with minimal compaction had poor performance. Compaction minimizes water saturation in the soil and thus stabilizes the installation.
It also happens that a plot is purchased, and construction is not planned immediately, but in a year or two, or even more. In this case, it is also recommended to put up a fence first - it will immediately become clear that this territory belongs to someone, there is an owner. Orphaned areas are often used for walking trails or driving. Also, the fence will discourage uninvited guests in the form of cows and other animals, which often walk the same familiar route and then drive them out of the way is extremely problematic.
If trenching, the soil must be overfilled and compacted with the machine wheel for effective results. The wiring refers to correct distance and the depth of soils in the soil. Posts should be 4-5 feet apart where water will concentrate, and 6-7 feet in low voltage areas or specifications. The posts should be as deep in the ground as the fabric above the ground. Steel posts are easier to install to the desired depth and have a better life than wooden posts.
Multiple runs break the management area into manageable storage areas. Attachment means that the fabric is properly anchored to the post as it must support 18 inches of water and sediment. Three plastic ties or wire set diagonally within eight inches of a steel rack work well. A few staples or even a small lathe on top of the fabric are used to secure the fabric to the wooden posts.
A situation is likely when a neighboring building falls on a part of an empty plot - be it a fence, part of a house, a bathhouse. Most often this happens unintentionally, but in the future it is usually impossible to change something, not to clean the whole fence or house for the neighbor. Also, an unfenced area can be very attractive for a landfill. Timely installation of a fence and a clear marking of its borders will protect you from such troubles.
The most common problems with sludge intake are. Improper placement - Installing a sludge fence where it will not store water is a waste of money! How many times do we see a sludge fence installed in a straight line with water around the end? Or a long run of a sludge intake diverting the effluent to a low point with a small storage area where the volume easily overlaps with a fence. Incorrect installation - some vague attempt at trenching or nothing at all, with little or no backfill, and therefore no compaction. The posts are 8-10 feet apart and are too shallow to withstand the stress and where the fabric sags just a few inches above the ground. Inspectors and contractors who approve payment for poorly installed or installed sludge fence. Water, especially in volume, is a tremendous force.
In the absence of financial ability to install a permanent good fence, for example, it is possible to install a temporary fence - wood or mesh-netting. However, a wooden fence is not so cheap and not durable, and the chain-link does not create the effect of closeness, it is transparent, this option is only suitable for marking boundaries. To avoid unnecessary costs, it is recommended to spend it once and install a permanent, reliable and beautiful fence.
Because the silt fence is mechanically set in the soil and mechanically supported, it can trap hundreds of pounds of sediment and water - even a concentrated stream. What could provoke the question of a wire-backed fence? There is mountain of evidence that a properly placed sludge fence will retain 18 inches of sediment - no wire. My own experience has shown that the wire can actually interfere with work if it is in a trench because it prevents the trench from being compacted.
In addition, wire creates large, expensive disposal costs, resulting in more environmental damage than good. The only reasonable excuse for the wire was that construction people don't like to drive on it, so it doesn't seem to have too much trust from the bureaucratic side.
What time of year should you install a new fence?
Very often, installers of fences, fences and gates claim that a fence can be installed almost at any time of the year. This is not true. The construction of fences, if you want it to stand in its place for many years, it is possible to start in the spring, when stable positive day and night temperatures are established on the street, when the permafrost subsides, which will exclude the possibility of movement of soil layers and movement of the fence. When the water leaves, irregularities in the area will be visible, which must be leveled before installing the fence. For our regions - Irkutsk, Angarsk, Shelekhov and adjacent territories - not earlier than April-May. Accordingly, the installation time of fences will continue until autumn, when the thermometer columns begin to fall below zero marks.
Build a new sludge fence at full capacity. The sludge collection is being taken care of. But maintenance not a substitute when filled with sediment. In this case, the owner has achieved his benefit and needs to install a new sludge fence.
First of all, how do you remove wet sludge, how do you process it, and where do you get it? And secondly, the fabric of the sludge fence is now completely clogged and cannot allow seeping water through it, so it no longer functions as a sludge fence, but as a sedimentary basin with limited capacity. Must be installed correctly installed fence to prevent sedimentation.
But in every rule there is an exception - the installation of fences and gates in winter is possible when used - the design and material of the piles allow you to perform work all year round.
Thus, when deciding to install a fence, you must adhere to several rules:
The first step on the new site is to put a fence, providing for the possibility of entry and exit of equipment;
Removing the sediment just doesn't make sense. It is much better to build a new sludge fence run above or below the existing one and start a new one. If there is no space, the entire installation must be removed, calibrated and reinstalled. Last but not least, the sediment is real and has physical qualities. Devices are not filtered unless there is evidence of sedimentation, unless effective upstream erosion control methods have been implemented. The absence of sludge or sewage sludge is a sign of either poor performance or good erosion control, and the device should be checked for leaching and breakage.
It is better to immediately set the fence permanent - reliable and durable;
The installation of the fence can be started in the warm season - when the soil melts (except for screw piles).
Almost every owner country house faced with the need to build a fence around his site.
Silt fencing is the ideal way to prevent erosion. The fencing is made with a synthetic mesh that allows water to seep through, but prevents the passage of soil or other materials. If you want to install a silt fence to prevent pollution and erosion, follow the steps below.
Lay out your silt fence by placing stakes in each corner and pulling a piece of rope between the stakes. Posts should be placed 10-20 meters apart, depending on the application. In general, the spacing between the silt fences is 12 to 16 feet, which is a good number to work with. Once your fence line is laid, spread your bets around the perimeter so you can make sure you have the correct number.
After all, without a fence, it becomes a so-called passage yard. Most decent looking structures are quite expensive, and affordable fences don't always look respectable. For this reason, many decide to take the initiative in their own hands and put on the site a fence structure that they create with their own hands. In this regard, an important question arises: how to install a fence?
The sludge barrier must be partially buried to work properly. This prevents water from moving under the fence and helps to anchor the fence, and a lot of force is applied to it, which can happen during heavy rains. Dig a trench 12 to 24 inches wide and 8 to 12 inches deep. If you are crossing the roots of trees, it is okay to work around the roots rather than cutting through them. The trench should be fairly uniform, but it doesn't have to be precise.
Used 2 to 5 pounds of sledgehammer to drive through the stakes. For building fencing, make sure the stakes are evenly spaced for visual aesthetics and drive each one at least 12 inches into the ground at the bottom of the trench. Roll the fence over the silt one section at a time to keep the wind from causing inconvenience. Place the rails on the side of the uprights that will allow water to flow out, and allow the first 8 to 12 inches of the fence material to swing away from the railing in the same direction. Attach the guardrail to the stakes with a heavy staple gun and apply 3 to 5 staples per stitch.
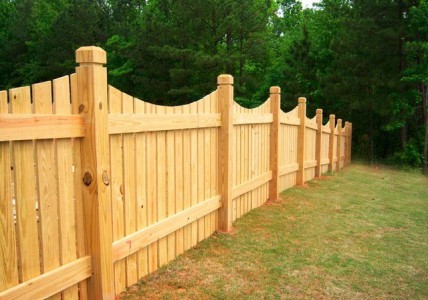
Construction wooden fences widespread everywhere. This is one of the most affordable, low-labor-intensive and traditional types of private property fencing.
What is required for construction?
In order to make a do-it-yourself fence on the site, you will need the following tools and materials:
- fence posts are the most important element supporting structure each fence;
- fence boards. They are of several types:
Step 5: backfill and compact
Make sure the bottom flap is pointing up the hill or in the direction the water is coming from and that it flattens to the bottom of the trench. Fill in the trench before betting. Start by filling 3 to 6 inches at the bottom of the trench to hold the flap in place. Then fill the hole with all the soil you removed. There is no need to fill tables, but you can do this if there is excess dirt, or if the ground is particularly soft or damp. For best results, use a sealant, a flat square of metal on a straight wooden handle, and reattach the area you just filled in.
The advantage of wood for making a fence is that wood is an environmentally friendly material that, after installation and painting, does not require maintenance for a long time.
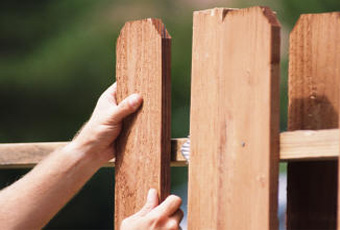
- Sliced. The most common version of a picket fence made of wood. This view suitable for the vast majority of fence models.
- Aged. This type is becoming more and more popular every year. Such boards have a very stylish and effective appearance. The boards are processed in such a way that soft fibers are completely removed from its surface, which makes it possible to highlight the relief of its resinous part and thereby emphasize the natural texture of wood.
- Decorative. It differs from the rest by the unique processing of the ends and side edges, so such boards have an effective exclusive appearance. Which, of course, is a huge plus for those who want to install an original fence.
- Unedged. It is used not only in order to save money, but also to decorate the exterior in eco, ethno or country style, which are gaining more and more fans every season.
If possible, a mechanical seal can be used instead. Who decides if a wall, opaque board, wrought iron trellis, picket fence, picket fence, stacketzown, wire fence, or barbed wire fence, or should a living fence serve as a fence?
In some cases, municipalities have prescribed how the investments should look, both in terms of construction and in other statutes. For example, fences can have a specific material and height set. It may also be necessary to re-install shrub wire fences or allow only a hedge. Ask the municipality or city government if there are such rules for your property.
The use of antiseptics for treating the fence will extend the operation for years to come.
- wooden lining (grooves);
- lining;
- sand;
- cement;
- crushed stone;
- water;
- container for mixing cement mortar;
- shovel;
- roofing felt sleeves;
- several nuts;
- special hairpins;
- impregnation is necessary to protect wood from the harmful effects of natural conditions, insects, and molds. It penetrates deep into the tree and forms a protective layer;
- varnish is necessary for the shade to appear natural woodas well as to protect wooden structure from the negative impact of the environment and, of course, from destruction.
It is very important to follow the sequence and not to rush, as rushing will not lead to anything good.
If walls or fences are to be installed, they must be protected in accordance with the building regulations of Lower Saxony and must not be dangerous. Therefore, in residential areas, no fence can be built from barbed wire alone. Moreover, neighbors can come to terms with how the case should look. If no agreement is reached, any local fencing is permitted. The enclosure has its own type and height, typical when it is used in the relevant field also in other areas and not only sufficiently insulated.
So take a look around your area so that your fence doesn't fall completely out of order. If the neighbors do not agree with the elevation and do not exceed the lower fences in the area concerned, the height is usually at least 1.25 m in accordance with the Law on the Neighboring Law of Lower Saxony.
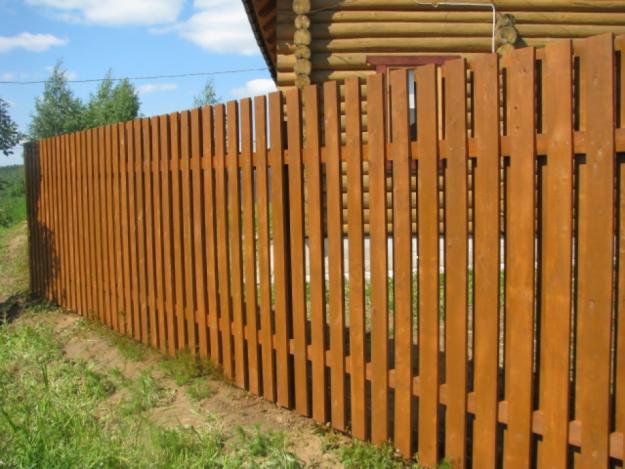
Picket fence is popular because it is easy to install and perfectly complements the landscape design.
How to start building a fence with your own hands?
- First you need to pull the rope and mark the places where the pillars will be located.
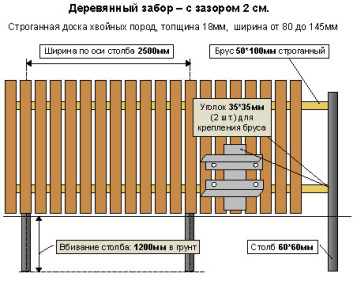
- After that, wells should be made about 1.2 m deep. This depth is needed so that the pillars do not tilt during the period of seasonal soil fluctuations. Yes, and during heavy rains, the ground gets 40-50 centimeters wet. This should be taken into account during the construction of a do-it-yourself fence on your own site.
- Next, in the resulting openings, you should put sleeves from roofing material, install pillars in them and fill in everything concrete mortar... This is done in order to maximize the stability of the fence structure. It is especially important not to forget about concreting for owners of plots located on slightly heaving soils and in areas where wind loads are quite high. The pillars must be prepared in advance, their length should not be less than 3.2 m, that is, they will rise 2 m above the ground.
How to make a cement mortar with your own hands?
Typically, the wrapper is directly adjacent to the property boundary. Only then does it provide protection for neighboring buildings. In order not to reach too high fences at the border, which, like buildings, affect neighbors when using their land, the building codes of Lower Saxony are set. An extension at the border can be 2, 00 m in height, there are no heights in commercial and industrial areas.
Above 2, 00 m, a notification or building permit is required, up to 2, 00 m without it! If you want to stage fencing, you must do it on your own lot and place the fence on the neighbors' ground or in the middle of the border line. The side rails should face the property so that the neighbor sees the smooth side of the fence. Of course, neighbors can decide something else, and something else also applies if both neighbors are bound by law together.
This is not so difficult to do, but, of course, physical strength is required. First, fill the container with water, then add cement there and mix well. The so-called cement milk is formed. It is imperative that every grain of cement is moistened with water. Then sand is added and also thoroughly mixed with a shovel.
Next, you need to add crushed stone and also mix. In order to avoid an error in the dosage of components, it is necessary to use the following gradation: for 1 bucket of cement, add 2 buckets of sand, 3 buckets of gravel and 0.7 buckets of water.
The concrete solution is ready to use!
If there is a desire to build an original fence with your own hands, then you can give preference to the horizontal option, without the slightest gaps, solid. In order to bring this idea to life, you should make special grooves for laying the boards. These can be pillars made of wood. The grooves must be fixed to the post with studs at three points and tightened with nuts.
Difficulties may arise with the posts of the gate. Here you need to make overlays on three sides. In addition, in this area it is necessary to make a recess for the door leaf. The overlays will give the pillars a certain "massiveness", and will, of course, perform an aesthetic function.
Then you should go directly to the gate. First you need to make a frame. It is made from two blanks 0.8 m long and a pair of 1.8 m. In long blanks it is necessary to make grooves 18x15 mm, and in short blanks - special spikes. Then the lower bar should be glued in, and the upper one should be inserted so that the door leaf eventually turns out to be rectangular.
Next, you need to wait until everything dries up, in time it is about a day. Then you need to start laying pieces of lining up to the top bar. Next, the upper block is glued in, and again they wait a day until everything is thoroughly dry. Then the lock is cut in and everything is covered with impregnation and varnish so that the boards do not start to rot prematurely due to weather conditions.
The last stages of building a fence with your own hands
This is followed by the most tedious and painstaking part of the work on. It is necessary to prepare the boards. They must be thoroughly dried. The boards should be cut to the desired length and aligned in thickness. The thickness should be about 22-23 mm, no less. It is necessary to align the edges of the boards as much as possible so that they fit as tightly as possible to each other. Further, the blanks are necessarily covered with a special impregnation. Particular attention should be paid to the ends.
After all the blanks are ready, you can proceed directly to the assembly. The boards must be inserted into the grooves of the overlays on the posts, before that loosening a little the nuts with which they are attached. The bars should be screwed into the lower part of the overlays and the boards should be laid on them.
After it has been laid required amount blanks, you need to tighten the nuts located on the pillars of the pillars in order to clamp the entire row of boards. Further, it is advisable to once again coat the finished structure with impregnation.
Well, that's all, the work is over, and the question, which has always worried many owners of a country house, how to put a fence on your own plot with your own hands, is closed. If desired, the fence structure can be coated with decorative paint of any shade, various patterns can be made on its surface.
It all depends only on the flight of imagination and the desire to stand out against the gray everyday background of neighboring areas with your own originality and an unusual approach to home improvement.


