One of the most important stages in the repair of bathrooms or showers is, competently done work on waterproofing walls, floors, ceilings. In this publication I will help you figure out why you need to do waterproofing, decide on the choice of a waterproofing manufacturer, describe the steps for carrying out waterproofing works, the consequences of negligence in this matter.
Modern requirements of construction supervision include measures to monitor the implementation of waterproofing works in damp and damp rooms. And these requirements are very, very reasonable.
Water falling into building construction causes such damage, the elimination of which is very costly. Even small amounts, such as water vapor, can lead to damp areas and promote the growth of mold inside structures.
Unfortunately, not everyone pays due attention to waterproofing walls, floors, ceilings in damp and wet rooms. As a result, after some time, you have to completely redo the previous repair.
On one of the objects I ran into a shower room in which the floor and walls were not properly treated with waterproofing mastic. Next, we look at the consequences of all this.
Consequences of lack of waterproofing on walls and floors in shower rooms
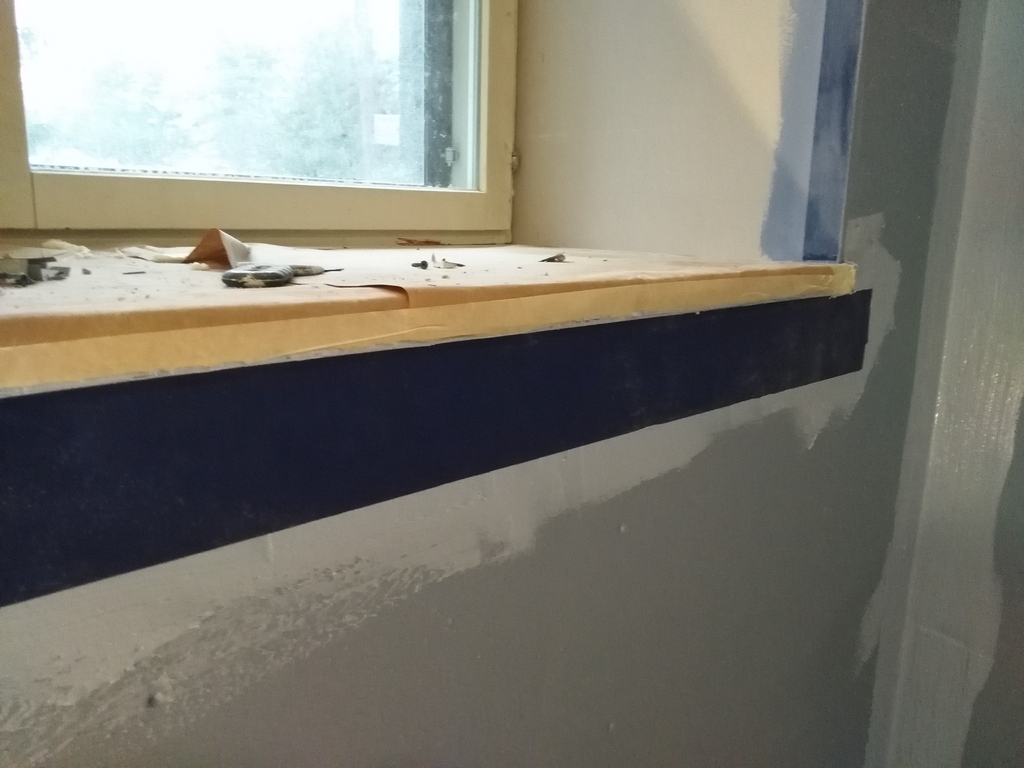
One customer complained that water was dripping from the ceiling of the second floor. Finding the cause on the fly is problematic, since on the second floor in the area of \u200b\u200bthe leak there are other communications, including water supply pipes and sewers. It turned out that water seeps through the walls in the shower, dripping down.
The problem was that no waterproofing was done on the gypsum cardboard walls. Whereas, the floor was waterproofed. See below for the consequences of permanent leakage. As you can see, mold began to form inside the wall.
The drywall profiles are corroded. The drywall also fell into disrepair. I had to completely cut out the lower part of the wall, replacing the profiles and the drywall itself.
According to rough estimates, the damage amounted to about 100,000 rubles.
Principles for applying waterproofing to walls and floors
To save you from such troubles, I will try to give as much information as possible on the correct application of waterproofing.
For wet and wet rooms, such as showers, bathtubs, special waterproofing mastics are made. There are several types of mastics and they are intended for different purposes. Oil-based mastics are made, containing acetone and acrylic.
In my opinion and taking into account my experience, Kiilto Fiberlast waterproofing mastic is the best in its class.
Kiilto products are valued for the quality of their products, although I cannot say that they have a low price, but I do not recommend saving on such things as waterproofing.
Slightly cheaper and also with good quality, there is Knauf mastic.
Steps to properly apply waterproofing in a shower
First stage, surface preparation. Before applying waterproofing, it is necessary to remove all particles that are not firmly adhering from walls, floors, ceilings. In simple words all that falls off must be removed. Check that there are no greasy, damp, fungal surfaces. In the photo above, we first had to knock down all the soaked mortar from the floor, make a new fill, and only then start applying waterproofing. Then apply KIILTO FIBERLAST PRIMER to walls and floors
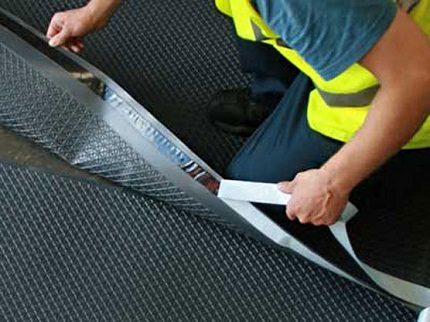
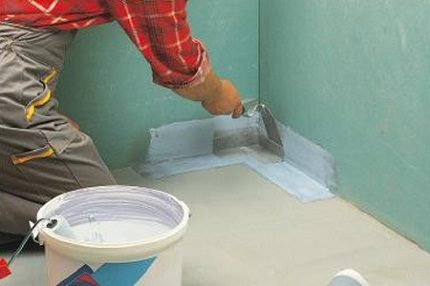
If you are waterproofing in a shower, then the application must be started from the inside and outside corners. To strengthen the joints, such as the corners of walls, ceilings, niches, doorways, and so on, use a special waterproofing tape. A 10 cm wide waterproofing tape is ideal for internal and external corners. In the photo below, for example, a Kiilto waterproofing tape.
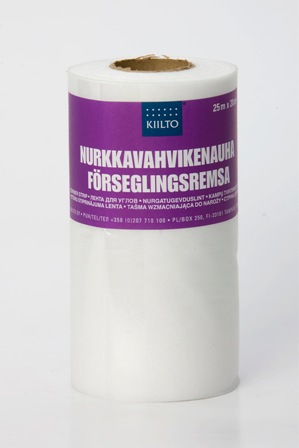
Reinforcement of corners is an important point. At this stage, it is important to ensure that the tape adheres evenly and does not wrinkle. It sticks like this. We measure the required length of the tape and cut the workpiece.
Try to make your workpieces as accurate as possible. Then with a brush 10 cm wide we apply mastic to both surfaces. We do not regret the mastic, it is necessary that the tape is saturated with mastic.
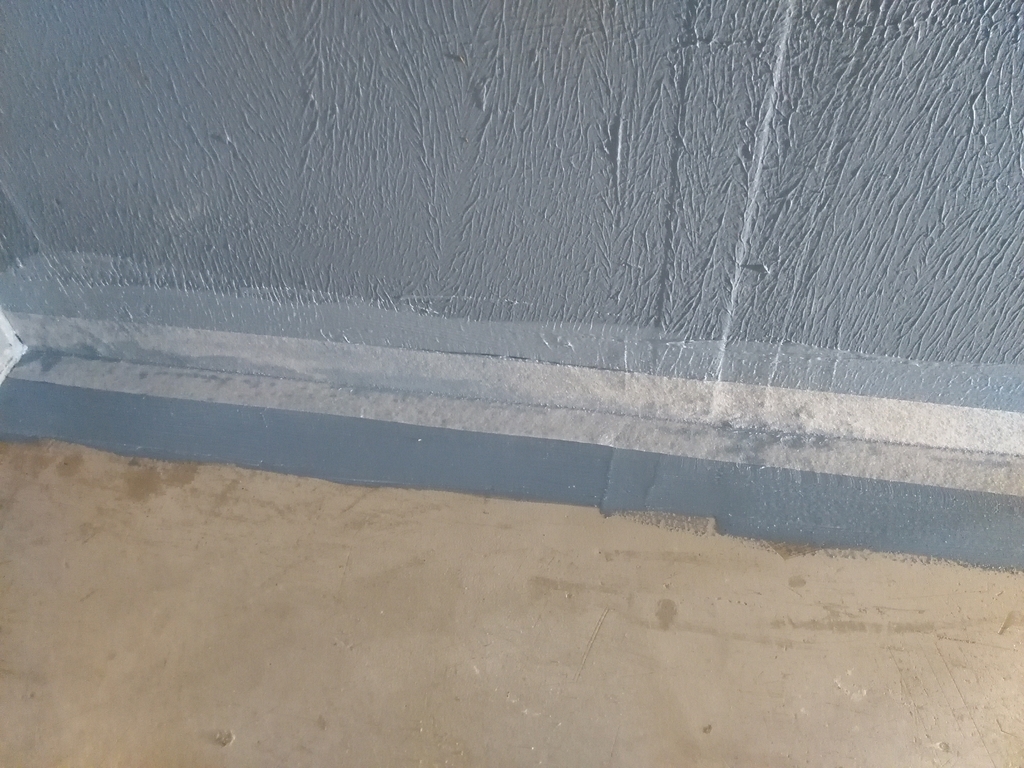
The joints of waterproofing tapes are overlapped. I repeat, do not feel sorry for the mastic at this stage, the tape should stick reliably.

We glue the waterproofing tape.
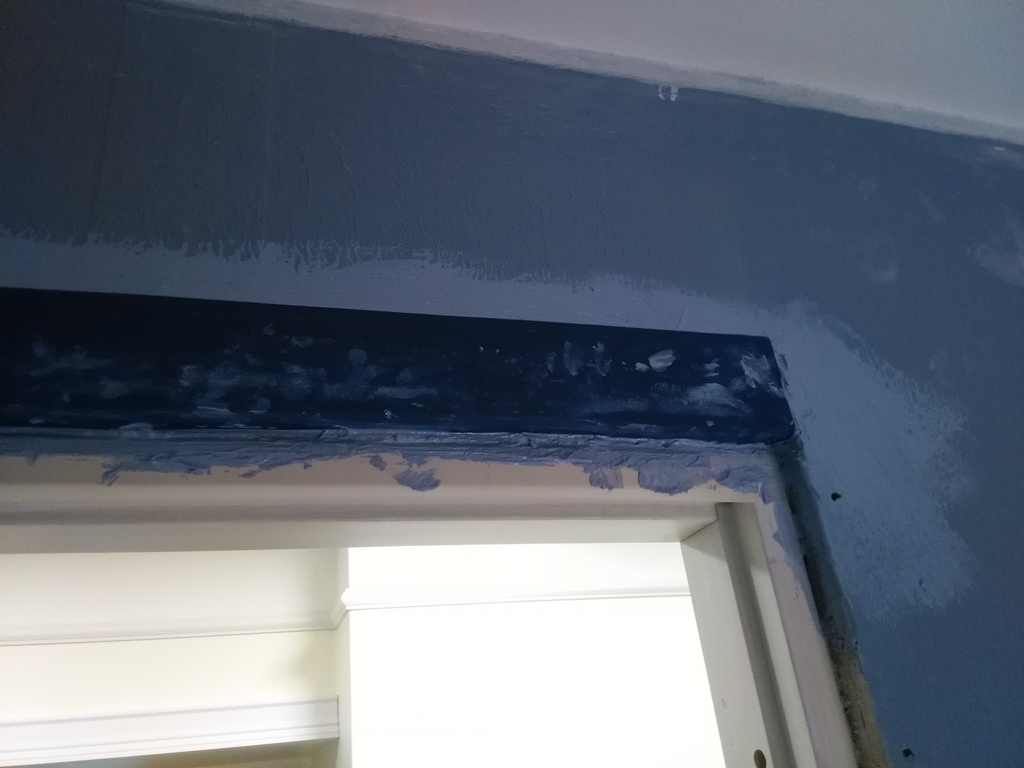
If you already have a door frame installed, be sure to glue paper tape (adhesive tape) to avoid additional work of scrubbing the waterproofing from the frame.
We glue the waterproofing tape around the window.
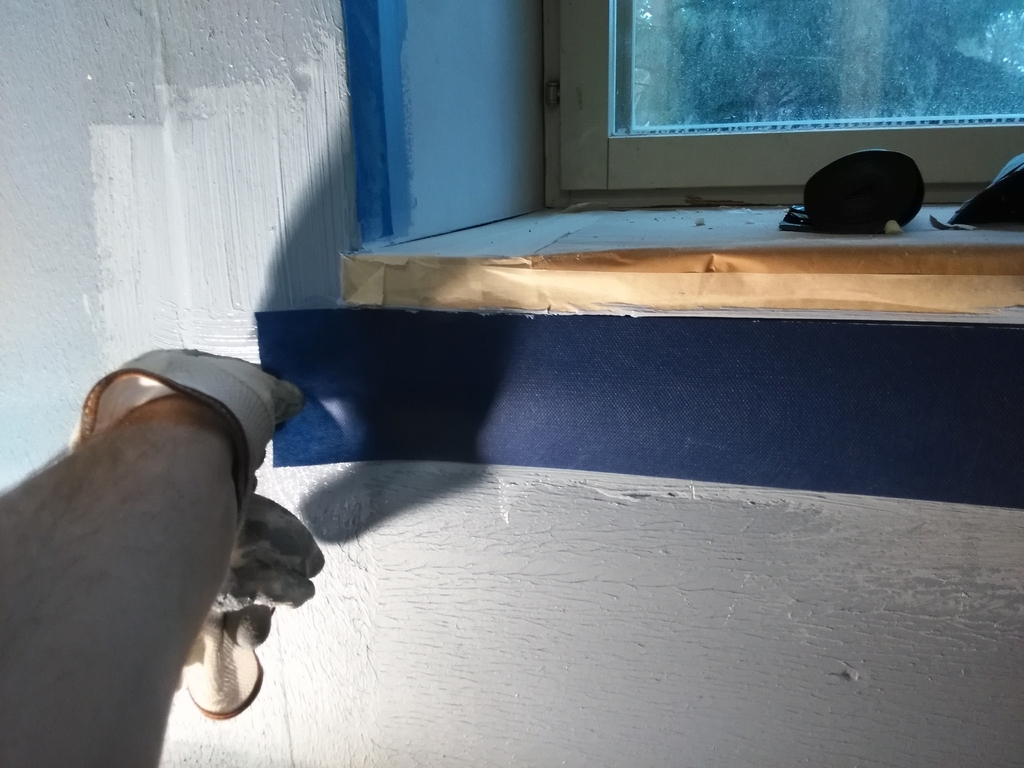
After gluing the tape on top, apply mastic. We try to apply the layer thicker.
We also glue the reinforcing tape on the vertical-horizontal joints of gypsum cardboard.
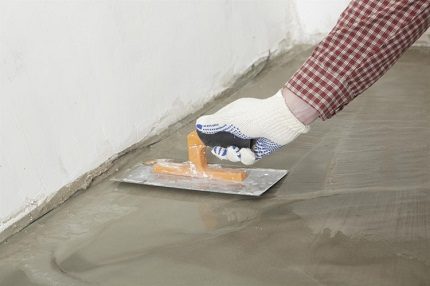
After all the joints are glued, we proceed to applying waterproofing to the walls. Can be applied in two ways with a wide brush or with a roller.
The second way is faster and easier. Use a roller 20 cm wide and with a medium bristle. Apply evenly by rolling well. It is applied in two layers.
It is important to maintain a thickness of about 0.4 mm for each layer. As a result, the total thickness should be at least 0.8 mm.
To check the workmanship, cut three triangles with a sharp knife in three different places. They can be checked either with an electronic caliper, or visually by eye. Make sure the layer is even throughout. If the result is not satisfactory, the waterproofing process must be repeated.
Photo of a high-quality application of a layer of waterproofing.
Since the work of applying waterproofing refers to hidden works, all stages must be photographed. It is also desirable to keep the cut triangles.
Particular attention must be paid to the places of the ladders. Special elements for ladders are sold. We apply mastic around the ladder, glue the rubber gasket. The second option is cut from a solid reinforcing material a piece measuring 1000 mm by 1000 mm.
Apply mastic abundantly around the ladder, glue the material on top right in the center of the ladder. Next, we saturate the material abundantly with mastic. After drying, we make a slot in the center of the ladder.
Leave 15 mm of material at the edges. Press the locking ring from above onto the ladder. We coat the ladder with mastic from the inside.
Material consumption is calculated as follows, for one square meter 1 kg of mastic per layer. Consumption of mastic based on gluing tapes.
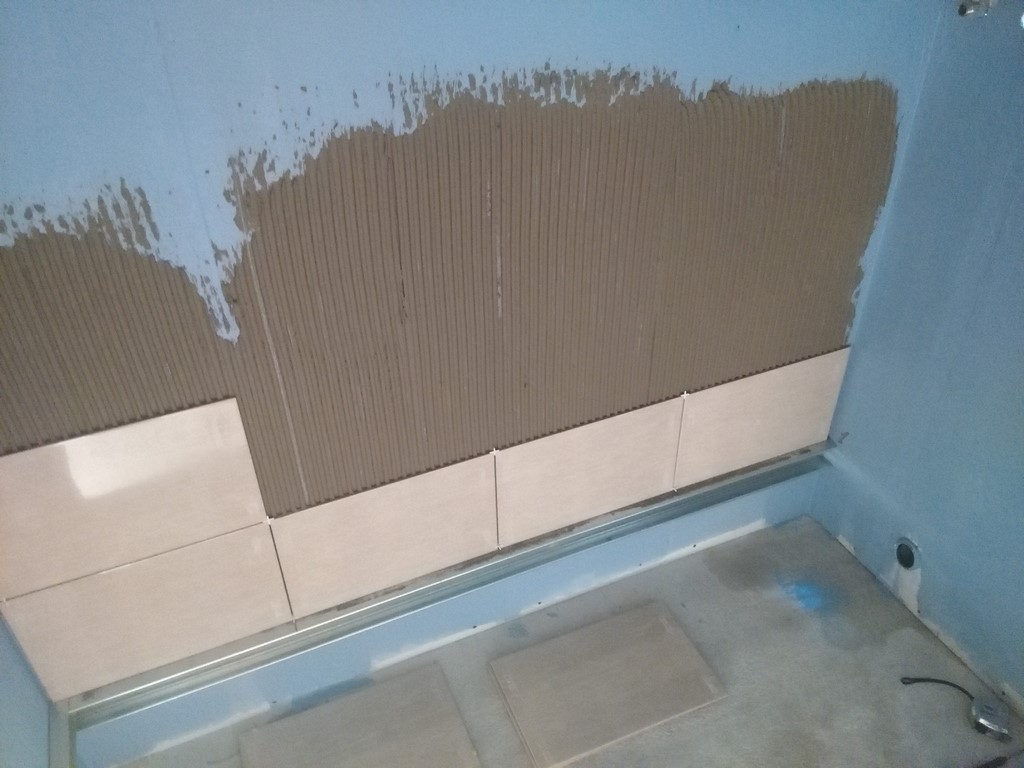
Gluing work ceramic tiles can be started after the waterproofing mastic is completely dry. Usually after 6 hours. Please note that according to the rules, after the mastic has dried, it is undesirable to walk on it.
According to the rules, waterproofing is done in the evening before leaving, in the morning the tiles are laid.
First, the walls and corners are waterproofed, including the corners of the floor. Then the tiles are glued to the walls without the bottom row. Then the floor is waterproofed. And the next day the tiles are laid on the floor.
If a long time has passed between laying the tiles and applying the waterproofing, more than 3 days, the operation to apply the waterproofing must be repeated in one layer without priming.
Caution: Work with rubber gloves.
The waterproofing of the bathroom or shower, performed in accordance with all the requirements, will save you from problems with leaks, mold, flooding of neighbors for many years. You will also save yourself from unplanned costly repairs.
For more details, see the official video guide from Kiilto below.
When renovating a bathroom, its walls and floor must be waterproofed. This is necessary to prevent the appearance of fungus, the growth of bacteria. The choice of compositions for moisture protection depends on the type of finish and the characteristics of the room itself.
So, it is planned to waterproof the bathroom under the tiles: why and which is better to choose?
The waterproof layer protects building and decoration Materials from the destructive effects of moisture. The service life of floor and wall materials depends on the correct selection of waterproofers and the quality of work.
If you make a mistake, then the finish will quickly become unusable, and the materials themselves will be infected with a fungus that is very difficult to remove.
It is advisable to perform high-quality waterproofing of all structures - floor, walls, ceiling. Ceiling treatment protects the bathroom from being flooded by neighbors; floor - prevents water from seeping into the apartment below.
If everything is clear with the relevance of moisture protection of the floor and ceiling, then the need for wall insulation is sometimes in doubt. Why is it needed? Waterproofing materials on the walls do not allow the growth of fungi and bacteria, preserve the finish, and prevent cracks.
Cracks in building materials, which can appear with prolonged exposure to moisture, contribute to the flow of cold air into the room. This creates certain health risks for the people who use the bathroom.
Dampness and cold air currents accelerate the destruction of building materials. As a result, plaster deteriorates and crumbles faster, paint bursts, tiles fall off the walls and floor. Therefore, it is imperative to protect the walls at least in those areas where splashes of water constantly fall on them.
In the figure, areas that need particularly careful waterproofing are marked in blue. It is in these places that the greatest dampness of building materials is possible.
Varieties of waterproofing materials
To choose the right waterproofing for the floor and walls in a tiled bathroom, you need to understand the types of insulation materials. They are bought, focusing not only on prices, but also on the structure, properties of coatings, and predicted loads.
Possible options:
- coating compositions;
- pasting waterproofing - roll, film, bituminous materials;
- special hydrophobic plasters;
- waterproof paints;
- impregnating waterproofing;
- compounds based on rubber.
For waterproofing a bathroom under a tile, coating, gluing, penetrating materials, and rubber-based compounds are suitable. It should be borne in mind that plastic films are rarely used for moisture protection of bathrooms.
With all its advantages and an affordable price, polyethylene is the worst choice for a bathroom. The material does not have good vapor permeability. This makes it unsuitable for use in a bathroom - a closed room with high humidity and specific temperature conditions.
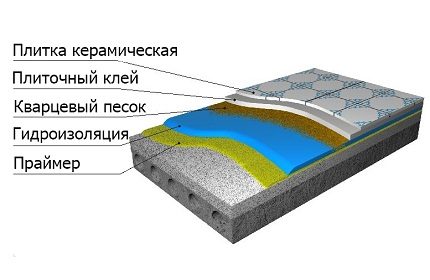
Floor and wall decoration consists of several layers, incl. and waterproofing. Its thickness and functionality depends on the selected materials
An important point: the joints of the floor and walls, the junction of the bathtub to the wall, need thorough waterproofing. Many materials are difficult to apply in corners with an impermeable layer, so sealing cords or tapes should be chosen.
The sealant cords are made from hygienic materials that prevent the growth of fungus and mold. They are laid at the joints, firmly glued to surfaces, and closed with a fine finish. Such a cord can serve for decades.
How a tape or a sealant cord is laid is shown in the video:
The main requirements for the quality of moisture protection
Waterproofing materials should be applied in such a way that, after drying, they form an integral coating without gaps, therefore all work is carried out in a relatively short time.
If the coating is two or three layers, the next layer is applied immediately after the previous one has dried. This allows for the best adhesion of materials. Time intervals are minimal.
When using roll materials, the dimensions of the overlaps provided by the manufacturer must be observed. When insulating the floors at the joints with the walls, it is necessary to bring the material onto the walls.
Regardless of what materials or compositions are chosen for insulation work, they should all be applied to clean surfaces. To reduce material consumption and improve adhesion, primer mixtures are used.
What materials to choose for waterproofing walls?
For waterproofing the walls of the bathroom under the tiles, several different types materials:
- Bituminous and polymer mastics. A very popular waterproofing option. Simple application technology, efficiency and durability make it extremely popular. Many brands of mastics are universal and suitable for any premises.
- Impregnating. These are liquid formulations that are applied to the substrate with rollers or cysts. They are easy to use, serve as much as the building material itself, with which it was processed. At the same time, they strengthen the base and extend its service life.
- Membrane. When choosing membranes, you should carefully read the scope of application of a particular material. The instructions must clearly indicate that the membrane of this brand is suitable for internal waterproofing of premises. It is undesirable to choose too thick films, because they are less elastic.
- Expanding cement. It increases in volume during the solidification process. Thanks to this, the cement fills the smallest cracks and crevices, reliably plugging them and preventing moisture from entering.
Before starting work, remove old coatings and clean the bases to concrete. Only after this, the surfaces are leveled and prepared for waterproofing.
What is the best way to waterproof a bathroom? For tiles, coating and impregnating compositions are often chosen.
To apply them, you do not have to hire professional builders, all the work can be done by hand, and this is a serious cost saving.
In recent decades, decorative panels that are initially water-repellent have become popular.
The only disadvantage of this type of waterproofing is the high cost, but if the budget allows, then this is an excellent option, because the panels will last for several decades.
The features of installing moisture-resistant panels are described in the video tutorial:
What is suitable for protecting the floor from water?
What materials are best for waterproofing the bathroom floor under the tiles? By and large, almost any will do, depending on the preferences of the owner and his financial capabilities. It is important to consider the service life so that the waterproofing lasts no less than the finish.
Roll-up waterproofers can be placed under the concrete screed, but often they are replaced by coating materials, because they are more comfortable to work and create a durable elastic protective layer... They can be applied both under and over the concrete screed.
Lubricants are well combined with penetrating waterproofing. In this case, the base under the concrete screed is protected with a coating compound, and the finished screed is impregnated with a penetrating compound.
This guarantees 100% protection against any “floods”.
Modern roll materials are easy to install. For their gluing, special adhesive tapes are provided, which reliably fasten the strips
Popular bathroom waterproofing technologies
If you plan to do all the work yourself, it makes sense to choose the most available materials, for the installation of which you do not need expensive equipment or special skills.
The video shows a lesson on waterproofing a bathroom, in which the general procedure for work is described in stages:
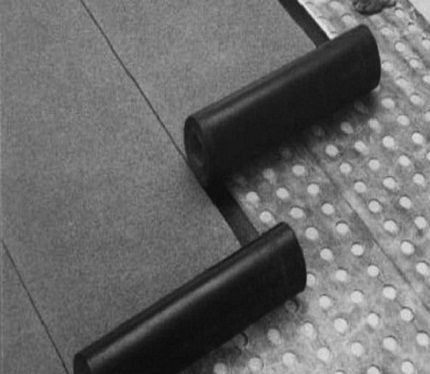
Option # 1: using roll materials
For waterproofing the floor in the bathroom under the tiles, you can choose fiberglass or fiberglass. These are rather expensive materials, but they do not have the disadvantages inherent in traditional roll waterproofing - roofing material, glassine, etc.
Fiberglass and fiberglass are not subject to decay, so they are practical and durable. However, they have their drawbacks. When unrolling rolls and installing strips, be careful not to break them.
There are three main mounting techniques. They vary in complexity and equipment used:
- Fastening. This method is not very popular. Fasteners will be required. The rolls are mounted on the subfloor and the punched areas are carefully insulated.
- Fusion. A heat gun is required to fuse the material. This equipment is used indoors - where gas burners are inapplicable. For waterproofing bathrooms, fusing materials are used relatively infrequently.
- Gluing. This is the best option for arranging moisture protection. The materials are glued using bitumen-polymer mastics or adhesives... The mastics create an additional protective barrier. When choosing them, one should pay attention to the temperature regime at which the materials retain their properties.
Before starting work, the cut strips of material must "lie down" for a day. This is necessary so that they even out and bubble less when laying.
The procedure for gluing waterproofing:
- The base is checked using a level. If necessary, leveled with a concrete screed. The joints of the floor and walls are rounded so that the material does not crack during installation. After that, the base is thoroughly cleaned of debris, dust, dried, and primed.
- The rolls are cut into panels of the required length. The finished strips are rolled out and treated with diesel oil (it cleans and promotes greater elasticity), left for a day.
- The base is covered with the mastic selected for gluing the roll material.
- Strips are glued onto the mastic with an overlap of about 10 cm, if there are no other manufacturer's recommendations in the instructions for the material.
- The bubbles formed during installation are carefully cut, the edges of the material are folded back, coated with mastic and glued to the base again, smoothed.
- To improve the adhesion of waterproofing to the next layer - a concrete screed, it is coated with mastic on top and sprinkled with coarse sand.
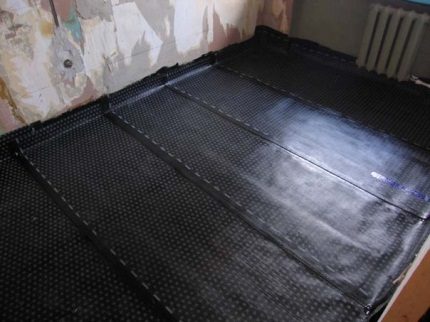
When waterproofing the bathroom floor with roll materials, the joints of the floor and walls are finished by putting stripes on the walls by 15 cm
Option # 2: device for coating waterproofing
There are many types of waterproofing mastics. The most popular are bitumen-containing, polymer and cement-polymer. All of them fill pores and cracks well, after hardening they form a dense water-repellent layer.
For rooms with a complex configuration, it is best to choose exactly coating waterproofingsince The mastics are easy to apply to the ledges. When buildings shrink, the coatings do not crack and reliably protect surfaces for many years.
Application technology is simple:
- The surface to be treated is cleaned, dedusted, leveled if there are drops of more than 2 cm. To improve the adhesion of materials, the base is moistened with clean water or primed.
- The easiest option is to use ready-made formulations. If a dry mixture is chosen, then it is diluted with water at room temperature in the proportions recommended by the manufacturer, and stirred until a homogeneous mass is obtained. After that, leave for 3-5 minutes and mix again.
- Use the mastic immediately. It is applied in two layers, and the corners and joints are trimmed with tape, carefully pressing it into the waterproofing layer.
- A reinforcing fiberglass mesh is laid on top of the finished coating. When the material is dry, the last layer of mastic is applied, completely covering the mesh without gaps.
The video shows the main stages of work with a description of the technology:
Option # 3: plaster waterproofing
For plaster waterproofing, mixtures with polymer additives are used that improve the properties of materials. The most famous brands are Knauf and Tserezit. These are time-tested, high-quality mixtures that are excellent for treating surfaces in bathrooms.
Important! When choosing waterproofing, give preference to materials of the same brand. They go well together and complement each other. For example, when working with a mixture of "Ceresit CR65", it is worth buying a sealing tape "Ceresit CL52".
Composition application technology:
- The surface of the base is prepared: cleaned, treated with a primer.
- The corners and joints are sealed with a special tape.
- A solution is prepared and applied to the surface in one direction, and the next - in the perpendicular to it.
- Waterproofing is done in two or three layers.
Compositions for plaster waterproofing are universal. They can be used for any finishing materials, incl. ceramic tiles
Option # 4: impregnating compounds
Impregnating waterproofing materials include compositions based on bitumen, polymers, water glass, etc. They share a common property: they saturate the base, strengthening its structure.
Impregnating compounds form hydrophobic compounds that change the characteristics of building materials. As a result, concrete or brick acquires water-repellent properties and becomes compacted.
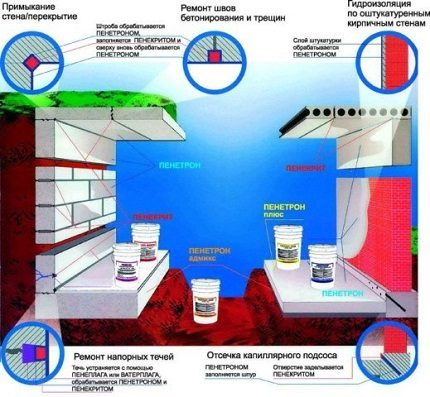
Impregnating waterproofing also includes penetrating waterproofing. The materials of the Penetron system are very popular among our compatriots. These are several types of mixtures designed for different types of work, and polymer repair tapes.
The advantage of penetrating materials is that they can be used not only for arranging new waterproofing, but also for repairing an old one that has lost its properties
Application technology:
- The base is prepared: cracks, seams are closed; cleaned of debris. Further preparation depends on the type of material and the manufacturer's recommendations. Before using Penetron, the surface is often wiped with 9% vinegar, dried, and then abundantly moistened.
- If a dry mixture is used, dilute it according to the instructions. The amount should be such that the solution is sufficient for 30-40 minutes of work. After this time, it becomes unusable.
- The waterproofing compound is applied with a brush or roller. After the first layer has set, the surface is re-treated.
- Complete drying time depends on the selected composition. If Penetron is used, it will take three days. During this period, the surface is regularly moistened in order to achieve good crystallization of the resulting compounds.
Some useful tips from a specialist:
Final conclusions
There are many materials for waterproofing a bathroom, and it is difficult to decide which is better for the tile. However, you can choose based on the basic properties of the finished coatings.
So, it is strongly not recommended to use paint compounds under the tiles. They are short-lived and will last less than the finishing material. When the waterproofing layer collapses, fungus may appear in the bathroom, and the tiles will flake off.
If the choice is made in favor of penetrating waterproofing, then it must be taken into account that it is used only for concrete foundations... It is ineffective when used on stone or brick surfaces.
For waterproofing the bathroom floor, it is better to choose gluing materials in combination with high-quality mastics. Such protection will last for several decades, but it can only be used under a screed.
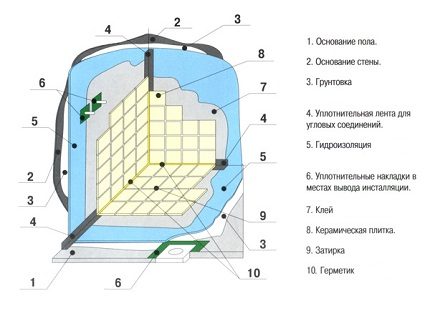
- Waterproofing materials
- Isolation points
- Shower base
- Wall sealing
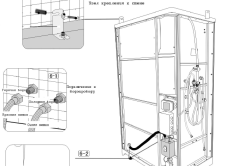
Having planned the installation of a shower stall, it is worth paying close attention to its proper waterproofing and taking care that moisture cannot penetrate into the concrete floors. In the future, this will prevent leaks, flooding of the bathroom and neighbors, the appearance of fungus and mold on the walls of the room. Also correct waterproofing shower cabin will be able to provide optimal hygienic conditions, which will positively affect the health of the person using the bathroom.
When installing a shower cabin in the bathroom, you must carefully monitor the quality of waterproofing.
Waterproofing materials
The correct choice of materials for waterproofing a shower stall should be based on information about what the walls, floors of the room and the shower stall are made of. Usually, one material is enough to seal, but the best result can be achieved by applying complex waterproofing using each of the materials in a particular area of \u200b\u200bthe bathroom and shower in particular.
All types of waterproofing can be roughly divided into:
- coating options;
- penetrating waterproofing;
- use of roll materials;
- the use of polymer-cement compositions;
- elastic type of waterproofing.
Roll waterproofing is made using bitumen reinforced with polyester or fiberglass with the addition of polymers. They are both self-adhesive, laid without the use of any additional devices, and welded, which are mounted using a gas burner. Such materials can be used for waterproofing both walls and floors. When installing welded roll materials, a special burner is needed, which not everyone has, and it is not very convenient to work with it in a small room. But the main disadvantage of this method is the high surface requirements. Its irregularities should not exceed 0.2 cm, and sharp chips are categorically unacceptable.
The coating option is more modern than the previous one. These are various bitumen-based mastics. This view insulation is also called liquid rubber. The main advantages of this method include a high degree of elasticity, good adhesion to an insulated surface and a long operating interval. They are easy to apply to flexible and rigid substrates. For reliability, a cement screed is placed over the coating seal.
Particular attention should be paid to the choice of high-quality waterproofing material.
Polymer-cement compositions look like a dry mixture that must be diluted with water. This method is suitable for both walls and floors, and the high degree of elasticity eliminates the need for additional screed.
Polymer mastics allow you to isolate showers and bathrooms from moisture and liquids at a fairly advanced level. The composition penetrates deeply into the surface to be treated and provides high levels of water resistance.
It is important that cement-polymer mastics are resistant to high temperatures and go well with the underfloor heating system.
Back to the table of contents
Isolation points
When installation works it must be borne in mind that any bathroom has places that are more susceptible to the destructive effects of water than others. These include walls and floors, joints between them. They require complete waterproofing.
The floors must be insulated with access to wall slabs at least 20 cm. This is due to the fact that the joints between the floor and the wall are most vulnerable to moisture and it is from here that the concrete wall collapses.
The shower stall itself needs waterproofing 20 cm above the shower head attachment, but in order to avoid unforeseen situations, it is better to seal it up to the ceiling. When waterproofing the cab side walls waterproofing material it is advisable to enter at least 0.5 m beyond its limits. Risers with pipes are also referred to as wet areas. The rest of the surfaces can be attributed to the wet area.
Back to the table of contents
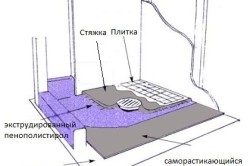
Shower base
First of all, you should clean the surfaces from dirt. All debris must be swept out and dust collected with a vacuum cleaner.
Next, you need to install a drain for the pallet, treat the seams of the plug with a moisture-proof sealant. Then the floor should be leveled to install the cab. Otherwise, a lot of insulating material may be lost.
Polystyrene foam plates are glued to the base for the pallet, which insulate the structure and protect the pallet from capillary suction.
Next, a mounting mesh is glued to the expanded polystyrene, a screed is poured shower tray... After it dries, all cracks, edges and corners are filled with a sealing material, for example, liquid rubber. Liquid rubber It is also applied to the concrete screed of the shower tray, and it is better to do this in several layers. Required amount layers and drying period should be in accordance with the recommendations in the attached instructions. It should be remembered that the application of layers of the composition is carried out "crosswise".
After that, you can fix the finishing materials and put a shower stall. You can pour water on the structure and make sure moisture remains on the floor.


