Specialization: Capital construction works (foundation laying, wall construction, roof construction, etc.). Internal construction work (laying of internal communications, rough and final finishing). Hobbies: mobile communications, high technology, computer technology, programming.
Floor waterproofing is a guarantee of the absence of "precipitation" in the apartment of the neighbors below.
No one thinks about why waterproofing the bathroom floor under the tiles is needed until water starts dripping from the ceiling while shaving. More precisely, not to drip, but to pour in a stream. This is the story that happened to me recently.
Going upstairs, I quickly solved this problem. As it turned out, a young girl living there started a bathroom renovation. And the cause of the water leak was an old tap, which was temporarily installed on a partially dismantled water supply system.
The damage caused by this morning flood was not so great, so I did not raise the issue of compensation. However, he advised her, in order to avoid problems in the future, to waterproof the floor and part of the walls, describing in detail how to do everything necessary.
The story that happened was the reason for this material, in which I want to tell the amateur masters about how to do waterproofing in the bathroom with your own hands.
Choosing a floor protection option from water
Whichever method is chosen for the work, waterproofing concrete surface under the screed in the sanitary room (as well as waterproofing the wooden floor in the bathroom) is aimed at creating a waterproof pallet with low sides glued to the walls.
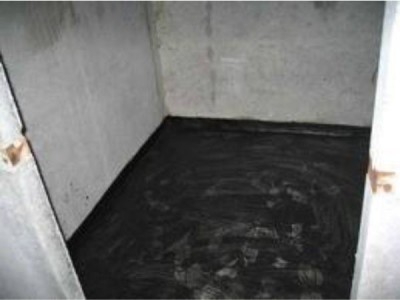
Such a self-made "trough" will collect water condensing on the walls or spilled from plumbing fixtures, preventing it from flowing into the thickness of the interfloor and further. This will not only protect your neighbors from flooding, but also prevent mold and mildew.
As you can see, the task facing the wizard is one, and the rules for performing it can vary greatly. The choice of the best way to solve the problem depends on many external factors:
- condition of the rough surface, that is, the subfloor - some types of insulation require preliminary alignment, which is not always possible or acceptable for me personally;
- technical characteristics interfloor overlap - for example, materials for waterproofing a wooden floor in a bathroom are different from those that will be used for concrete;
- the planned timing of the repair work- the waterproofing layer made of some materials can dry for a very long time, therefore, in order to speed up the timing of the work, I resort to other options;
- number of storeys of the building;
- the possibility or impossibility of reducing the distance between the floor and the ceiling -in some buildings, the height of the ceilings is so low that it will not work to equip a multi-layer waterproof cake if you do not want to take a shower while bent over.
Sometimes the choice of specific technologies is influenced by the banal presence or absence of the necessary tools. For example, if you do not have a building hair dryer or a gas burner, you should not take on the fusion of waterproofing. It is better to prefer something with a simpler application technology.
Of course, even I, who have done more than one hundred repairs in the bathrooms, have not yet found the ideal option, so I will be careful not to advise anything specific. I'd rather tell you about the pros and cons of different methods so that you can decide for yourself how and with what to waterproof your bathroom floor.
Floor waterproofing methods
The most effective way to waterproof the bathroom floor is to use a polymer liquid flooring, roofing material or bulk soil mixed with bentonite and liquid glass. However, no one resorts to such methods, although the instructions for their use do not prohibit this.
Obstacles to the use of the methods described above are the high cost of materials, the need to fill in a thick layer and the unpleasant odor emitted by the materials.
- Application of hydrophobic mixtures to surfaces, which, after curing, form a homogeneous waterproof membrane (for example, polymer mastic or bitumen-based products).
- Bonding to rough floor roll materials that do not allow condensed moisture and water to penetrate into building structures.

Depending on what materials are used for waterproofing the bathroom floor, a distinction is made between coating and pasting technologies. Although the basis of all water-repellent mixtures is bitumen. I'll talk about these two methods in more detail.
Lubricants
The distant ancestor of such materials was animal fat and vegetable oilsthat were used by our ancestors. Now I buy everything I need in hardware stores. There are three types of materials:
- dry mixtures that need to be prepared for use by mixing with tap water or polymer emulsion;

- ready-to-use mastics and pastes supplied in hermetically sealed containers.
Depending on the consistency of your chosen waterproofing, the following are used to apply it to the treated surfaces:
- wide paint brushes on sticks - I use such tools if the acquired water-repellent composition resembles paint in fluidity;
- spatulas with teeth - suitable in the case when the coating looks like children's plasticine.
By the way, the consistency of the material directly affects the thickness and efficiency of the finished product. protective layer... Therefore, the scope of application of certain products differ:
- Liquid water-repellent mastics are made from a special method of oxidized petroleum bitumen. They are applied in two layers, which should be placed perpendicular to each other. After hardening, a thin, sealed membrane 1 mm thick is formed.
I use these materials in cases when a cement screed is then poured from above, special operational properties are not required here. The main thing is to be clean and dry.
- Bituminous pastes, which, in addition to bitumen, contain additives and modifiers based on polymers or minerals (cement-polymer mastics). They also fit in 2-3 layers, forming a sealed membrane with a thickness of more than 3 mm.
For me personally, the paste is good because, in addition to water-repellent properties, it plays the role of a screed. It is even reinforced in some cases. Only not with a metal mesh, but with a polyvinyl chloride one.
I will say in advance that it is necessary to apply each next layer of paste or mastic only after the previous one has completely dried (unless otherwise provided by the instructions). Therefore, the operation to waterproof the floor and walls in the bathroom can take quite a long period of time.
The use of the materials described above subtracts a certain number of millimeters or centimeters from the distance between the floor and the ceiling. If you cannot allow this in any way, you need to buy and use a penetrating waterproofing compound (impregnation).
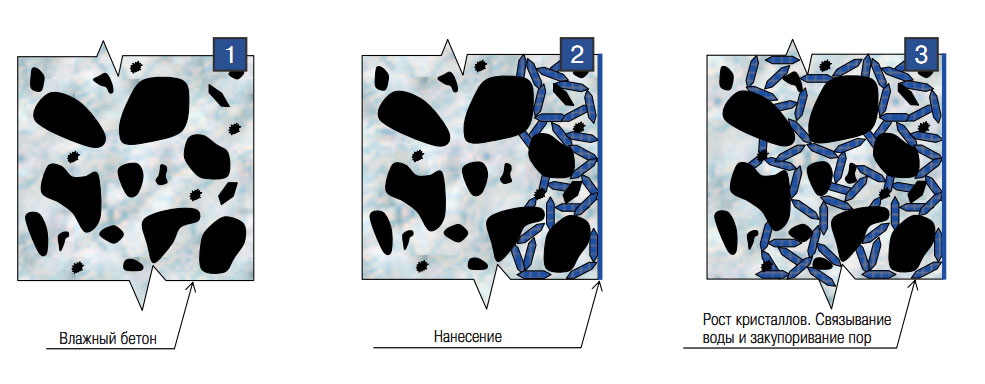
As the name suggests, the impregnation after application is absorbed into the surface to be treated, retaining moisture on the surface. The principle of its operation is based on the formation of needle-like crystals in the thickness of concrete or other similar material, the base of which is deployed to the place where water is supposed to appear.
Therefore, the waterproofing composition does not prevent air infiltration through the enclosing structures, which has a positive effect on the microclimate inside the sanitary room.
The only drawback of the last solution is the high cost of the material. But if the bathroom is already too low, another option is unlikely to suit you.
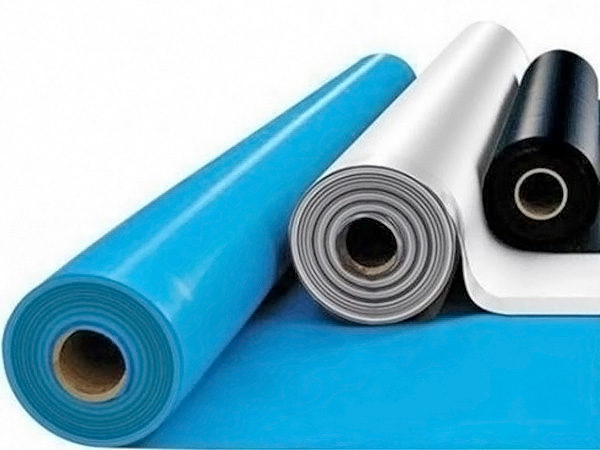
Gluing materials
In childhood and adolescence, I knew only two types of waterproofing materials of the gluing type. It was roofing felt and roofing material. However, they do not stand up to criticism in terms of environmental friendliness and ease of installation.
Now they have been replaced by new waterproofers based on polyester, fiberglass or fiberglass. The outer and inner surfaces are treated with bituminous resins, which give the products water-repellent properties.
For ease of installation, the bottom of the pasting materials is covered with a special substance, which holds the membrane on the base. The top is additionally treated with a component that improves the adhesion properties of the surface. This is done to make it easier to install decorative trim.
Some gluing materials are covered with sand with a medium fraction on top, which can crumble during installation. There is nothing wrong with that, the peeled off excess can simply be swept away with a broom.
In turn, gluing waterproofers are divided into two groups:
- Mounted with a gas burner or. In them adhesive composition acquires its properties only after heating.
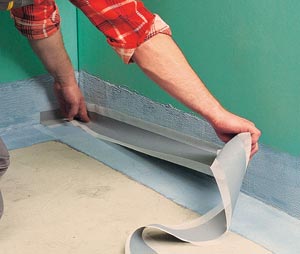
- Glue-mounted. In this case, you just need to cut the roll into sheets of the required size, then remove the protective film and glue the membrane to the protected surface.
I recommend the second option to all inexperienced and novice craftsmen. Moreover, when heated, lining membranes often emit chemical compounds dangerous to humans, which cannot be allowed in bathrooms due to their small size.
To make it easier for you to choose, I will indicate all the pros and cons of membrane insulators:
| Benefits | disadvantages |
| Low cost of waterproofing materials. For purchase necessary materials you will need much less money than in the case of coating. | The material can only be glued to a pre-dried surface with a height difference of no more than 2 mm. Otherwise, you will have to additionally level the base. |
| The strength of the attachment to the base. After gluing or fusing onto the surface, the waterproofing will not budge, no matter what construction work is carried out next. | I highly do not recommend using fused types of waterproofing in bathrooms, as they emit harmful substances when heated and continue to do so during operation. In extreme cases, they can only be installed under the concrete floor screed. |
| After the end of the installation process, you can immediately proceed to other work, without waiting for the complete solidification of the composition (and even more so, you do not need to waste time to polymerize several layers of water-repellent coating). | Laying membranes requires careful processing of corner joints and joints. If something is done wrong, it will not be possible to create a homogeneous waterproof layer, since the liquid will flow into the holes formed. |
Be that as it may, waterproofing is widely used to protect a wooden floor: under a tile or other type of decorative coating. The fact is that elastic membranes tolerate well the movements of the base, which are not uncommon during the operation of timber buildings. Moreover, they do not close the pores. natural material, therefore, do not disrupt the aeration processes.
Waterproofing technology
Now that you know everything you need to know about the waterproofing materials used, I will move on to the story of exactly how to perform the necessary work.
However, before that, I want to discuss the question of what to do first - waterproofing or screed. After all, the answer to it has been the subject of controversy among professional craftsmen for more than one year.
Some advise to perform waterproofing under a layer of concrete screed (that is, before it is applied). Then tile can be glued on a flat concrete surface, which is perfect for this.
Others say that in the case described above, when water flows, the concrete layer is moistened, as a result of which mold, an unpleasant odor and other troubles appear in the bathroom. Therefore, they advise to glue the waterproofing already on the screed.
So, it seems to be not bad, but the tile fits extremely badly on a thin layer of water-repellent material and there is no need to talk about reliability.
I propose to make waterproofing using our own universal technology, which I consider to be the most correct, reliable and high-quality (well, how else?). I'll tell you about it.
Preparatory stage
So, first, I perform several preparatory actions, which greatly affect the quality of work:
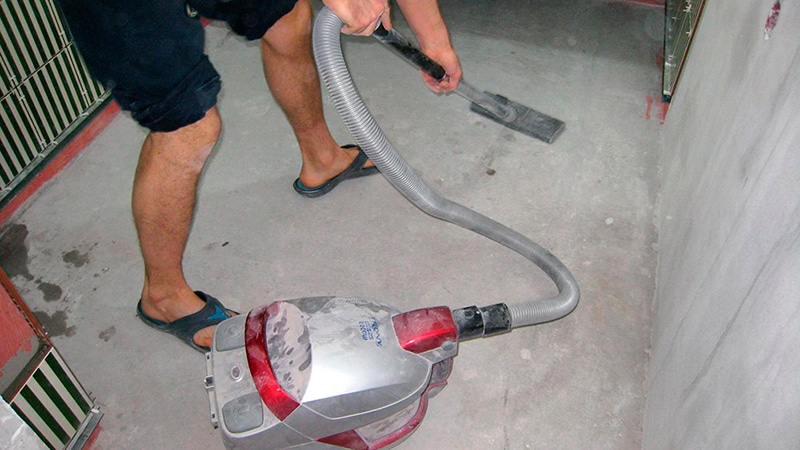
- Thoroughly clean the surface of debris. It is best to use a vacuum cleaner for this purpose, which thoroughly removes dust from the mineral surface.
- I carefully examine the old screed for hidden cracks, potholes and other defects. You need to tap the surface, and if you hear such a "boom", it is better to dismantle that area, as it will negatively affect the strength of the floor and the effectiveness of waterproofing.

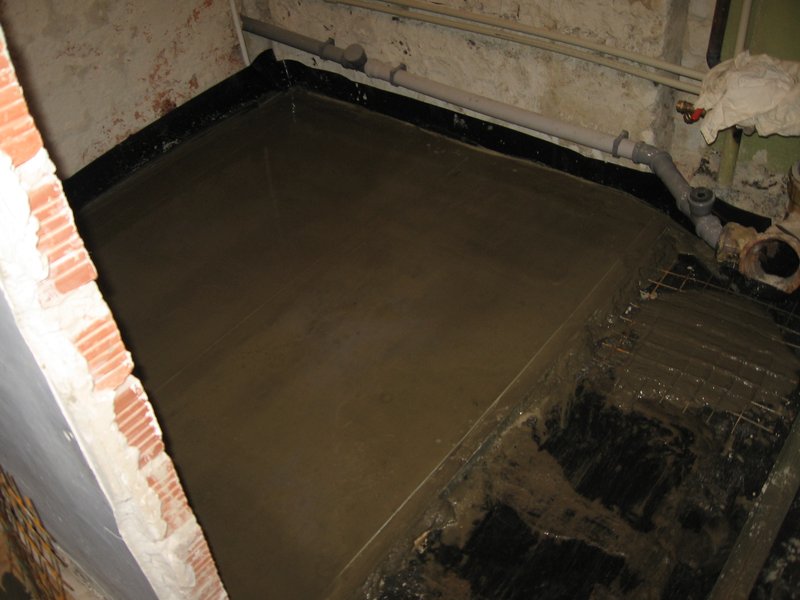
- I install beacons and carry out cement screed floor. To increase the reliability of the base, I pre-lay the reinforcing mesh. Once the mortar is poured and the surface is leveled, you can rest for at least a week until everything is dry.
- After that, the concrete must be dedusted. For this I use primers. To achieve the maximum effect, I always treat the floor twice with intermediate drying.

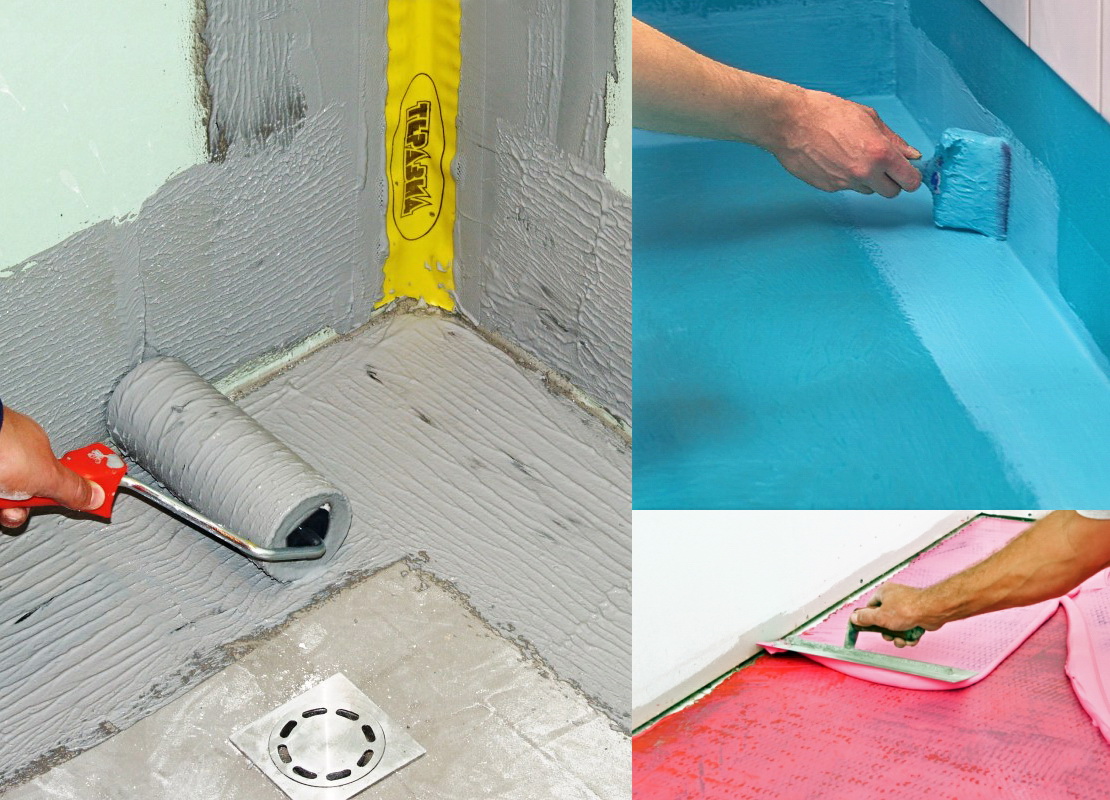
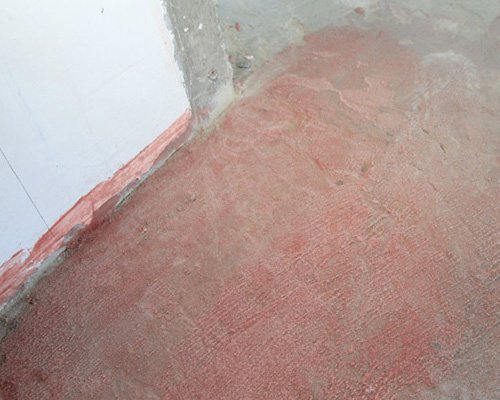
- I process the corners of the room and the joints of the walls and floor with coating waterproofing. As soon as it dries, I glue the self-adhesive rubber-based sealing tape there.
This completes the preparation for waterproofing the mineral surface. And you can proceed to the main stage of work.
The main stage
I continue to work according to the following scheme:
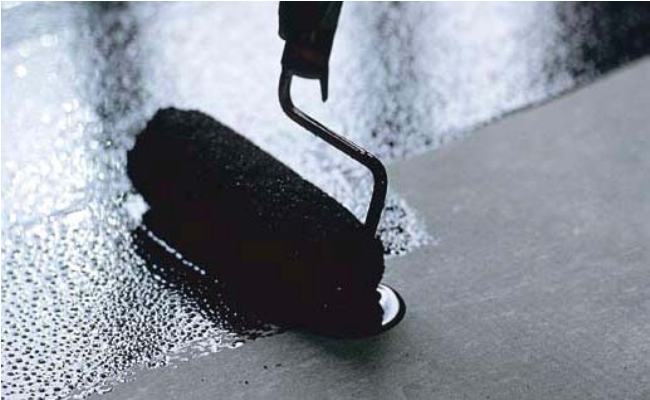
- I cover the entire prepared surface of the bathroom floor with a coating waterproofing. I prefer to work with a liquid composition, so I use a roller with a long handle (so as not to crawl on the floor).
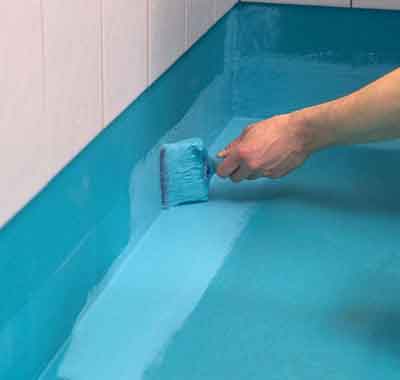
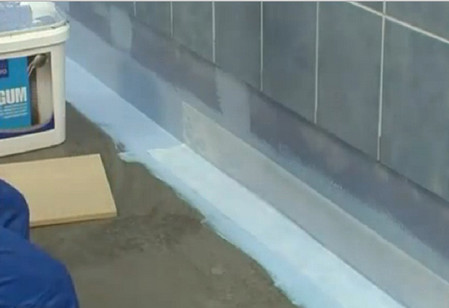
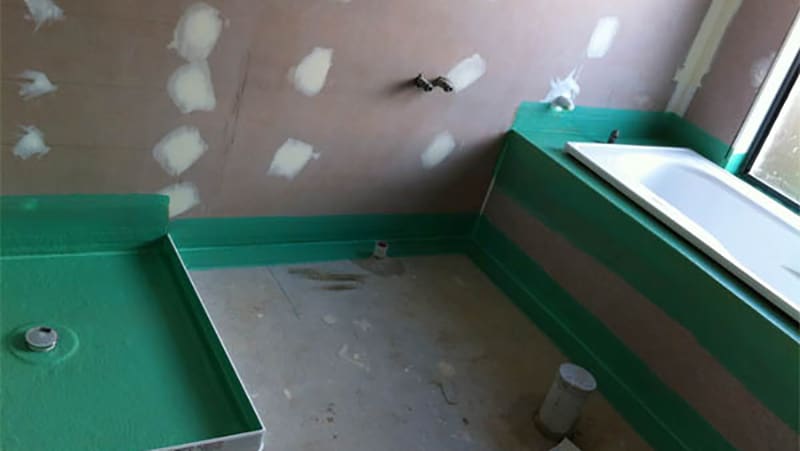
To form the "bath", which we talked about at the beginning, you need to cover the walls with the selected material to a height of 20 to 40 centimeters.
I prefer to treat the floor with three coats of water repellent mastic. Each layer must be dried for at least a day, so this is not a quick event.
- A primed waterproofing surface with a primer filled with quartz sand. This composition makes it possible to greatly improve the adhesion properties of the surface, which is important for further stages of work.
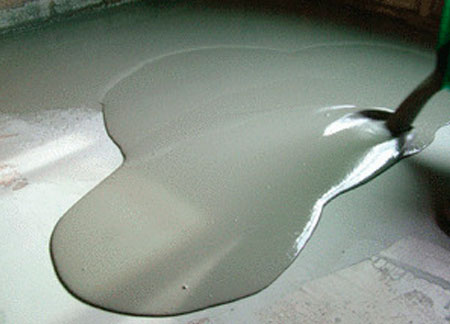
- After the soil has dried, I fill the surface with self-leveling flooring mixture. You can also use a regular self-leveling floor, but in this case you will have to distribute it yourself and align it with the newly installed beacons.
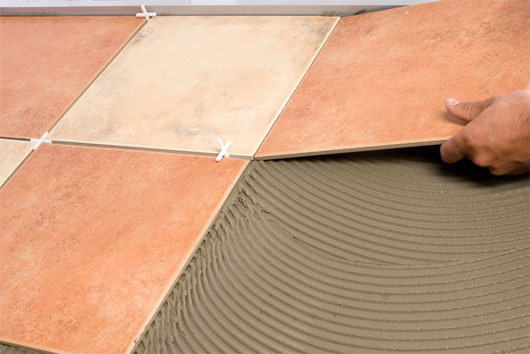
- As soon as this solution hardens, you need to prime the floor again. This is the last stage of the work, after which you can start tiling the surface with tiles, gluing it to a suitable cement-adhesive mixture.
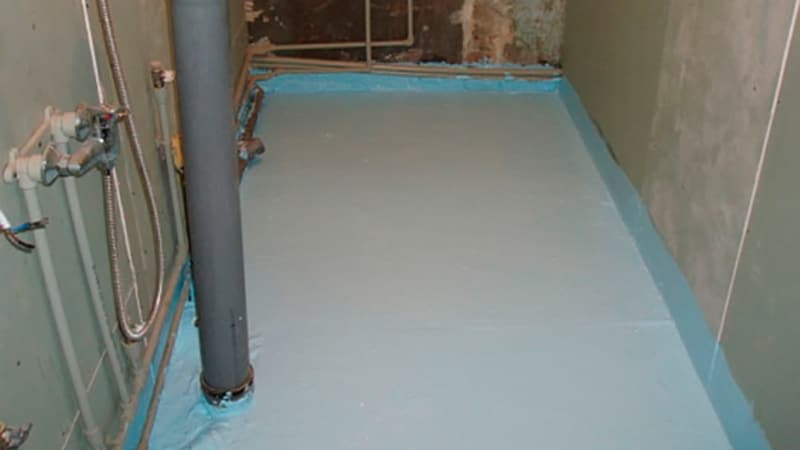
At the end of the work, I have a durable multi-layer floor that does not allow water to pass through and serves as an excellent base for tiles.
Features of waterproofing a wooden floor
While I was preparing this material for you, the father of the girl who made the flood called me and asked me to tell you how to properly waterproof the floor in wooden house... It turned out that he is now building a cottage from a profiled beam somewhere outside the city and having learned about the current situation and the fact that I am a specialist in the field of construction, he asked for appropriate advice.
I must say right away that wooden base requires a special approach to waterproofing, as it is subject to significant shrinkage during operation. Therefore, if the technology is violated, a defect may appear in the waterproof sealed layer, which will nullify all the efforts made.
But I'll start in order and, as usual, with the preparation stage.
Preparatory stage
Before proceeding with the application of hydrophobic materials, you need to carefully inspect the wooden floor, cleaning it of dust and debris. Found cracks and other similar defects, I always cover with mastic to ensure the most tight fit of the waterproof membranes.

Moreover, natural construction material, which is a tree, I recommend treating with an antiseptic, which will not allow the development of mold and mildew.
To improve the adhesion properties of the surface, the wood is also coated with a primer. I take dry powder and dilute it with the same amount of water. After mixing, the material should resemble fat sour cream. I cover the wooden floor with it and wait until it dries completely.
The main stage
For waterproofing a bathroom with a wooden floor, I advise you to use gluing materials. They allow you to make a multi-layered waterproof cake that will be elastic enough so as not to lose its tightness when the base moves.
The selected membrane material is always glued to the substrate using a bitumen-based mastic. I apply it to the surface with a layer of about 2 mm, after which I roll out the rolls of the waterproofer. So I repeat three times to get three layers.
Then I process the joints with a waterproofing putty containing polymer additives. Well, on top you can glue tiles. For more information on preparing a wooden floor for decoration, see the video in this article.
Conclusion
Waterproofing the bathroom floor is an integral part of the renovation of a plumbing room. This is the only way to be 100% sure that the neighbors from below will not come running to you one morning, demanding to shut off the water and compensate for the losses. If you have any questions, let us know in the comments.
A bathroom in an apartment or house is a room in which the concentration of water vapor in the air is always the highest due to the use of large volumes of hot water. Water vapor constantly forms condensation on the walls, and the use of the shower leads to the direct ingress of water onto the walls. Even with the highest quality tiling, moisture can gradually penetrate under the finish through the seams.
The waterproofing of the bathroom walls, along with the floor, is primarily intended to prevent flooding from the neighboring apartment, and, conversely, to prevent the flooding of neighbors in the event of a pipe break.
This contributes to the destruction of both the finishing coating and the wall material itself. Especially if the walls are not concrete, but are lined with silicate bricks, gypsum boards and other small-sized materials that are negatively affected by moisture. If the walls are wooden, then the penetration of moisture under the finishing coatings can lead to rotting wood and create conditions for the growth of mold and mildew.
To avoid most of the negative consequences associated with high humidity, it is necessary, in addition to the floor, to waterproof the bathroom walls.
At the same time, it is very important to choose the right materials that are best suited for the walls. For example, most bituminous-based waterproofing materials used to protect basement walls are not suitable for waterproofing bathroom walls. It is almost impossible to carry out any finishing wall coverings based on bituminous waterproofing due to poor adhesion, therefore such materials are not used in bathrooms.
Technologies and materials for waterproofing bathroom walls
Waterproofing technologies with appropriate bathroom wall materials are divided into three main types:
- coating waterproofing polymer-cement materials;
- liquid membranes;
- penetrating waterproofing.
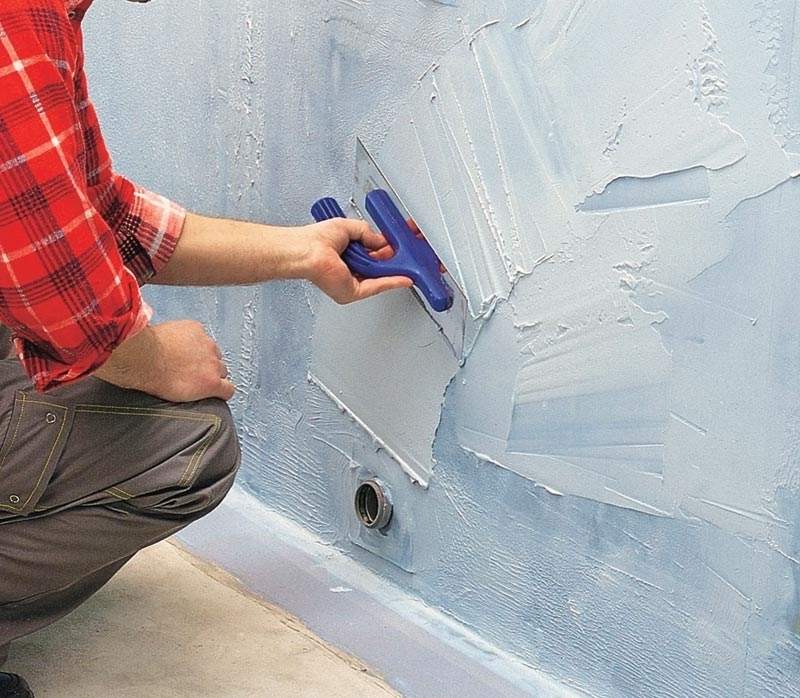
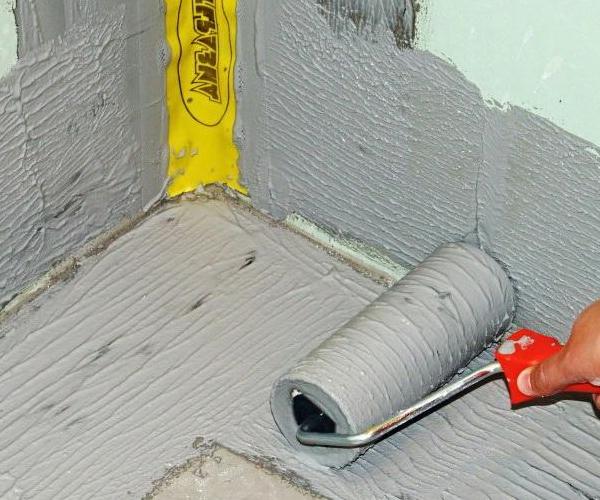
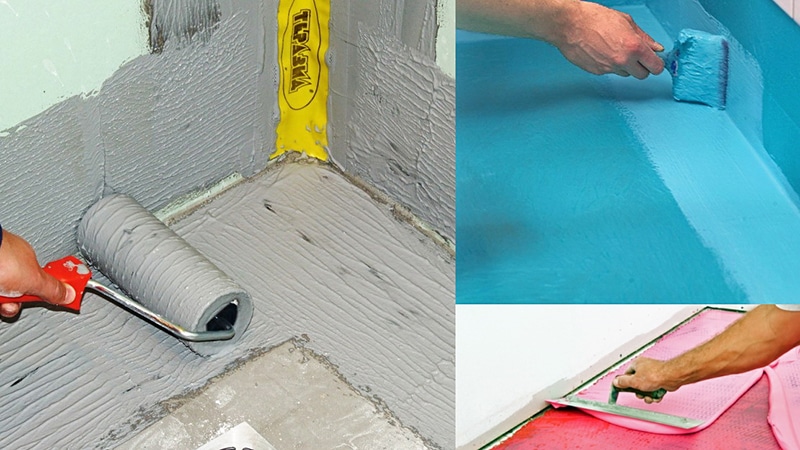
Waterproofing coating with polymer-cement materials
In the building materials market, you can choose polymer-cement materials for waterproofing from a wide range and from many manufacturers. Their composition is approximately the same: these are dry mixtures of Portland cement, fine quartz sand and polymer elasticizing additives, which give the composition waterproofing properties... Additives in mixtures from some manufacturers may be proprietary and confidential.
Dry mixes can be one-component or consist of two different components that are combined before use. One-component formulations contain dispersion polymer powders as additives, two-component formulations contain polyacrylic aqueous dispersions.
Tools for working with polymer-cement compositions:
- maklovitsa - a wide brush for applying solutions to large surfaces and a set of smaller brushes for smearing narrow areas;
- paint roller;
- a set of spatulas;
- level and plumb line - to check the evenness and verticality of the walls;
- a set for plastering works, if necessary, preliminary leveling of the walls - a bucket, a falcon, a rail-usually, a trowel, a trowel;
- electric drill with attachments for mixing ready-to-use materials or preparing them from dry mixtures.
Work technology
Before starting work, directly on waterproofing, the walls should be prepared, depending on the material that will have to work and the condition of the walls:
- 1 Walls must be thoroughly cleaned of dirt.
- 2 Check the evenness and verticality of the walls with a plumb line and level. If the wall is uneven and there are vertical deviations of 2 mm or more, it is better to level it with plaster.
- 3 After the plaster has dried, apply a primer.
- 4 In the places where the floors meet the walls, stick the sealing tape.
Polymer waterproofing materials from different manufacturers there are many, we list some, intended only for internal work: "Lakhta Elastic Waterproofing, Hydromax-2"; Vaskon MA15 (WaSCoN MA15), Hydrostop 94, WaterPlast, Elastoschlämme 1K and many others.
We cannot indicate here the exact ratios of water and dry mix for diluting the solution, so it is better to adhere to the manufacturer's instructions, which are found on each package. First, a certain amount of water is poured into the dry mixture and mixed with a drill with a mixer nozzle until a homogeneous mass is obtained. If the compositions are two-component, you also need to strictly adhere to the recipe for the preparation of such compositions.
Usually, a limited amount of solution is prepared for production in a certain time. If it thickens, the addition of water to the already prepared solution is not allowed. Polymer-cement mastic is applied to the surface, which must be prepared and primed using a spatula or spatula in two or three coats. The thickness of the double-layer insulation is 2-3 mm.
After applying the first layer, it should take from several hours to a day. Before applying the next coat, the first coat must be moistened with a spray gun.
It is better to treat walls in three layers in areas more exposed to moisture - around a washbasin, bath or shower. During work and while the applied solution sets (about a week), the bathroom should be warm - at least +5 ºС. If the room is very hot, it is necessary to protect the treated walls from drying out by periodically moistening them with water from a spray bottle.
Consumption of polymer-cement materials in terms of the amount of dry mix is \u200b\u200bno more than 3-4 kg / m².
After applying all layers of waterproofing for 2-3 days, the surface must be looked after so that cracks do not form - periodically moisten or cover with a film.
A week after applying the composition, you can carry out finishing work with any finishing coatings.
Benefits
Waterproofing a bathroom with polymer-cement compositions is considered effective and popular, as it has many positive properties:
- excellent adhesion to the surface of walls made of concrete, brick, gypsum boards, any other small-piece materials. On the other hand, finishing materials after waterproofing also adhere perfectly to the polymer-cement surface;
- the polymer-cement coating has a high resistance to mechanical stress, it is very difficult to damage it;
- the technology for applying the composition is very simple and can be done by hand without difficulty;
- the composition can be applied to damp surfaces, there is no need for thorough drying of the walls, which is very important before applying pasting waterproofing or bitumen-based mastics;
- polymer-cement mixtures are environmentally friendly, they do not contain any materials harmful to health;
- relatively inexpensive in price in comparison with other waterproofing materials.
Tools
To apply ready-to-use liquid membranes, since they can be of different compositions, you will need different tools:
- spray;
- set of brushes;
- rollers;
- a set of spatulas.
In some cases, waterproofing a bathroom with one type of liquid membrane can be done using any of the above tools.
Technology
For example, consider the technology of the device and features of several types of membranes.
Membranes
Liquid membranes used for waterproofing works, - these are compositions of various materials: urethane, artificial rubber, vinyl, plastic, polymerized bitumen in combination with a solvent. They are applied in liquid form, and after hardening, they form a continuous seamless membrane. Liquid membranes should only be installed on clean and dry surfaces; in the presence of moisture, the membranes do not stick and form bubbles.
When constructing liquid membranes, it is very important to control their thickness, which should not be less than 1.5 mm. This material has a relative elongation of about 500%, due to which it bridge cracks up to several mm wide. The main advantage of liquid membranes is that they can be used to insulate surfaces made of any material - concrete, brick, wood, metal and others - of any complex shape, on ledges and in niches, as well as at the junction of walls with the floor.
Bathroom waterproofing with most types of liquid membranes is done using workwear and personal protective equipment, as they can contain hazardous and toxic chemicals, although there are some types of membranes (silicone) that do not contain hazardous substances.
SOFEXIL silicone membranes

SOFEXIL silicone membranes contain special polymers STP-E (with end silanol groups), which give them such properties as a short drying time, the ability to polymerize at room temperature due to exposure to water vapor contained in the air, can be used in a temperature range of -40 up to +80 ºС, do not stick after hardening. Unlike some other types, silicone membranes are environmentally friendly - they do not contain toxic substances, do not have solvents in their composition and an unpleasant odor, therefore they are especially suitable for indoor spaces... In addition, this type of membrane is characterized by high adhesion to any materials, therefore it is suitable for tiling and other wall materials in the bathroom.
The material is produced ready for use, applied in any way - with a roller, brush or spray. The sufficient thickness of the finished coating is 2-3 mm, it is applied with a spray gun 2-3 times in layers of 1 mm. The consumption is about 1.6 kg / m³. The tensile strength of the membrane is 8.8 N / mm, bridging cracks up to 7.5 mm wide. After application dries up in 3 hours at temperatures above 20 ºС and relative humidity more than 50%.
This membrane consists of a solvent-free synthetic resin in an aqueous dispersion. It is produced in the form of a pasty solution, ready for use in containers of 5, 10 and 25 kg. It differs in that it is applied to walls made of any material - concrete, brick, gypsum boards and plasterboard, wood, aerated concrete blocks, plaster, old tiled cladding, etc.
First, it is necessary to prepare the base: concrete and brick surfaces are cleaned of dirt by flushing with water or a brush. Gypsum or foam concrete blocks of the base are treated with a primer, which must be purchased together with the membrane material. Existing tile or stone claddings are primed with a complete primer.
The membrane is applied with a roller, brush, trowel or spray gun in 2-3 passes approximately 1 mm thick. Each layer is applied crosswise - perpendicular to the previous one after 1-2 hours to allow the previous layer to dry. Material consumption is about 1.5 kg per 1 mm of thickness. After about a day, tiles can be laid on the finished membrane or covered with any other material.
Nippon Ace "3 in 1" liquid displacement membrane
Such a membrane is intended specifically for waterproofing floors and walls before cladding ceramic tiles... Available in 750 ml aerosol containers and applied by spraying, as well as in 2.4 liter cans, in this case, applied by brush or roller.
The material is a composition containing a polymer component, which, after curing, creates a waterproof membrane, a primer that increases adhesion to the surface to be protected and to subsequent tiling, a herbicide complex that prevents the emergence and reproduction of microorganisms - fungus and mold in the bathroom.
The liquid membrane can be used to cover not only dry but also wet surfaces, as it contains a special additive that displaces moisture from the surface to be coated.
This membrane can be used as waterproofing of bathroom walls made of different materials - concrete, brick and masonry, timber, drywall. The material penetrates pores and surface irregularities, creating an elastic and impermeable coating.
Benefits
The use of liquid membranes has the following advantages:
- creates an impervious seamless elastic and durable coating;
- have good adhesion to any wall material, and any finishing coating fits well on finished membranes;
- the technology for the production of work is simple and can be done by hand in different ways;
- due to its high elasticity, it can bridge cracks and other damages on the walls without their preliminary sealing;
- membranes are resistant to aggressive chemicals. They are highly resistant to water containing detergents;
- dry quickly, which greatly reduces the time of waterproofing and finishing works;
- the service life of the walls is much increased;
- protect expensive finishing materials from destruction;
- the formation of an environment for harmful microorganisms is excluded when using certain types of membranes.
Penetrating insulation
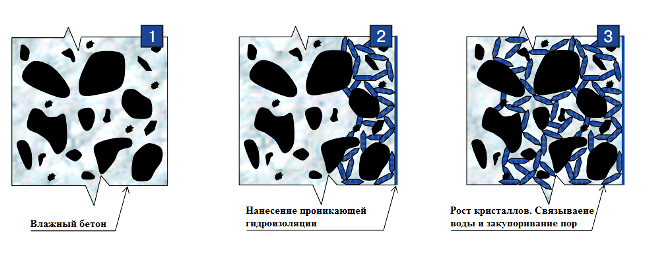
The use of penetrating waterproofing in the bathroom is most effective when the walls are concrete or reinforced concrete. Operating principle: penetrating waterproofing contains special particles with chemically active properties. These particles penetrate into the smallest pores of the concrete surface and, after moistening, begin to crystallize, clogging all cavities and thereby preventing the penetration of water into the concrete.
One of the most famous and popular penetrating waterproofing materials is Penetron. It is a dry mix containing Portland cement, fine silica sand and proprietary chemically active substances. The dry mixture is diluted to a certain consistency, then it covers the moistened concrete surface.
In addition to the Penetron material, other types of penetrating insulation are used for waterproofing, for example, Lakhta, Gidroteks, Kalmatron, Isopron, etc.
Waterproofing walls under the "Penetron" tiles does not require special construction skills, so it is better to do it yourself.
Tools:
- maklovitsa - a wide brush for applying liquid formulations to large surfaces and a set of smaller brushes for smearing narrow areas;
- paint roller for applying liquid formulations;
- a set of spatulas;
- electric drill with attachments for mixing ready-to-use materials or preparing them from dry mixtures;
- mortar pump with spray.
Technology
A solution from a dry mixture with water is pre-mixed, while water is poured into the dry mixture. The ratio should be maintained as follows: 400 g of water per 1 kg of dry mix or by volume - one share of water is added to two parts of the dry mix.
It is necessary to knead such a volume of solution that can be worked out in half an hour. If you cook too much mixture, it can thicken, and do not dilute the thickened mixture with water.
The concrete surface is pre-moistened abundantly with water and the first layer is immediately applied using a spatula, spatula or spray gun. After a few hours, when the first layer has set, it is again moistened with water and the second layer is applied.
It is very important to cover the entire wall surface evenly without gaps or gaps.
Work can only be carried out in warmth at a temperature of +5 ° C. The consumption of the mixture is about 1.1 kg per 1 m² of surface in two passes, calculated as dry mixture.
With the help of penetrating insulation, it is possible to waterproof, in addition to concrete, walls made of other materials covered with plaster. It is only important that the plaster is not lime or gypsum, but cement-sand, grade not lower than M 150.
The layer of applied penetrating insulation must be looked after for 3 days, avoiding mechanical damage, and when high temperature protect it from drying out by moistening with a spray or covering the surface with a film.
More details about the material, its properties, technology of work can be found in the article "".
Waterproofing bathroom walls using penetrating materials has the following advantages:
- due to the deep penetration of the material into concrete and the formation of expanding crystals that fill all pores and small cavities, a reliable waterproof barrier is created;
- penetrating insulation protects walls made of any materials from water with any chemically aggressive substances;
- material "Penetron" changes the properties of concrete in better side - its strength and frost resistance, reliability and durability increase;
- waterproofing the walls of the bathroom protects not only the structures in the bathroom itself, but also prevents moisture from penetrating into other rooms, thereby extending the life of the entire house or apartment.
In rooms with high humidity and active use of water, you should definitely take care of high-quality waterproofing, because this is a guarantee that moisture will not spread to neighboring rooms, and also dirty smudges on the ceiling and walls will not appear from the neighbors below.
How is the waterproofing of the bathroom floor done? What methods and materials are there? It is these questions that will now be considered.
Waterproofing the bathroom floor - methods and options
Among the main options are:
- Application of mastic;
- Roll materials;
- Special polymer blends;
- Penetrating water protection;
- Special hydro-barriers (mainly rubber).
In order for the waterproofing of the bathroom floor to turn out to be of high quality and reliable, and also you can perform it on your own, we recommend that you consider the mastic and roll materials, the installation of which will be discussed in this article.
Each option has its own positive and negative qualities, therefore, having familiarized yourself with the installation features, as well as the main characteristics, it will become much easier to make a choice.
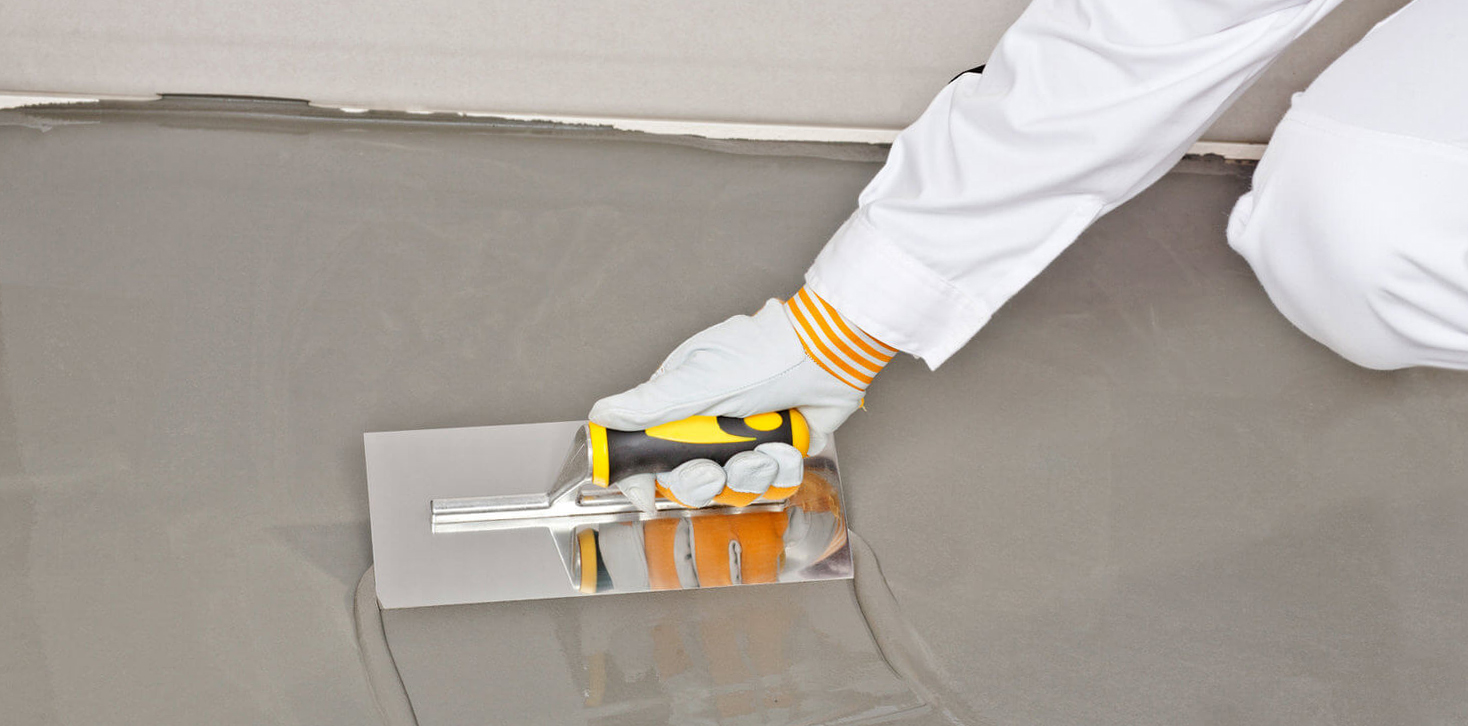
Waterproofing the bathroom floor under the tiles with mastic
The main material for coating waterproofing works is considered to be the application of mastic. Here, as with all types of finishes, you need to take care of the tools and materials. And you will need:
- Primer;
- Brush;
- The mastic itself;
- Roller for applying mastic;
- Special tape.
Waterproofing the bathroom floor under the tiles with mastic implies careful preparatory processes from the very beginning. To do this, oddly enough, in no case need to wash the surface, just sweep it thoroughly, thereby reducing the amount of dirt on the floor. In order to maximally clean the surface from dust, use a vacuum cleaner.
Next, cover the entire floor with a brush with a primer, preferably with deep penetration. Let's say even more - it is advisable to cover the surface with the composition at least twice. Primer application increases the adhesion between the surface and the mastic.
And now - we proceed directly to waterproofing the floor in the bathroom with mastic. The mastic itself is a fairly dense material that is not easy to apply, so please be patient and use a high-quality roller to use it on open surfaces. In hard-to-reach places and corners, it is better to apply the mastic with a brush.
Important! The mastic dries for about a day, and at this time it is strictly forbidden to walk on the floor.
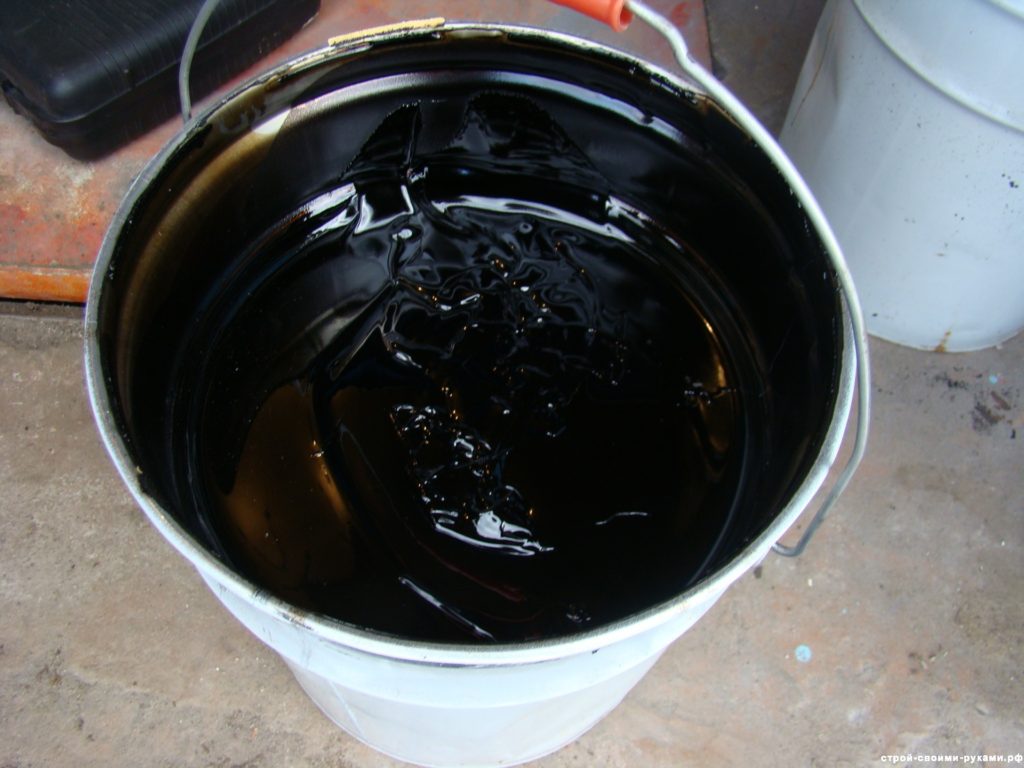
Mostly bituminous or polymer mastics are used, but I must say that bituminous mastic is usually used for waterproofing foundations, since it is diluted with either gasoline or an organic solvent, and these substances are usually accompanied by a very strong odor, which is easy in a closed room can cause poisoning, therefore, if you decide to use mastic, then stop at the polymer one.
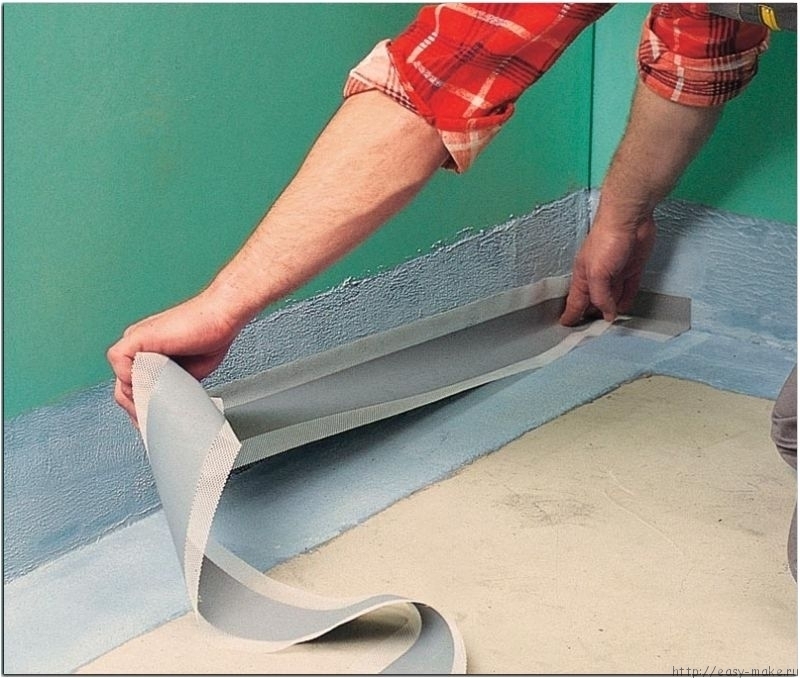
Waterproofing the bathroom floor with roll material
Self-adhesive materials are considered the best option for self-assembly. They are not as reliable as those that are glued with a lamp, but these works are much cheaper and easier to do at home.
Waterproofing the bathroom floor with roll material will require the following materials and tools:
- Primer brush;
- Primer;
- Capacity for primer;
- Roller;
- Sealant;
- Construction gun;
- Building level;
- Roll material itself;
- Painting knife.
To prepare the floor, again, you need to thoroughly clean it of dust, and it is also recommended to check that the height differences are not more than 2 cm - since only in this case you can be guaranteed an excellent result of waterproofing the floor in the bathroom.
Further, as in the previous case, the floor is covered with a primer, which in itself serves as a minimal method of waterproofing the surface, and if it is based on bitumen, its waterproofing properties increase significantly.
While the primer dries, you can cut the material. However, keep in mind that you will need to give the walls an allowance of about 15-20 cm on each side.
After you have prepared and cut the strips - peel off the protective film and install the waterproofing strip.
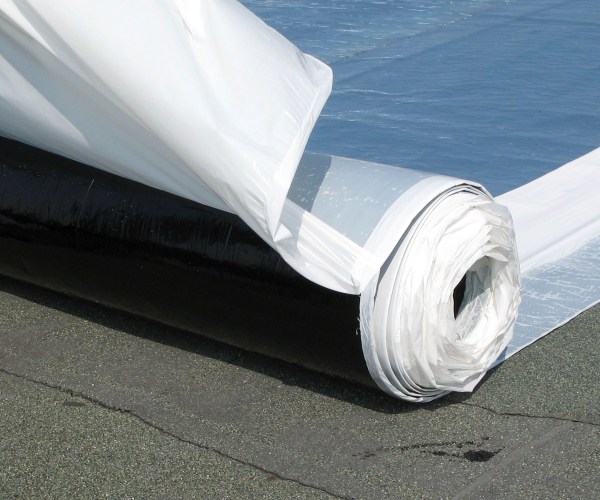
The material itself is overlapped, not less than 5 cm, on average 10-15 cm. After laying it is necessary to walk over the glued sheets with a roller, thereby "expelling" excess air. Also, experts recommend gluing the joints with a sealant, which will serve as additional protection.
How to waterproof a bathroom floor - results and conclusions
You have already met the main options, as well as how to waterproof the bathroom floor, so all that remains is to make a choice in favor of this or that option.
Taking into account the fact that the construction market is developing, we can say that polymer, mastic waterproofing nevertheless has an undeniable advantage over roll, even with a self-adhesive layer, since it is the presence of joints, as well as some difficulties in installation (a particular difficulty lies in the organization of overlaps on the walls - you need to properly measure and cut to ensure waterproofing of the corner) and even taking into account the fact that the mastic has a rather thick consistency and it is rather difficult to apply, however, this process will be obtained by a person who does not have much experience, better than a waterproofing device made of roll materials.
15 August, 2016Specialization: Capital construction works (foundation laying, wall construction, roof construction, etc.). Internal construction work (laying of internal communications, rough and final finishing). Hobbies: mobile communications, high technology, computer technology, programming.
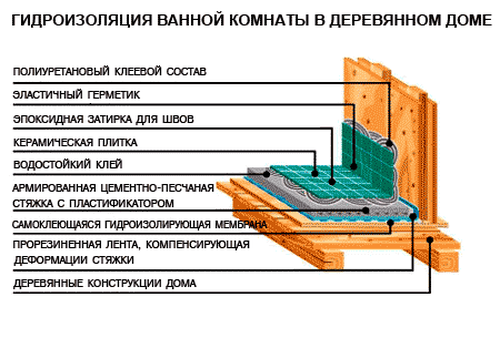
Waterproofing a bathroom is not just an important, but an obligatory stage of finishing a sanitary room. Especially in a wooden house where bearing structures poorly tolerated exposure to moisture. Equally important is the waterproofing for the bathroom under the tiles, thanks to which the integrity is maintained. floor slabs and repairs in the apartment next to the bottom in case of an accident.
Most recently, I did this kind of work and, taking this opportunity, I want to tell you how to make waterproofing in the bathroom with your own hands so that not a molecule of water leaks from the ceiling under your plumbing room.
The need to waterproof the bathroom
To begin with, I will allow myself to acquaint you with the information about what waterproofing is and whether it is necessary to do it when decorating a bathroom. This term in construction means a set of measures aimed at preventing the penetration of liquids through the enclosing walls and interfloor floors of buildings and structures.

According to SNiP numbered 2.03.13-88, the bathroom belongs to the class of premises experiencing medium and high intensity of exposure to liquids on the floor surface. Construction instruction states that water protection measures are mandatory for her. Naturally, in addition to the floor, you also need wall waterproofing for tiles or other finishing materialotherwise, the desired waterproof performance cannot be achieved.
It is especially important to waterproof the bathroom in frame house and a room where drywall was used for wall decoration. These materials are easily damaged as a result of wetting and, with constant contact with water or water vapor, they will quickly become unusable.
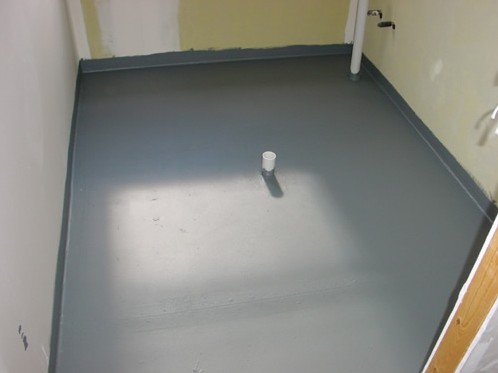
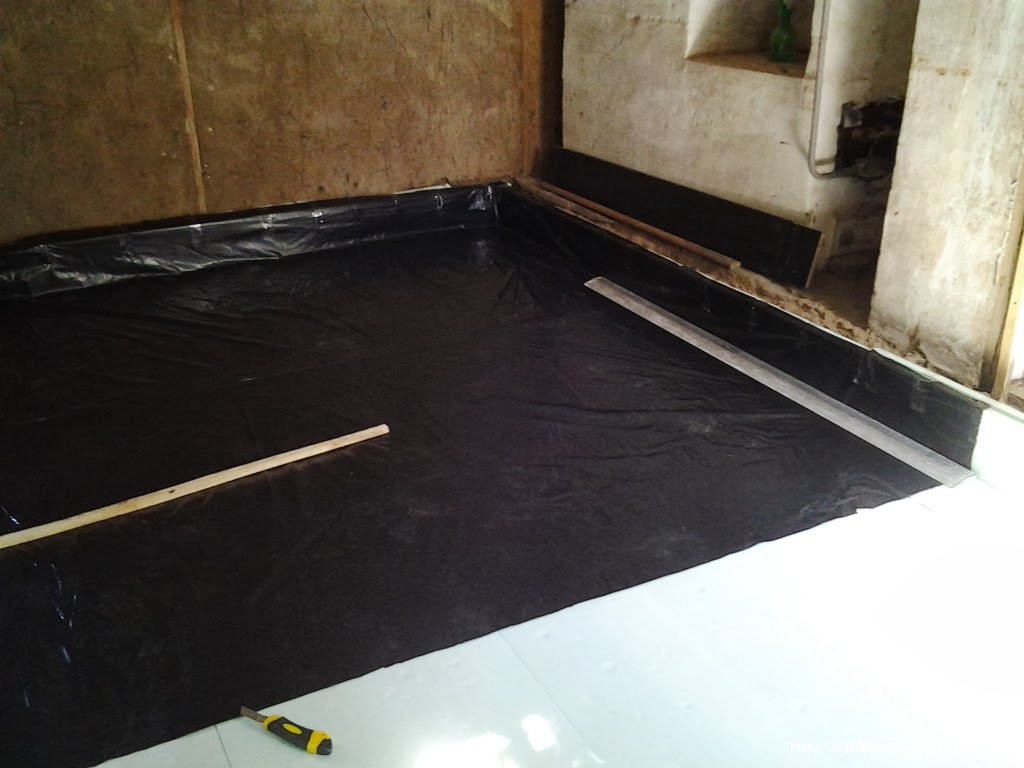
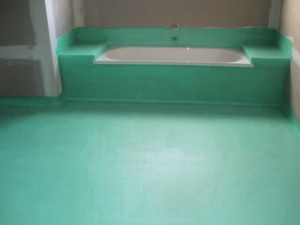
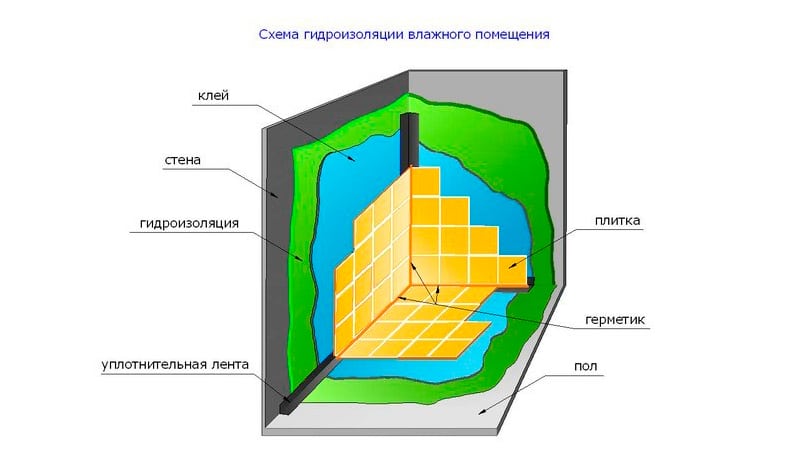
Regardless of what waterproofing materials are used, the goal of this stage of work is to create a waterproof "trough" on the floor in the bathroom with sides on the walls of the room 15-20 cm high.
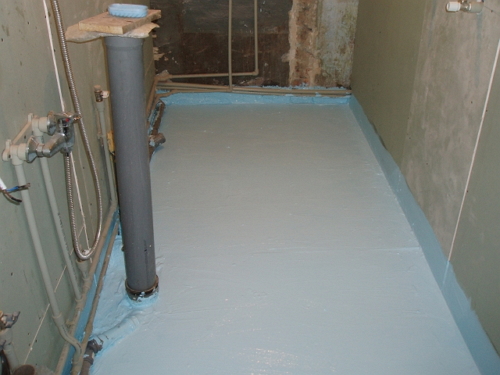
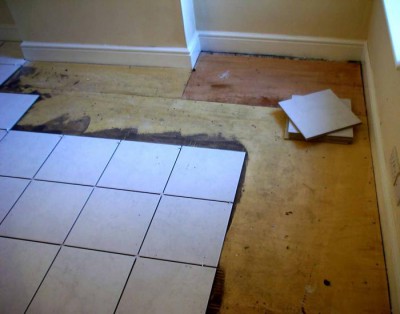
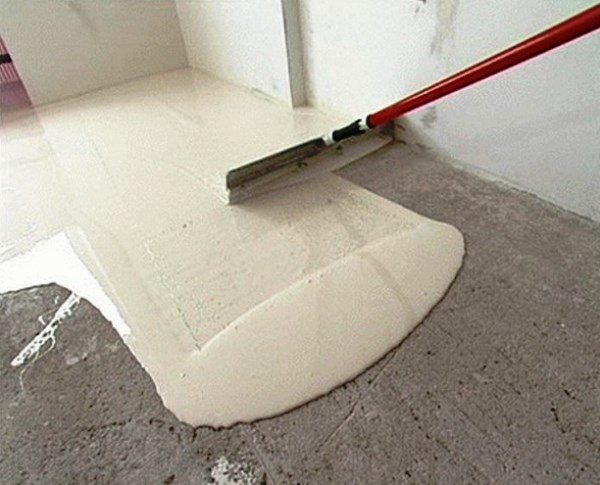
In the photo - "trough" of waterproofing material in the bathroom.
The monolithic sealed layer will not let water falling on the floor into the interfloor overlap, thereby protecting the structural elements of the building from destruction. In addition to increasing the service life of the building and preserving the nerves of the neighbors, this will prevent the appearance of mold, fungus and other pathogens.
Some people doubt whether waterproofing is needed under the tile, because the tile itself does not allow water to pass through. In this regard, I can note the following: when facing walls with ceramic tiles, an absolutely sealed waterproof layer does not form (due to the presence of seams), therefore, the type in question cannot be considered as an alternative to waterproofing.
As for the specific method of forming a waterproof layer and the materials used for this, they depend on several factors:
- the condition of the surface to be processed;
- the material from which the interfloor floors are constructed;
- the time allotted for the arrangement of the waterproofing layer;
- number of storeys of the building;
- the ability to reduce the distance between the floor and the ceiling of the sanitary room.
Waterproofing methods
I hope I have convinced you of the need for waterproofing materials. In this section, I will talk about various ways to protect the bathroom floor from water and about the types of materials that are used for this.
I presented all the necessary information in the form of a table so that you can independently decide which technology to choose for carrying out the necessary work.
| View | Description |
| Oleechnaya waterproofing | For work, flexible membranes, bitumen coating are used. The most common roofing felt or roofing felt, but now more effective and easy-to-install glued waterproofing is sold in stores. For example, TechnoNICOL. Fixing the sheets of material is carried out using glue previously applied to one side of the membrane. Sometimes it is necessary to use a gas burner or a hairdryer for work. |
| Cast waterproofing | One of the most effective and fastest methods of waterproofing surfaces, which is often used during repairs in city apartments. Waterproofing is carried out with polymer mastics, which, after hardening, form a sealed seamless layer that prevents moisture from seeping into the floor. |
| Coating waterproofing | The most common technology (at least in my practice). It is carried out with bituminous mastic. Liquid waterproofing is applied to the treated surfaces with a brush or roller and, after curing, also forms a completely sealed layer that does not allow water to seep into the floor. |
| Backfill waterproofing | For work, bulk hydrophobic materials are used, which are used to fill the floor in the bathroom. I have not come across this method in practice, so I can't tell you anything specific. |
| Plaster waterproofing | Cement mortars are used, to which polymer additives or water glass are added, which prevent liquid from seeping through the applied waterproof layer. This is a fairly effective and inexpensive way to protect floors from moisture. I use it less often just because it is easier to apply coated waterproofing. |
When asked which technology is better from the ones presented above, everyone answers for himself. Personally, I am impressed by the coating method as the easiest to implement. It is about him that I will tell you in more detail. If you are interested in learning about other methods of waterproofing - ask questions in the comments.
Specificity of using lubricants
Previously, the basis of waterproofing materials was animal fat and mineral oils. Now, you can protect the bathroom floor from water seepage using dry powder (a solution is made from it), liquid mastic or paste.
The thickness and effectiveness of the sealed layer depends on what consistency the waterproofing solution will be:
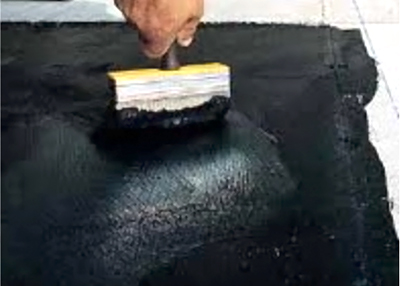
- Bitumen based liquid mastic is suitable for waterproofing bathrooms. It is applied in two layers, each after hardening - 1 mm. Most often, a tile is placed on top of such a mastic or a concrete screed is poured.
- Pasty mastic is made from bitumen with polymer additives. It is also stacked in two layers, each about 3 mm thick. The paste-like mixture can serve as both a waterproofing layer and a heavy one, leveling the floor. For surface hardening, fiberglass reinforcing mesh is often used.
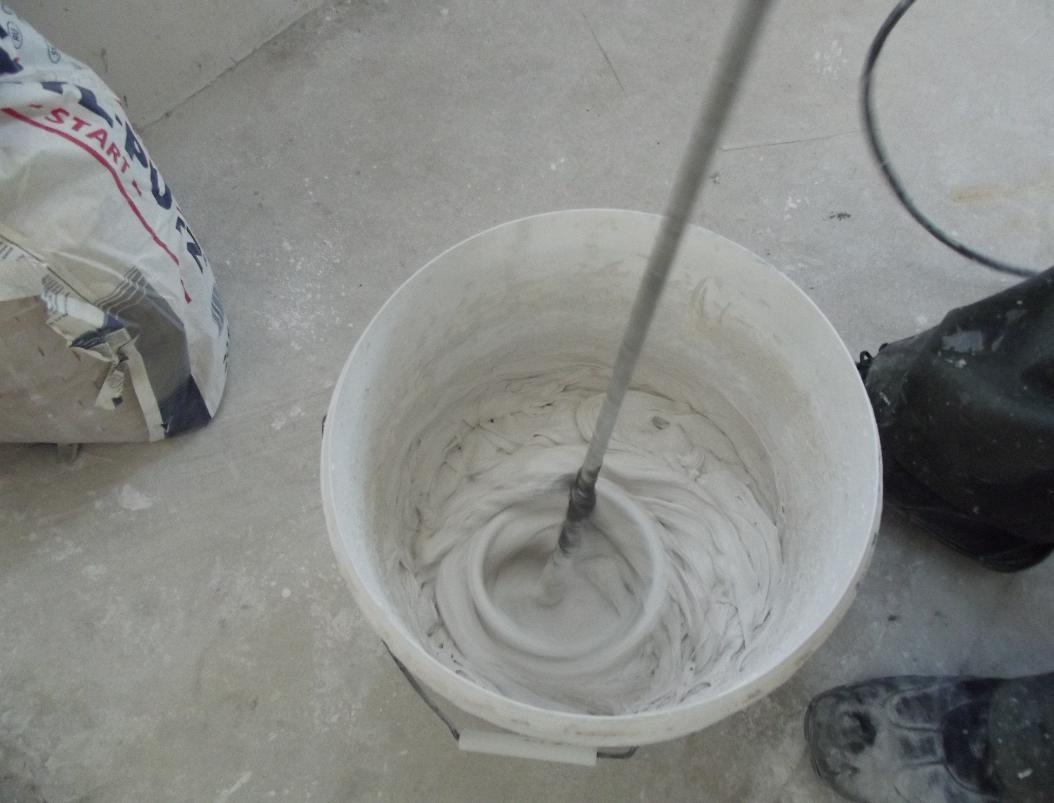
- Dry powder based on cement with hydrophobic additives. It is used for the simultaneous waterproofing of the surface and leveling the floor in the bathroom under the decorative coating. It is applied in one layer with a spatula.
I prefer bitumen-based liquid coating waterproofing.
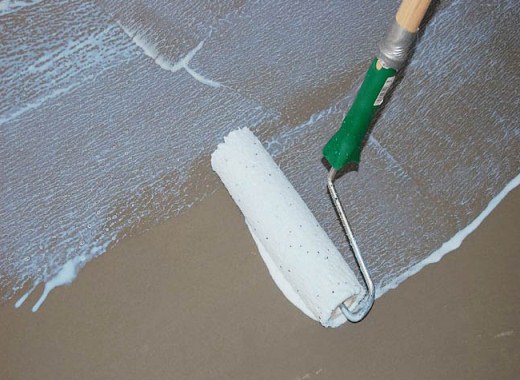
Floor waterproofing by painting method
Now is the time to tell you about how waterproofing for the bathroom is done. I will describe the technology using the example of a typical bathroom in an apartment building. And you already refract it taking into account your conditions.
Training
The effectiveness of measures to protect the bathroom floor from water directly depends on preparatory phase... I tell you how I act:
- I examine the floor (bathroom floor) and carry out minor repairs to the reinforced concrete surface. I seal small cracks with polyurethane foam or cement mortar, I clean large ones with a perforator and also fill them with cement mortar.
- If your bathroom floor is located with a significant difference in height (more than 2 cm), I advise you to first make a concrete screed along the lighthouses. If the difference is not so significant, but still present, you can limit yourself to a self-leveling mixture.
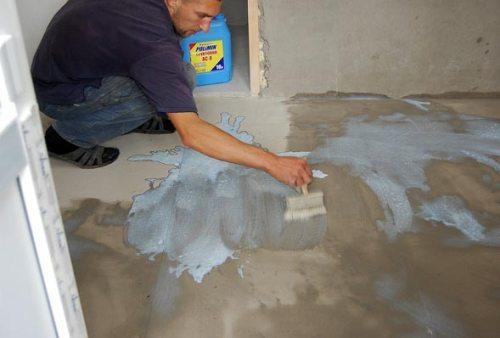
- After repairs, I will prime the surface. The primer improves the adhesion of the waterproofing to the mineral board and reduces the consumption of waterproofing material. I apply the primer with a brush in two coats with a 2 hour drying interval.
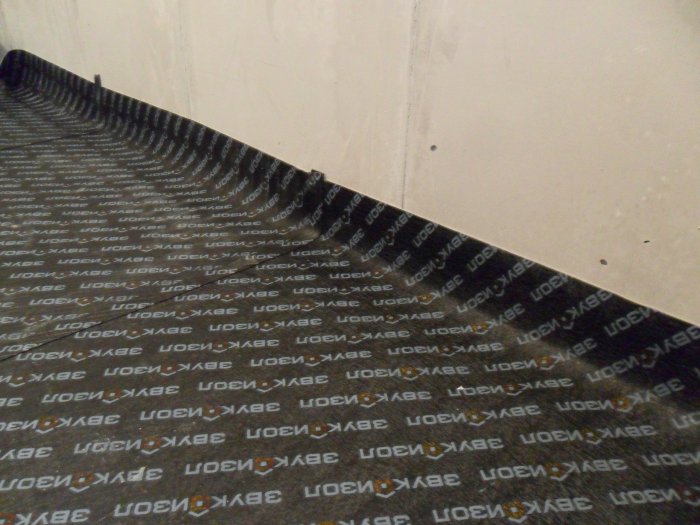
- At the junction of walls and floor slabs I glue waterproofing film... In these places, microscopic movements of structural elements are possible, which can lead to cracks. Therefore, an elastic tape is used, which maintains its integrity when the base moves.
If you did not buy the tape in advance, then the mentioned areas should be very carefully (in 4-5 layers) smeared with bituminous waterproofing mastic.
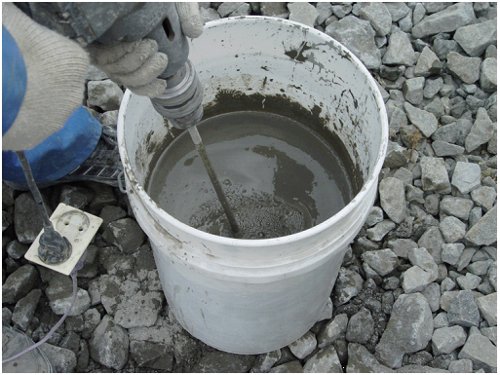
Solution preparation
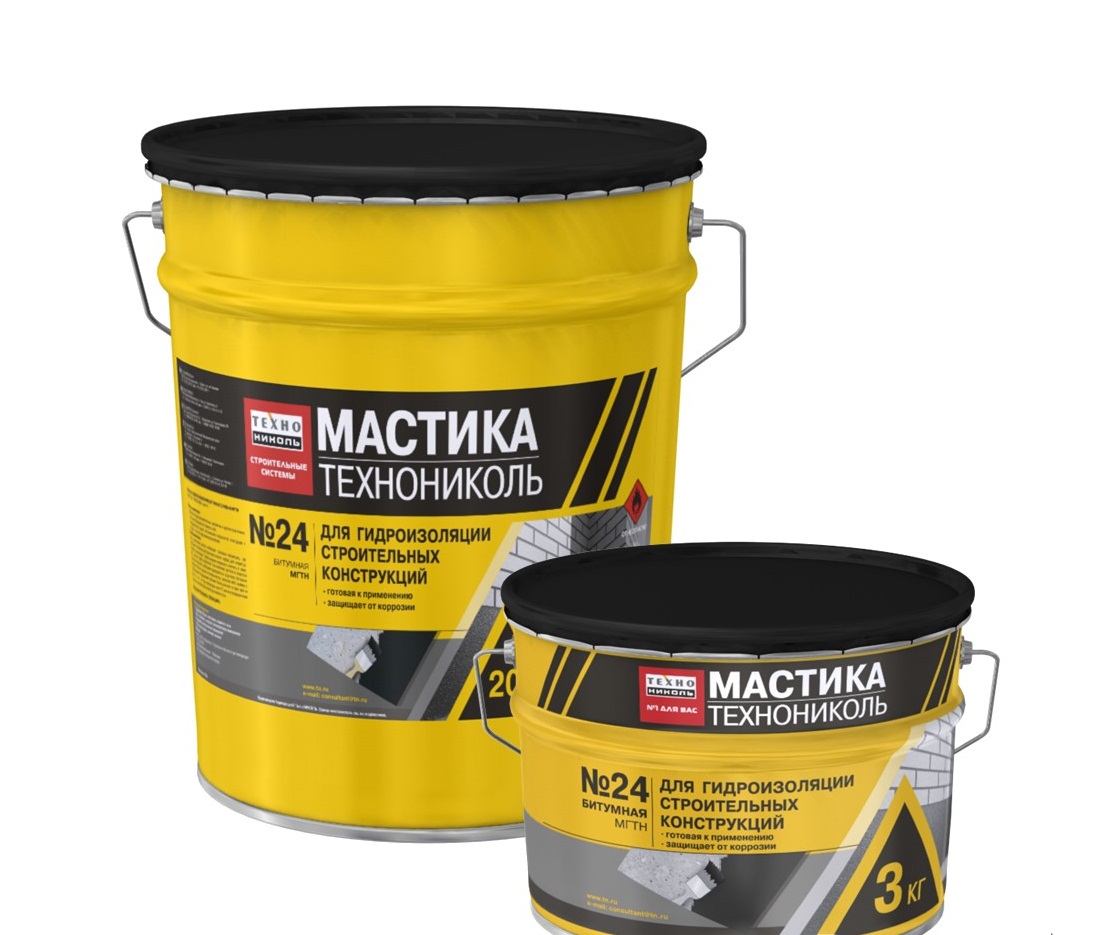
In the case described in this article, for the waterproofing of the floor, I used the MG-1 coating mastic produced by the Leader company. It is sold in buckets of different capacities (I bought 6 kg) and is completely ready for use.
However, many use cement-based formulations with various additives for work, which are sold in the form of a dry powder. Then you will need to prepare a solution by mixing the powder with water in the proportions indicated on the package.
Here it is important to achieve complete homogeneity of the mixture. For mixing the solution, I recommend using a mixer that fits over the drill.
To achieve the maximum quality of the prepared solution, follow these tips:
- Use only clean containers. Very often, the remnants of the previously prepared mixture became the reason that the new waterproofing solution did not turn out to be uniform and it was necessary to redo all the work again.
- The prepared solution has a limited shelf life (no more than 40 minutes). Therefore, you only need to knead the amount of material that you can use up for the specified period of time.
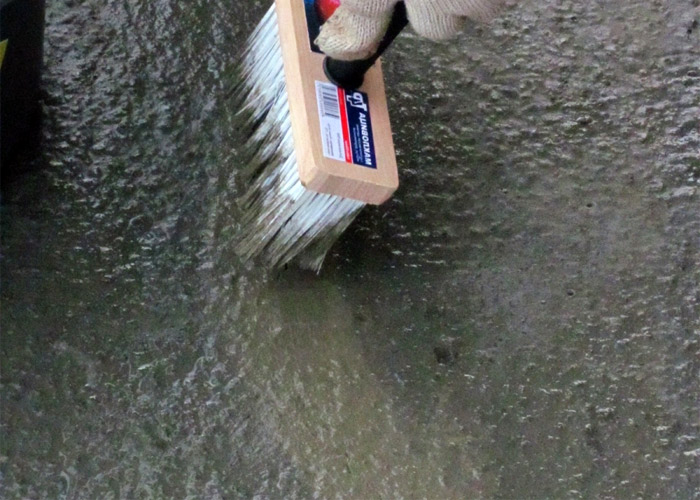
Application of mastic
Applying bitumen mastic to the floor is not particularly difficult. The material has a liquid consistency and can be applied with an ordinary wide brush, evenly spreading over the surface to be treated.
The scheme is as follows:
- First, the first layer is applied, after which it is left to dry for 6-8 hours.
- After that, a second layer is applied, which is dried for at least a day. Only after 24 hours can you continue finishing work in the sanitary room.
It is very important to process not only the floor by raiding the walls to a height of about 20 cm, but also those surfaces that water will get on when taking a bath or shower. Although SNiP does not require such an operation, I still advise you to spend some time and mastics on waterproofing the walls in these places. This will significantly increase the service life of the enclosing structures (especially in wooden houses).
Summary
Now you know how waterproofing is done in a bathroom. As you can see, the processing of the floor and walls with your own hands using a bituminous mixture is carried out quickly and does not require significant cash costs. Therefore, I see no reason to neglect this stage of finishing plumbing, thereby protecting myself and my neighbors from unnecessary problems.
What do you think is best for waterproofing a bathroom under tiles? I am interested in the methods that you have already tried in practice. If there are any, I will be glad if you tell us about them in the comments.
Not a single room in an apartment or house, except for a bathroom, needs careful protection from high humidity and direct contact with water. Even if you take a very gentle bath, the walls and floor will still be doused with water.
If the waterproofing is not very good, then not only the renovation in the bathroom will deteriorate, but there is also a possibility of harm to the neighbors. Also, improper insulation from moisture is a risk of mold and mildew. Moreover, in places where more moisture is concentrated, for example, between the bathroom and the wall, toilet bowl and the floor, unwanted insects can appear.
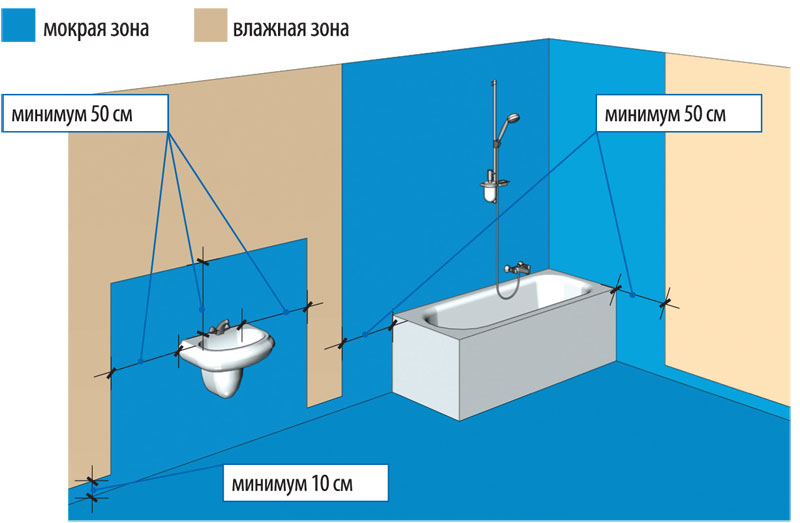
Before starting repair work in the bathroom, you must first of all determine the humidity zones, regardless of whether it is a new building or a room that is already being renovated. Often these can be walls and floors directly exposed to water. How to protect yourself from moisture? Showers, bathtubs, washbasins, and walls exposed to moisture in the bathroom should be thoroughly waterproofed initially. The waterproofing procedure itself is described step by step in the article below, however, you need to know which waterproofing to choose for the bathroom.
It is necessary to isolate places from water using one- and two-component liquid mixtures for waterproofing.
The waterproofing materials include sand-cement mixture, chemical plasticizers and polymer fillers. Thanks to polymeric substances, larger particles are bound, and a moisture-proof film is formed. As for the cement, which is part of the waterproofing, with its help the solution turns into a solid monolith. Well, the plasticizer creates excellent conditions for preventing this waterproof shell from cracking.
Waterproofing materials for bathrooms
The building materials market offers two types of waterproofing materials for bathrooms: one-component and two-component solutions. Let's figure out which waterproofing is better for a bathroom, so that the room remains dry for a long time.
There are no particular differences between the above mixtures, the only difference is in the method of their preparation. One-component mixtures are made using water, in the amount specified in the instructions. Two-component - using a polymer emulsion, which reliably protects against the penetration of fungus and mold.
Do-it-yourself waterproofing of walls in the bathroom
Bituminous mastics
Waterproofing of rooms with a high level of humidity is carried out using liquid lubricating waterproofing materials. The advantages of such materials include their versatility, regardless of what surface they have. Thanks to this, you can significantly save preparation time and speed up the repair process.
Bitumen-polymer and bitumen-rubber mastics are the most common waterproofing materials. Manufacturing takes place on the basis of oxidized bitumen with an organic solvent, as well as various modifiers and fillers in order to increase elasticity.
As for the advantages, the degree of adhesion of such construction putties to the base is quite high, as well as their resistance to aggressive influences. They are often used to insulate walls from moisture, where there is constant contact with water. A screed must be made on top of the waterproofing compound.
Bathroom waterproofing materials
Cement-polymer mastics
Lubricating mixtures can be made using cement-polymer mastic. Their manufacture is carried out based on a combination of cement and mineral fillers in a solution.
One-component compositions, as mentioned above, are bonded using water, and they contain waterproofing agents, and two-component ones - using polymer-based binding emulsions.
The materials are quite viscous, in their composition they are similar to soft plasticine. The materials mentioned above are applied in two layers.
Important! There are 3 kg of cement-polymer mixture per 1 sq / m.
The adhesive coefficients of the mastics allow them to be applied to rigid and flexible surfaces. Polymeric substances, which are the basis for the tightness of mastics, penetrate into the base and close all the pores. Layers can be up to 3 mm wide. Waterproofing materials perfectly cope with elevated temperatures and are ideally combined with electric and water floor systems.
Waterproofing composition
The composition of mixtures for coating includes sand, cement, as well as polymer elements. When combined with cement, sand is the best bonding material, which, in contact with the polymer mixture, penetrates even the smallest cracks and cracks, thereby providing complete protection. Nevertheless, there are rules, breaking which even the best waterproofing materials cannot be protected from moisture and water.
We carry out waterproofing in the bathroom with our own hands
First of all, you should check the walls for their flat surfaces using special devices. If there are even minor deviations, it is worthwhile to level the walls using beacons and plasters with excellent water-repellent characteristics.
If you want the waterproofing material to penetrate deep into the walls and floor, these surfaces should be pre-wetted with water.
Roll waterproofing materials
Now let's figure out how roll waterproofing of the bathroom floor is carried out. The materials required for roll insulation, as well as a step-by-step algorithm of actions, are described in more detail below.
Laying a roll of waterproofing material on the floor of a bathtub is similar to laying linoleum. For this, a certain piece of material is cut off, after which the bitumen base is heated to a certain temperature, the protective film is removed. Further, it is glued to the already prepared floor using a weighted roller on its surface several times. After that, you need to make sure that the material is securely fixed.
When laying waterproofing material, special attention must be paid to the corner places where communication and sanitary facilities are concentrated. In these places, special care must be taken. It should also be noted that the joints must be covered with silicone and polyurethane sealant, or, alternatively, a specially designed adhesive tape can handle this perfectly as a sizing, which eliminates the formation of small cracks and voids. If everything is clear with this option for insulation from moisture, then it remains to figure out how to waterproof the wooden floor in the bathroom?

Do-it-yourself wooden floor waterproofing in the bathroom
Materials for such types of work must be selected according to their composition with high moisture protection. Such products exclude water contact with wood, and their active components allow penetration into the floor, waterproofing the wood from the inside. An alternative can be the use of a material such as a thermal tree with high moisture protection and excellent resistance to fungal formations.
Waterproofing bathrooms step by step
- Before applying waterproofing material to walls and floors, it is necessary to carry out all preparatory work... First, the floor must be cleaned of the old flooring. Regardless of whether it is tile or paint, they must be completely cleaned. After that, it is necessary to check for evenness using the level of the wall, ceiling and floor so that the angles between them are exactly 90 degrees.
When leveling walls, wait a few weeks before starting waterproofing work.
- It is necessary to clean the surfaces from the remnants of coatings, after which you should walk over them with antifungal and anti-mold compounds. If you do not have this solution at hand, you can make it yourself using ammonia and medical alcohol, as well as clean water.
We remove all debris in the process of waterproofing the floor and walls of the bathroom
- The next step is to prepare a waterproofing mixture. It is possible to carry out waterproofing with one of two types of materials that perfectly cope with their functional features. Nevertheless, if you are pressed for time, it is better to use a two-component mortar, which sets more reliably, albeit not immediately, and also protects against bending. And for bathrooms this is very important.
- The mixtures are prepared in relation to the enclosed instructions without adding any additional mixtures, since oversaturation can negatively affect the action of the constituent substances. The prepared insulating mixture is necessary, first of all, to process the walls. The composition is applied with a special thick brush with wide brim, but you can also resort to using tight-fitting brushes.
Important! Waterproofing mixtures can be quite thick, so you should not dilute them with water, it is better to use viscous ones, since only the density will protect the walls and floor from moisture.
A small amount of the substance is taken and applied to the brush in horizontal and vertical movements, as appropriate. But do not combine these applications alternately. Better to give preference to one.
Diy repair scheme with waterproofing in the bathroom
- The solution must be applied twice in a thick layer. For convenience, the mixture can be halved in two containers. This will determine an equal amount of mix required for application.
- After processing the walls with insulating composition, we proceed to waterproofing the floor. Remember that the surface must be thoroughly cleaned of the previous coating before work. After that, the floor must be properly cleaned of debris, dirt that will interfere with work. If there are gaps between the walls and the floor, they should be carefully repaired, otherwise they can become a reason for the accumulation of moisture.
- After all the shortcomings are fixed, we prepare a waterproofing solution for the floor. Its composition will differ slightly from the solution for the walls. You need to know that a solution is purchased for the floor, which includes mastic and bitumen. The solution itself is made using gasoline or a very strong solvent. In the process of preparing such a mixture, the room should be ventilated, and a mask should be used to avoid vapor poisoning. The floor mortar is liquid enough that it can be applied with a brush.
- Upon completion of the application of the solution, it is necessary to ventilate the room and allow the substances to dry completely. After that, you can safely move on to others. repair work... It should be remembered that waterproofing is applied not only to the floor, but also to the walls, retreating 15 cm. This allows two materials that insulate against water in contact to create a particularly protected surface.
We carry out waterproofing of the bathroom floor
Taking into account all the rules and regulations for applying waterproofing substances to the surface, you can protect yourself from unpleasant odors, accumulation of moisture, flooding of the lower floors, damage to repairs and get a dry room for many years.
Features of waterproofing walls
In order for the waterproofing mixtures applied to the walls to perfectly cope with their functional features, it is necessary to resort to materials based on cement-polymer compositions. After all, if you use bitumen and means with it, over time, bitumen, as a flowing material, can begin to flake off. Pipes, joints and corner places must not be ignored, special cuffs must be put on them, and the corners between the walls and the floor themselves are glued using sealed tapedesigned for waterproofing works.
Before and after the insulation of the walls, the entire surface is primed. For reliability, waterproofing the walls of the bathroom under the tiles involves applying a building reinforcing mesh to the mortar, which allows you to firmly hold the glue and ceramic tiles.

