A plasterboard partition, characteristics of materials, advantages and disadvantages of the design, development of its scheme, installation of the frame and its sheathing, device of the doorway and preliminary surface finishing.
Advantages and disadvantages of plasterboard partitions
Not so long ago, all partitions in residential buildings were built exclusively from bricks, concrete or blocks. But after the appearance on the construction market of plasterboard materials, the situation changed radically due to their remarkable properties:
- Partitions made of gypsum board on a metal or wooden frame have excellent sound insulation, especially in combination with insulation, which in this case plays an additional role. A single-layer plasterboard partition wall has a sound absorption coefficient of up to 47 dB, and its second layer makes this indicator even better.
- Unlike concrete and stone partitions, plasterboard sheets and metal profiles that make up similar structures are very lightweight. On average, 1 m 2 of a plasterboard wall weighs 25-50 kg, depending on its thickness. This allows you to significantly reduce the load on the building floors and save, for example, on reinforcement, mortar and material delivery.
- Plasterboard sheets have an initially flat surface, which is good for further finishing: paint, wallpaper, decorative plaster and even tiles.
- GKL is not included in the category of combustible materials, so it is safe in case of fire.
- Its hygroscopicity makes it possible to stabilize the microclimate of the room, since the material is able not only to pass air, but also to absorb the excess of its moisture.
- An important indicator of plasterboard partitions is the ease of installation. For this reason, in a couple of days, you can transform a room beyond recognition. Moreover, it is quite possible for a home craftsman to do this, having at least basic skills in construction.
- The composition of gypsum plasterboard sheets contains only natural ingredients, so the material is absolutely harmless to health.
The material does not tolerate direct contact with water. In case of accidental flooding of the room, part of the plasterboard partitions will have to be changed. On this, perhaps, all the disadvantages of drywall end.
Selection of materials for GKL partitions
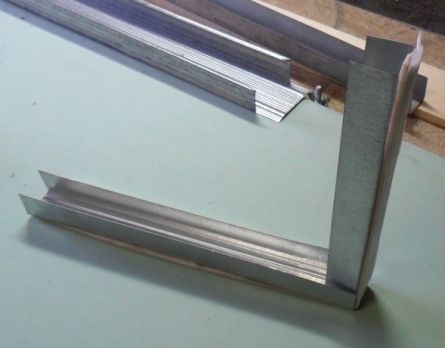
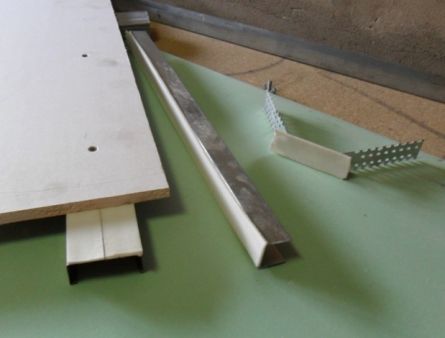
The main materials used for the installation of plasterboard partitions are light metal profiles and gypsum board. The profiles that form the frame differ in cross-sectional dimensions and functional purpose:
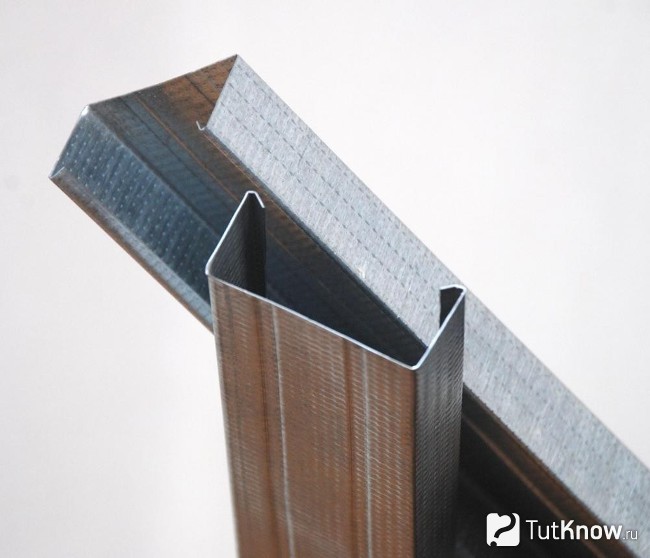
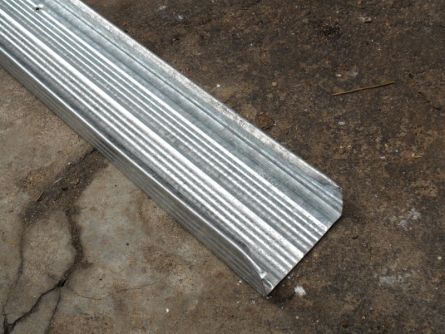
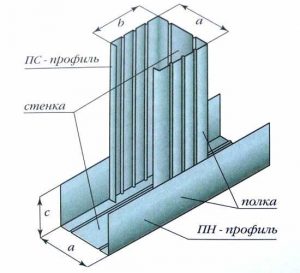
- Guide profile PN (UD)... Made in the form of a thin-walled channel. Its width can be from 50 to 100 mm, the size of the shelves is 40 mm. These parameters are always indicated in the marking, for example: PN40-75, where 40 is the width of the shelf, and 75 is the profile. The guide profiles fix the posts of the metal frame of the partition.
- Rack profile PS (CD)... It differs from PN by the presence of special bend locks on the shelves and has a similar marking. Rack profiles serve to stiffen the structure and attach gypsum boards (gypsum plasterboards) to them.
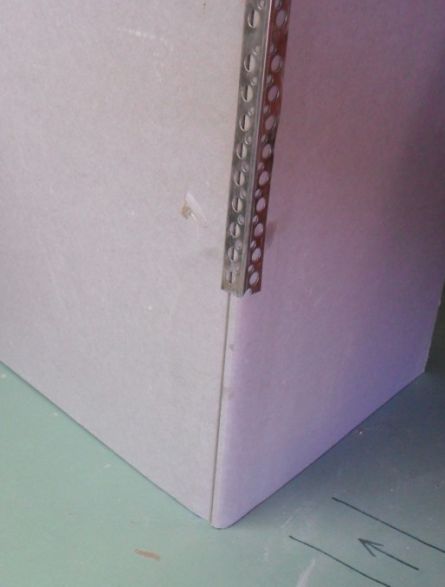
- Corner profile... It is used in the design of the outer corners of the partition and protects them from mechanical damage.
- Arched profile... It is used to create openings of any curved shape.
- Beacon profile... It is T-shaped and serves as a guide when aligning walls.
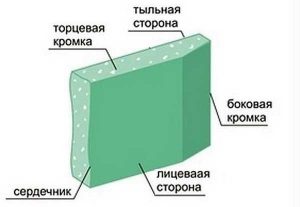
The gypsum plasterboards used to sheathe the frame must be at least 12.5 mm thick. In the manufacture of a curved opening in the partition, thin sheets up to 12.5 mm are used for the convenience of giving the structure the desired shape. Drywall is divided into types:
- Standard GKL... It is the most common material and has a gray color and blue markings. It can be ceiling or wall. Ceiling drywall sheets are always thinner.
- Moisture resistant gypsum board... It is used in the manufacture of partitions for the separation of wet rooms. It has a green color and blue markings.
- Fire-resistant gypsum board... It is used for insulation of ventilation shafts or electrical panels. is he gray, has a red marking.
When choosing a gypsum board, you should pay attention to its purpose, and not only to the thickness of the products. This will help to significantly increase the durability of the entire structure during its operation.
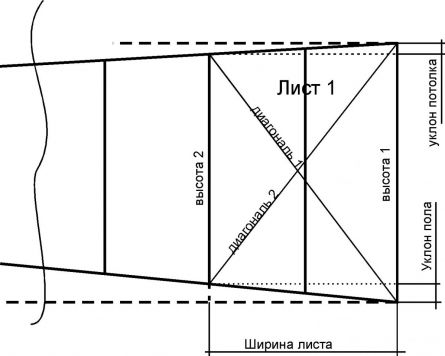
Creating a drawing of a drywall partition
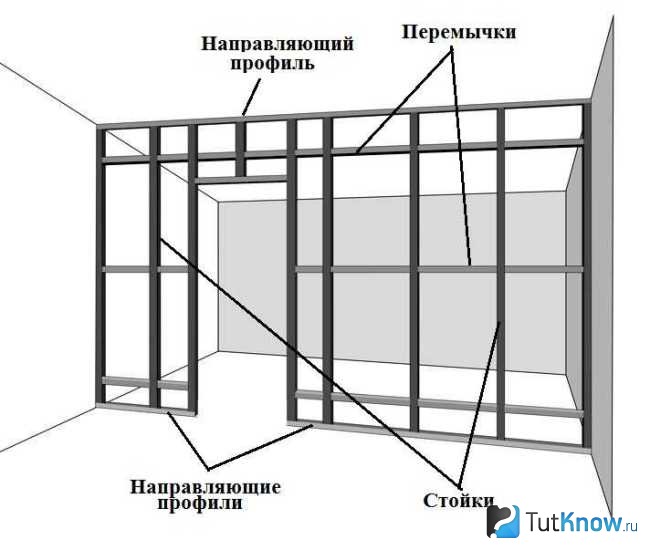
The working diagram of the plasterboard partition is necessary when planning the structure of the required rigidity and volume, as well as for determining the types and quantity necessary materials for its manufacture. Complex calculations are not required here.
Before you make a plasterboard partition, you first need to draw on paper on a scale a plan of the room indicating its height, length and width, and then mark the line of the future partition on it. After that, you should perform a frontal sketch of the wall and apply the location of the bearing profiles and gypsum boards to it, staggered. At their joints, provision should be made for the installation of horizontal jumpers.
The number of rack profiles, as well as their location, depends on the planned load on the structure. The sheathing of the outer and inner sides of the partition should be done so that the edges of the sheets are located on different profiles.
For example, if on one side of the wall the joints of the sheets are on the third, fifth and seventh racks, then on the other side they should be located on the second, fourth and sixth with a step between the racks of 600 mm. All this must be taken into account when making a drawing of a plasterboard partition for zoning a common room.
Important! The attachment points on the partition of furniture or decor items should be reinforced at the stage of creating the frame with additional profiles.
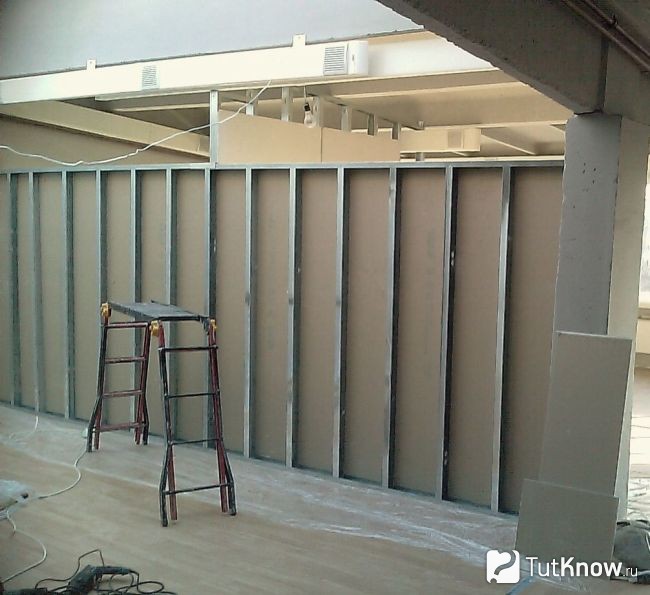
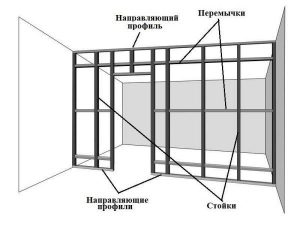
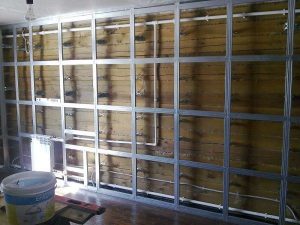
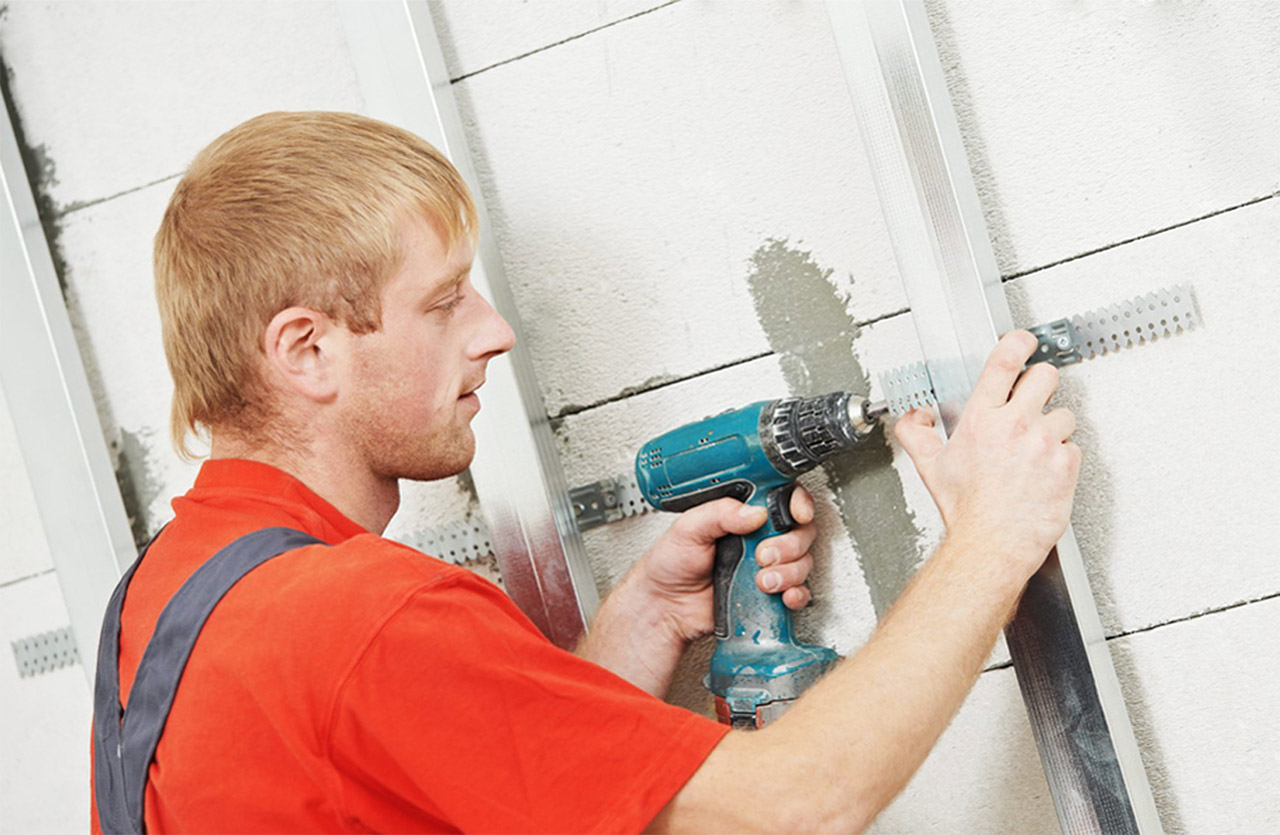
Installation of a frame for a plasterboard partition
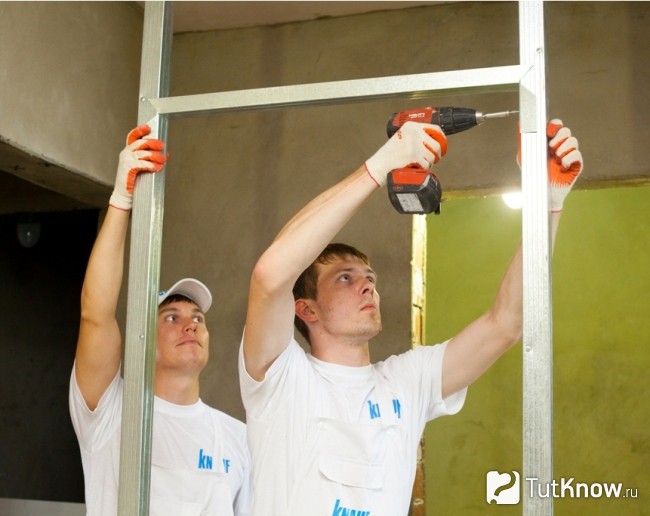
After drawing up the scheme of the plasterboard enclosing structure, counting and choosing the necessary materials, you can start making the metal frame. The set of tools used for this job is not that great. This is a tape measure, a plumb line, a level and a marker, a hammer, a clerical knife, screws, dowels, a screwdriver, metal scissors and a puncher.
According to the layout of the partition, it is necessary to measure the required distance from the nearest wall in several places and draw lines along the ceiling and floor. When connecting their ends on both walls, a closed loop will be obtained. Its sides must be strictly vertical, this must be checked with a plumb line.
Then, on the guide profiles, glue the sealing tape and fix them, guided by the markings made. To do this, it is required to make holes for the dowels with a puncher in advance along the lines of the ceiling and floor.
The step of fixing the PN profiles should not be more than 1 m. The size of the dowels depends on the material of the walls. To fasten the profiles to the concrete slab, you can use the "Bystromontazh" dowels 75 mm long, and to the wooden floor - ordinary screws 45-50 mm. Cutting profiles to the desired size should be scissors for metal, and in their absence, you can use the "grinder".
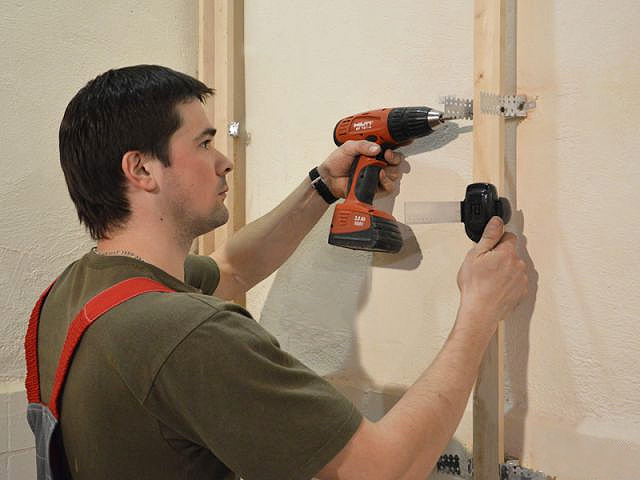
To install a drywall partition, the first rack should be placed close to the wall. Fastening it to the guide profiles is done using a cutter. It is also advisable to glue the stand with a sealing tape at the point of abutment to the main structure to increase the heat and sound insulation of the future partition.
After installing the first profile, you need to check its verticality with a level, and then attach the rack to the supporting wall with dowels. For concrete walls, the length should be 75 mm.
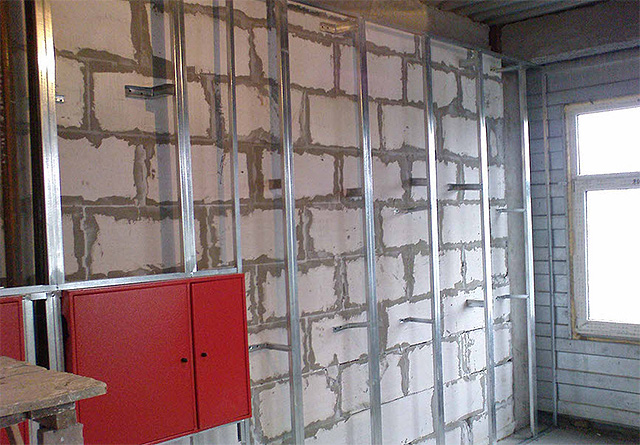
Then all other racks should be installed. Their number and pitch depend on the planned load on the partition. With its decorative purpose, the pitch of the profiles can be taken as 1200 mm. If a cabinet hangs on the wall, then the distance between the rack profiles should be 400 mm.
Usually the posts are mounted under the middle or edges of the sheet, that is, with a step of 600 mm. And only the second post is installed at a distance of 200-500 mm from the extreme profile. This is due to the fact that thinning will be cut off the sheet, making it narrower. At any distance between the vertical profiles, the edges of the gypsum board must always exactly fall on the center of the rack.
On both sides, each rack profile must be attached with a cutter to the guides. In the process of placing the racks, you should make sure that you do not have to attach too narrow a piece of drywall sheet in the corner of the partition. This can create a problem later in the process and contribute to cracking.
At the locations of the horizontal seams of the gypsum board, jumpers must be installed. To do this, cut off pieces of profile 100 mm long with metal scissors and attach them to the posts at the required height. Then the horizontal profile must be inserted inside and fixed with a cutter. This completes the installation of the frame.
Sheathing the frame of the partition with plasterboard

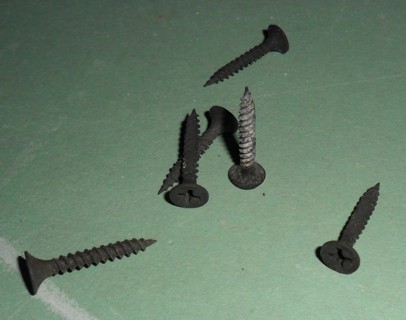
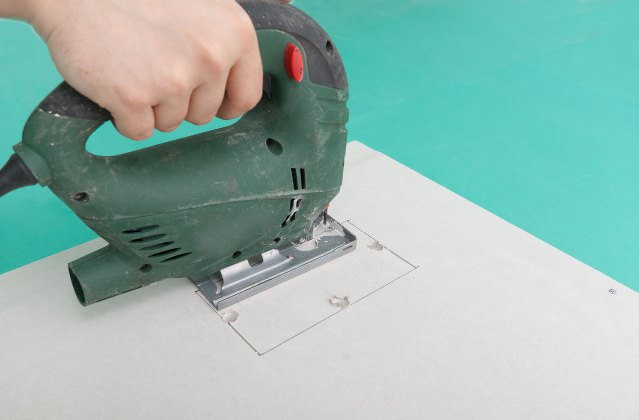
The installation of the first sheathing sheet should be started by cutting off its thin part lengthwise. Such thinning on the remaining sheets will be necessary to mask the joints of the gypsum board after their installation and putty. The first sheet must be attached to the frame so that its entire edge coincides with the center of the profile. Then the gypsum board should be fixed with self-tapping screws 25 mm long.
At the edges of the sheet, their attachment pitch should be 150-200 mm, and in the middle part - up to 300 mm. Self-tapping screws should not be screwed into the corners of the sheets, it is better to retreat from them by 5-10 cm. The rest of the sheathing is attached according to the developed scheme.
When installing a drywall partition with your own hands, you need to take into account several rules:
- It is imperative to leave the necessary deformation gaps of the sheathing: between the gypsum board and the floor - 1 cm, between the gypsum board and the ceiling - 0.5 cm, between adjacent sheets - 2 mm.
- It is recommended to avoid cruciform joints in every possible way, this arrangement of sheets violates the strength of the partition.
- If one side of the structure is sheathed from left to right, then the cladding of the frame on the other side must be done in the reverse order. This will prevent the overlap of the plasterboard seams on the same frame post.
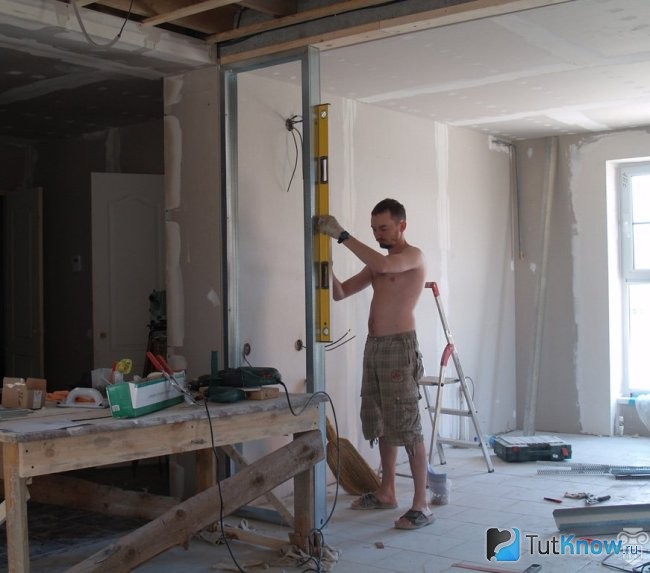
Installation of a doorway in a plasterboard partition
If a plasterboard partition with a door is planned, work should be started from the opening. After fixing the guide profiles, you need to install rack-mount reinforced profiles for it.
It will be easier if you take a beam of the required length and thickness slightly less than the width of the metal rack and insert it into the cavity of the doorway profiles. That is, when installing a partition from a profile w. 100 mm, a bar with a thickness of 95 mm is taken, inserted into the rack and fixed in it with wood screws with a pitch of 150-200 mm.
In the absence of a beam, the racks can be reinforced with a guide profile. To do this, it should be connected to the rack using self-tapping screws for metal. Then, according to the above principle, you need to fix all the other vertical profiles.
Installation of the door lintel between two reinforced uprights is done in this way. At each end of the lintel profile, measure 100 mm and cut only its flanges. Then, at the notch site, the profile needs to be bent 90 degrees - that's it, the jumper is ready. It remains to screw it over the opening at the desired height from the floor. When installing a heavy door, the top of the opening should also be reinforced.
Features of finishing plasterboard partitions

After finishing the installation of the partition, it should be prepared for exterior decoration... The joints of gypsum plasterboard sheets are reinforced with serpyanka tape and sealed with gypsum putty. The outer corners of the partition must be reinforced with a metal perforated corner, which is fixed with the same mixture. The caps of the screws should be hidden under the putty.
After the putty has dried at the joints, corners and fasteners, the entire surface of the partition must be treated with a primer to ensure adhesion, followed by a layer of finishing.
Then, a continuous putty is performed on both sides of the partition. To finish it with wallpaper, it is enough to apply a starting layer of a coarse-grained mixture - it will give the surface the required roughness. To prepare the surface for painting you will need additional layer fine-grained finishing putty. The work is carried out with a wide spatula in arcuate movements.
After the end of this process, it is necessary to wait time for the applied mixture to dry, and then sand the surface. For grouting, special abrasive nets No. 100-150 are used. The resulting gypsum dust can be removed immediately with an industrial vacuum cleaner. In its absence, the respiratory system should be protected with a respirator. The result of the work should be a smooth partition, ready for decoration with any coating.
How to make a drywall partition - watch the video:
In this way, you can lay out any layout with plasterboard partitions standard apartment make it original, not to mention the possibilities of their use in a private house. Good luck!
ilkin
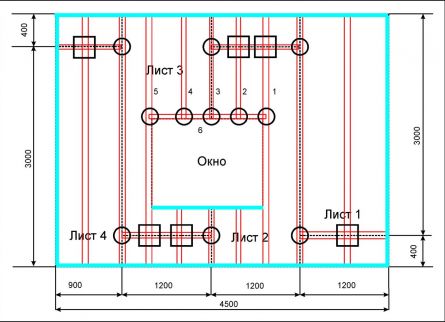
This article is a continuation of articles on drywall and. We will look at how to install drywall with your own hands on the walls. Specifically, we will analyze how to mark and correctly position the drywall sheets on the wall, how to properly install the profile for drywall and how to fix the drywall to the profile. We will also give an example of the consumption of drywall on a wall 3x4.5 meters.
Layout of the location of drywall sheets
In this article, we will consider the most difficult situation of installing drywall on walls - when there is an opening (window) in the wall. The basic principles of mounting drywall on a solid wall are the same as for mounting on a wall with an opening.
Now let's look at the main points when marking the location of the sheets on the wall.
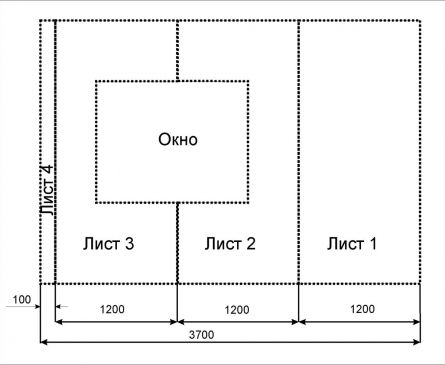
1. Opening in the wall. The basic rule for arranging sheets on the wall is as follows: if there is a door and / or window opening in the wall, then the joints of the sheets should be at least 200-300 mm distant from all corners of this opening. Otherwise, you will get a crack in the finished surface.
The red dotted line indicates how to divide the sheets you can't!
Layout of sheets on a wall with an opening
That is, the layout of the sheets begins precisely from the openings. At the same time, it is desirable that a whole sheet begins from some corner of the wall: then there will be fewer scraps.
2. If a narrow strip remains.
If the wall is long enough to leave a narrow strip
It is also better to take into account that it is better not to leave the strip narrower than 100 mm: you can get rid of it by moving all the sheets from this strip so that the strip becomes at least 300-400 mm. 300-400 mm is the distance of the rack from the adjacent wall, at which you can work normally with a screwdriver.
Way out:
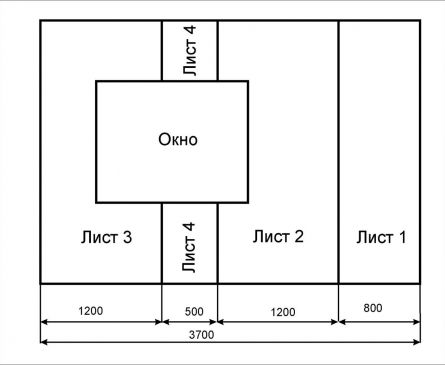
Rearranging sheets 3 and 4 in places, and cutting sheet 1, everything falls into place
Cut sheet 1 so that sheet 4 becomes a little wider -300-400mm. And we swap sheets 3 and 4 in order to fulfill the first rule.
3. If the height of the sheet is less than the height of the wall, and you have to add another part in height, then the sheets must be put apart. Simply put: if there is a horizontal joint, then it should not go over into adjacent sheets. The razbezhka must be at least 0.4 m.
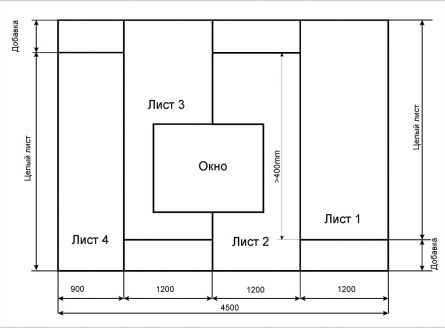
Layout of sheets if the wall height is more than three meters
Marking the location of the profiles
Now that we have decided where and how the sheets will be located, we can accurately mark the location of the racks, and the rest of the frame elements.
CD stands should be located in increments of 1200 mm, but not less than 600 mm. Most often 600 mm is enough for wall cladding. The uprights are profiles, which are called "tsedeshki" because of the C-shaped section.
CD profile
The guide profiles for CD are UD due to the U-shaped section. It is placed along the perimeter of the wall to be sewn.

UD profile
So, an example of the location of profiles for a wall with a window, if the height of the room is greater than the height of the drywall sheets.
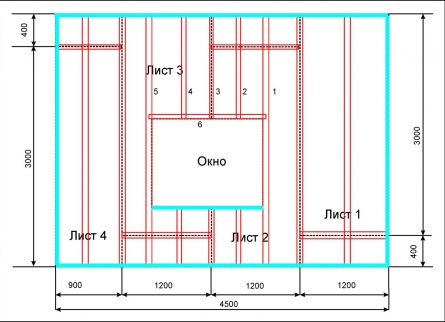
Arrangement of framing elements for a wall
We place the racks under the vertical and horizontal joints of the drywall (red). We also add 2 racks: 1 and 5 along the edge of the opening and a lintel over the window - 6. On sheets 2 and 3, two intermediate racks (1 and 2 on sheet 2; 4 and 5 on sheet 3): from behind the window we shift the central ones under the edge of the opening (1 and 5), and so that the spacing of the racks does not turn out to be more than 600 mm, we add one more (2 and 4) in the middle of these large spans. Install UD guides (blue) around the wall perimeter and under the window.
Note: If the length of the sheet is greater than or equal to the height of the room, that is, the sheet covers the wall in height, then there is no need for horizontal bridges.
You also need to provide a support for fixing UD of future adjacent planes: if you plan to sew up a wall next to it, or mount a drywall box, then put an additional rack under the GK along this line.
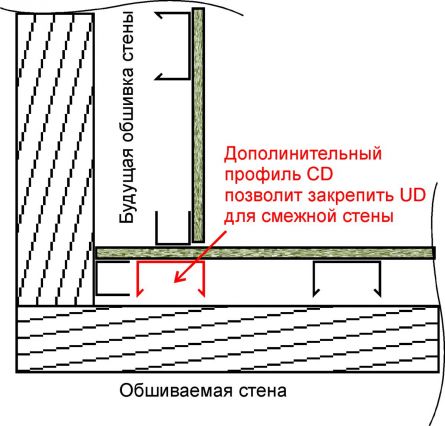
Additional CD will simplify the installation of the adjacent wall frame
When the UD is attached through a sheet of drywall to the CD, it creates a solid, good angle. If you will sheathe the ceiling, then it is advisable to additionally make horizontal lintels at the level of the future ceiling.
Securing the frame perimeter to the floor, walls, and ceiling
Plane marking
When we have decided on the location of the sheets and profiles on the wall, we need to mark the plane in which the drywall will be located. The minimum thickness of the entire structure on the profiles is 35 mm + 12 mm (GKL) \u003d 47 mm. The maximum thickness that the U-shaped bracket (P-cabinet) allows us is 110 mm.

P - shaped bracket, or simply "P-shka"
In general, we need all the markings and stretched laces for the profiles (not for the front surface of the GK), since we will expose the profiles. We beat off the line on the floor with the help of a dyeing cord so that all the profiles pass vertically without touching the wall, and at the same time do not take up extra space in the room. You may have to lay mineral wool under the gypsum board, this must also be taken into account: then the distance from the existing wall, to the gypsum board should be equal to the thickness of the mineral wool. Sometimes it is necessary to get a right angle between the walls: then you need to mark the adjacent walls on the floor, because at this stage it is much easier to control it. When everything is clear with the line on the floor, we draw vertical lines along the adjacent walls using a slatted level, or using a plumb line. And finally, we close the perimeter on the ceiling. To control the plane, you need to pull two diagonals with a lace. The laces at the intersection should touch, but not strain each other. We cut the UD profiles to length. But not completely, but only the side walls, and bend the middle wall.
Cutting UD side shelves to bend 90 degrees
Bend the middle wall and you're done
For sound insulation of structure-borne noise, we glue an elastic adhesive tape on the middle shelf UD - in German it is called dichtung. This simple technique will significantly reduce the rattling of the wall, improve the sound insulation of the room.
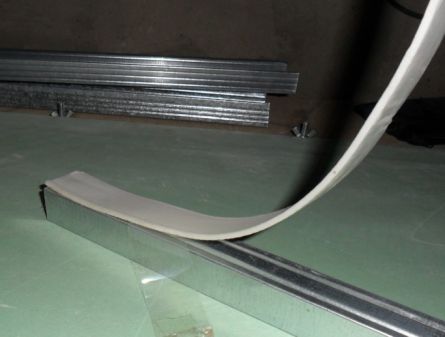
Glue the tape on the middle shelf UD
Now you can attach the UD profile. Depending on the material of the floor, walls and ceiling, we select fasteners. For durable concrete that does not crumble, a fast-assembly dowel (DBM) 6x40 is suitable, for bricks with DBM 6x60 plaster, in a loose, not very strong surface, it is better to use DBM 8x60, 8x80. If you need to attach UD to a tree, then take wood screws. It is necessary to fix UD at least every 400 mm.
Important! The evenness of the entire surface will depend on the evenness and verticality of marking and fixing UD.
In UD, there are usually Ø6 mm perforated holes for fasteners, however, it happens that the hole went away with the waste, or the hole falls on a fragile section of the wall. Then it is better to outline the missing holes and drill them with a metal drill, placing a block inside.
It happens that the base to which the UD is attached is uneven, and if fixed in a local "hole", the profile can bend. To prevent this from happening, it is necessary to put gaskets made of wood or plastic in such places.
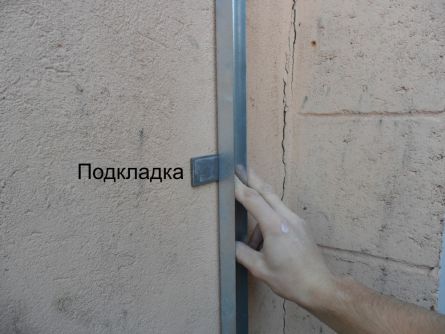
Place underlays under UD where needed
If the existing surface is fractured, then in this place it is necessary to make cuts on the side walls of the profile. Then you will have to, then trim the edge of the sheet, but the profile will not be bent and well fixed.
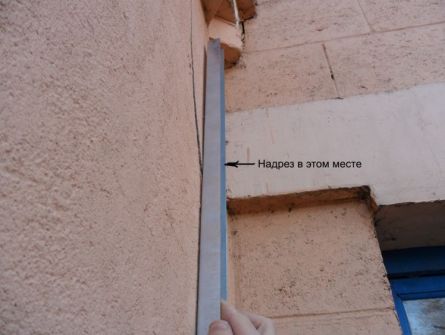
In the place of a sharp break in the surface, cut UD
Now it remains to fix the UD under the sill to the full length of the sill. Fasten UD from the bottom of the window sill with self-tapping screws. It is desirable that the self-tapping screws do not then stick up from the windowsill :). To fix the profile in plastic, a 9.5 mm flea screw is sufficient, no more than 15 mm.
Installation of profiles for CD-racks. Marking and fastening
Fastening the profile for drywall is as follows - on the wall you need to beat off the vertical lines of the CD location. We fix P-shki along these lines - every 500-600 mm. We retreat from the floor and from the ceiling by 500 mm, divide the remaining distance into equal parts.
Each U-frame must be fixed to one hole on each edge (optionally: 1 or 2, and 4 or 5), the middle hole 3 can be omitted. In general, it is needed for preliminary fastening, a long slot will allow the bracket to be displaced.
P-shka
We select fasteners, again, based on the base. For better sound insulation, you can glue a dichtung under the P-shk.
Fasten P-shki
When all U-shki are fixed, we insert the vertical CD racks into the UD profiles. Their length should be such that the profile fits into place without stress and does not dangle: 2-3 mm less than the internal dimension between UD.
We start racks
When all the racks are in place, you need to firmly pull the lace horizontally between the extreme UDs. Now you can bend each bracket to the CD, and in order for the lace not to be pulled back by the racks, you need to insert a nail or wire into the U-shku so that the racks are slightly bent towards the wall. If this is not done, then the wall will come out "pot-bellied".
We remove the profiles from the lace - with a carnation
Now we remove the limiter-nail from the extreme rack and fasten the rack to the P-shke. These are the 9.5 mm long self-tapping screws:
Self-tapping flea 9.5 mm
Important: None of the uprights should retract the lace.
First we fasten one screw on each side. It is convenient to twist the self-tapping screw into the hole that coincides with the groove on the profile. Then the profile will not move, and the screws will pop out. 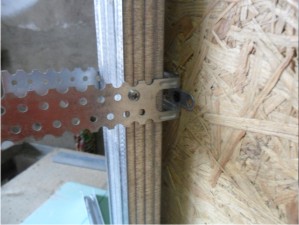
We fasten the racks to the P-shkam
We make sure that the stand is exactly in line with the lace, and does not pull the lace. We check with a long rule that the height of the rack is also even. Now it is too late to control verticality: we make sure that we get a flat plane. After control, you can twist on the second flea, for reliability.

We bend the protruding parts of the P-shki
When all the screws are screwed on, bend the ends of the U-shki protruding beyond the plane.
Frame under and above the window
Now we make a jumper from CD over the window. We make a T-shaped connection on both sides of the jumper. We set it to the horizon, remember that the lower edge of the lintel is a support for the slope. We fasten the jumper with 9.5 mm fleas.
We make a rack from the lintel to the ceiling. At the bottom there is a T-joint, at the top it just fits into the UD. We fasten 9.5 mm with fleas.
Arrangement of connections in the frame
Node: Strut lintel at the edge of the opening
If the rack along the opening becomes so that it has no support, then add jumpers after 500-600 mm and fix the jumpers on the P-shkakh.

Top view: if the post at the edge of the opening is not supported
When all the racks are screwed on and aligned according to the markings, we twist the racks to UD so that they do not move. When the sheet closes the racks, they will not be visible, and in order not to waste time calculating and remembering, we put the lines of the racks on the floor and ceiling.

We fix the racks and mark their location on the floor and ceiling
Fitting sheets to the required dimensions
It is advisable that the HA does not touch the ceiling and floor of 3-5 mm: this will improve sound insulation, and the HA will not saturate water in the event of a small leak. If the floor and ceiling are horizontal, and the corner from which you start sheathing is vertical, i.e. there is a right angle, then it is enough to measure two sizes: the height of the sheet and the width. If the floor is not in the horizon, then first this slope must be cut from the sheet. This is necessary so that all other edges of the sheets remain in a vertical position (for more details: and).
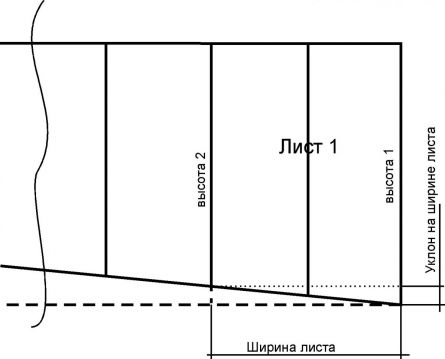
Sheet size chart if the floor is not in the horizon
And only then measure the height and width of the sheet.
Sheet dimensions if both the floor and the ceiling are not horizontal
If the geometry of the sheet is completely ugly, when, for example, there are no right angles, then the diagonals should be checked. They should be the same on the marked sheet as on the wall.
It should also be borne in mind that at the outer corner, for example, a slope, one of the sheets must be released to the thickness of a suitable edge.

One of the sheets on the outer corner must be released to the thickness of the other
And if these are both factory edges, then the outer filler corner will ideally fit in the groove of the edges, and will not protrude beyond the plane.
Optimal edge on outer corner
Fastening drywall to the wall
For better sound insulation, dichtung can also be glued to the surface of the frame under the gypsum board. When sound insulation is approached comprehensively, the result is much better.
Comprehensive sound insulation measures
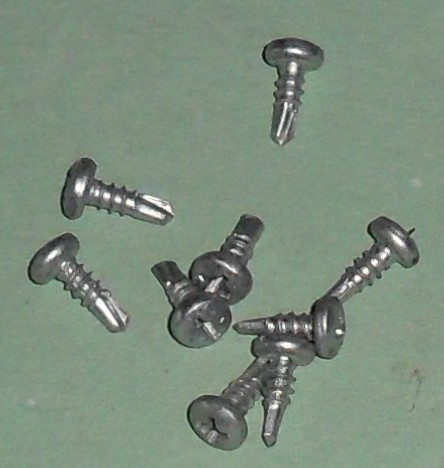
Sheets are attached to the profiles using self-tapping screws TN-25 for metal 25 mm long.
Screw for fixing drywall sheets TN-25
We fasten the sheets on each stand and along the perimeter in 20-30 cm increments.
We fasten the sheets to the frame using a screwdriver or drill with a small number of revolutions
Each screw should sink 1 to 2 mm into the paper. The screws must be twisted perpendicular to the surface of the sheets. If the screw has gone deeper than 3 mm, then it does not hold well, and you need to retreat 5 cm and tighten another one.
Exemplary screwed in
It is necessary to twist carefully along the perimeter in UD: when the edge is not factory-made, but cut off, then if the screw is deepened too much, the edge of the sheet will break off. This is not fatal, but it will have to be sealed with putty, and this has a bad effect on the strength of the sheet. If the sheet is cut inaccurately, and the GK sheet hardly reaches the UD profile, then you can do the same as with the plinth: insert the CD profile into the UD and there is no longer any need to tighten the screws to the very edge of the sheet (green).

An additional CD will help to properly fix the sheet, and the plinth in the future
If a screw head is found on the surface of the profiles, then the HA will not adhere tightly. Then we take a block, apply it in this place to the already exposed sheet, and with a precise blow of a hammer (without fanaticism?) We press in the GK from the back side of the screw. In general, the sheets are optimally measured, cut and screwed sequentially: this way we exclude unnecessary movements of the sheets, and can promptly correct inaccuracies in measurements. So that the sheet can be conveniently set in height (raised by a few millimeters) during screwing, you can use such a bar: the harder you press on it with your foot from one edge, the higher the sheet will rise.
The bar helps to set the sheet in height by a few millimeters
Frame for slopes
Now on our wall there are unprotected slope surfaces. It looks neat when all the slope planes are equally located on the window (preferably about 5-10 mm). The narrowest point is the hinges on the sash, i.e. It is necessary to "dance" from this side. Then the rest of the slopes can be made according to this size. 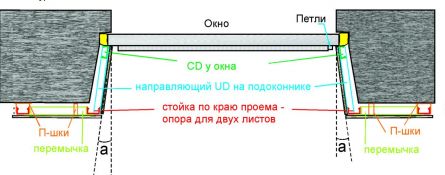
Frame for slopes
If the width of the slope does not exceed 600 mm, then two posts are sufficient: one is a CD in the plane of the wall along the edge of the opening, and the second is a CD under the window itself. For rigidity, you can add a horizontal web between them. First, we fix the UD profile in the window sill and in the plane with it we fix the UD in the upper slope. These will be the guides. Insert a cut-to-size CD under the window. The easiest way is to fix it on distance bars (chop off the bar to size): if the distance between the profile and the surface allows you to fix it with a long fastener through the profile into the wall, then good. If the distance is about 100 mm (in old houses it also happens), then the bar can be positioned with its end: the bar can be tightened with a screw through the profile, and the bar itself can be fixed through the corner. Such attachment points should be every 500-600 mm. Can be attached to conventional P-shkakh. But there are many difficulties here: it is difficult to work with a screwdriver due to the proximity of the slope, it is difficult to fix the second side of the CD, and the U-shaped bracket cannot provide the rigidity of the frame "to - from" the window.
We fix drywall to the frame of the side slopes. Then, similarly to the side slopes, we sheathe the upper one: first the frame, then fasten the sheet. Or you can proceed in the reverse order: first the upper slope, and only then the two side slopes.
We sheathe slopes with plasterboard
Cut out the upper slope.
- We measure the width of the slope: from the window to the plane of the wall. For control: we check the width in two corners, it often happens that the window does not stand parallel to the plane of the wall.
- We measure the length of the slope under the window.
- Now we apply a 90 degree square to the corner and measure the difference B: how much the outer edge of the slope is larger than the inner one. Also in the second corner is the difference C.
- Check: the sum of the two "differences" B + C and the length of the inner edge of the slope A \u003d the length of the outer slope.
- We mark the sheet. Cut off and fasten.

Slope Dimension Scheme
With the side slopes, the situation is the same, only there is a right angle between the window and the sill.
Approximate consumption of materials for wall cladding 2.5-3 meters high 4.5 m
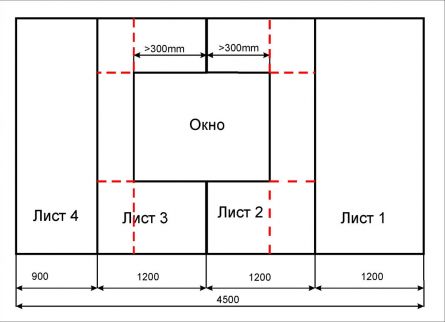
Layout of sheets on the wall 4.5x2.5-3 m
- UD 5-6 pcs x 3 m;
- Fasteners for UD 50 pcs;
- CD 9 pcs x 3 m;
- P-shki 50 pcs;
- Fasteners for P-shek 100 pcs;
- Self-tapping screw 9.5 mm (flea) 150 pcs;
- Drywall 3x1.2 m - 4 sheets + slopes depending on depth;
- Screws TH 25 - 200 pcs;
- Dichtung: on UD - 15 m + on P-shki 5 m + on CD 50-55 m.Total - 70-75 m 30 mm wide;
- Mesh at the joints 10 m;
- Fugenfüller 1-2 kg;
- Putty corner;
- Other little things to consider individually (acrylic sealant), etc.
Plasterboard walls and partitions
First, consider the case when you need to level the surface of existing walls. There are three options for attaching drywall to walls:
On a frame made of galvanized profiles. Allows you to get a perfect surface for any curvature. The profiles are attached to special clips. A frame is assembled from them - racks and lintels - the front part of which lies in the same plane. Since the drywall is at a decent distance from the main wall, communications and electrical wiring can be laid between it and the wall. Another plus of this option is the possibility of laying insulation or sound insulation. The minus of the frame from the profile - without insulation, it conducts sounds very well: if you hit the wall sheathing, the sound is like a drum.
On a frame made of wooden blocks. It is assembled according to a similar principle - from racks and lintels, but attached directly to the wall. Too large differences are more difficult to compensate: you will first have to look for the most protruding parts of the wall. Then there are two options: the first is to focus on them, placing additional bars everywhere, the second is to try to reduce the drop by cutting off the most protruding parts. The main disadvantage of fastening to wooden blocks is that if you use insufficiently dry ones (with a moisture content above 15-20%), they may "lead" when they dry, which will distort the entire structure. There is also a possibility of damage to wood by pests or fungi. Despite this, in some regions this method is more popular, since their prices for sawn timber are lower than for profiles.
Installation of sheets directly on the wall. This is the installation of drywall with glue. Use special mixtures or something like "liquid nails". This method is available if the walls are relatively flat - with a difference of no more than 2-3 cm.Glue is applied to the surface of the sheet or wall (in strips if the wall is almost even and in piles, if there are drops), then the sheet is set in place, set at a level, fixed with wedges and supports.
The latest technology - installing drywall on glue - is the fastest, but it also has disadvantages. The first - not everywhere under the finish there is glue, therefore it is problematic to hang cabinets on such a wall. If you plan to fix something to the wall in advance, lay a continuous layer of glue at this height or install a foundation beam, which will also be an additional beacon when setting the sheet level. Then the problem will be solved. Another disadvantage is that there are small differences. That is, the surface is imperfect. The difference is 2-3 mm. The sheet bends slightly between the "pieces" of glue. However, this is a good way to quickly level a wall.
Fastening to the frame
Since when gluing drywall to the wall, no fasteners are needed, we will talk about the frame and mainly metal. The rules for attaching to a wooden one are the same, just screws for wood are used.
GKL dimensions and purpose
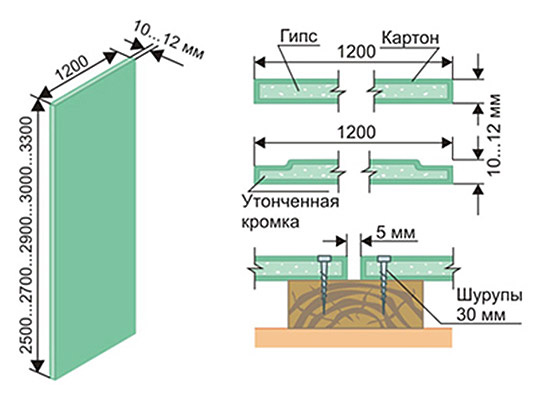
A few words about what sizes the sheets are and how to put drywall on the walls. Standard sizes such: width is always 1.2 m, height is 2.5 and 3 meters. Sometimes there is a “non-standard” of shorter length: it is easier to work with small ones, but more seams are obtained, which then have to be repaired. GKL thickness:
12.5 mm - universal material for walls and ceilings;
6 mm and 9 mm for curved surfaces.
It is often said that 9 mm sheets are ceiling sheets. But manufacturers do not have such recommendations. Any of the manufacturing plants positions the thin sheets as those used for finishing curved surfaces.
Bevels are made along the long edges of the sheet. They are needed so that the joint can be glued with reinforcing tape and sealed with putty. It is the side where there is a bevel that is the front. It is deployed inside the room.
How to dock
If it is necessary to join sheets in height, arrange the joints so that a long longitudinal line is not obtained. They say that the sheets are stacked at random or with a shift. At the same time, it is desirable that the displacement is at least 40-60 cm. Long joints are the most likely places for cracks to appear. By shifting the seam, you are almost 100% likely to get rid of cracks (see the figure for an example of laying sheets).
If the wall is sheathed with two layers of plasterboard, then the vertical seams are also shifted. The sheet on the top should be installed so that the joint of the bottom one falls in its middle (shift by half the width - 60 cm).
How to fasten and with what step
During installation, the sheet is pressed against the frame and fixed using a screwdriver and special self-tapping screws with flat heads. If the frame is assembled from metal, take self-tapping screws TN25 (3.5x25 mm). In stores, they are called "for drywall". Length - 25 mm, color - black (more likely to break) or white. For a frame made of wood, select those close in size with the flattest head: there will be less putty.
It is important to tighten the fasteners to the required depth during installation: the cap should be sunk into the sheet, but the cardboard should not tear. It is also necessary that the self-tapping screw be installed strictly perpendicular to the plane of the sheet: so there is less chance of damaging the cardboard layer, which in this structure is responsible for rigidity.
When assembling the frame on a solid wall, the distance between the posts should be at least 60 cm. Then it turns out that each sheet is attached to three vertical profiles: two at the edges and one in the middle. In this case, the edge of the sheet falls in the middle of the profile.
Having stepped back from the edge 10-12 mm, screws are screwed in. They can be placed, as in the figure above, one opposite the other, or they can be offset, as in the figure below. Installation step - 250-300 mm. Fastened along the perimeter and along the middle profile.
Another important point: when cutting out sheets, keep in mind that its height should be 10-12 mm shorter than the height from floor to ceiling. This is necessary in case of shrinkage: so that the wall or partition has the ability to compensate for the change in height without cracks (especially important for wooden and panel houses).
These are, perhaps, all the main points of working with drywall (excluding the peculiarities of mounting profiles).
Plasterboard partition
Markup
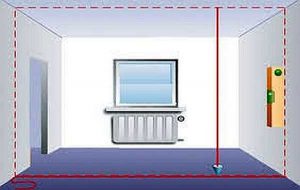
First, mark the installation site of the partition. The easiest way to do this is with a laser plane builder (laser level). This line is applied to walls, floors and ceilings.
If there is no laser level, you will have to use a regular building ( good quality) and a plumb line. First, mark a line on the floor - this is easiest. Then, using a level, transfer it to the walls. If both lines on the walls are vertical, the line connecting them must be exactly above the line on the floor. Whether this is true or not, you can check with a plumb line, lowering it from the mark on the ceiling to the floor line.
It is necessary to achieve a perfect match - the quality of all work depends on it.
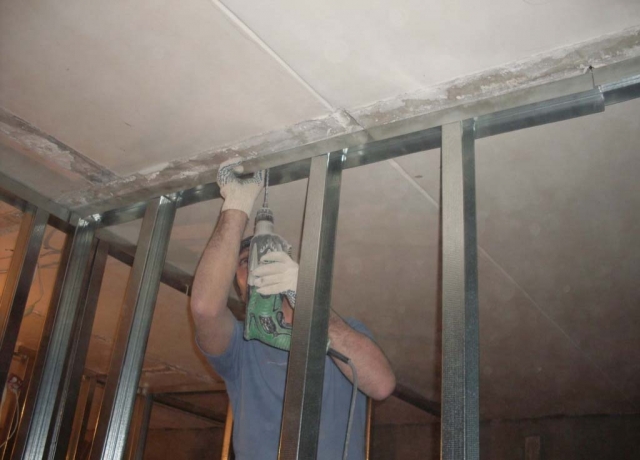
Assembling the frame
We will consider the assembly of the frame from galvanized profiles. Guide profiles are installed along the marked line on the floor and ceiling. It is marked UW or PN - bearing profile. They are usually fastened with dowels - 6 * 40 mm or 6 * 60 mm, the distance between two dowels is 30-40 cm.
PN-profile has a standard depth (wall height) - 40 mm, but it can be of different widths 50 mm, 75 mm or 100 mm. The thickness of the partition depends on the width of the supporting profile, as well as how thick the insulation and / or soundproof material can be laid there.
Bearing racks are inserted into the guide profiles. They are labeled CW or PS - rack-mount profile. It differs from the guide by the presence of additional shelves on the walls. These shelves make it more rigid by increasing bearing capacity... The width of the rack profiles depends on the width of the carriers: they must be the same. That is, the racks must be the same width. It is between them that the insulation is then installed.
The racks are attached to the guides in two ways. The first is used mainly by professional builders. They work with a cutter - a special tool that breaks through and bends metal to the sides, holding two parts together. Amateur builders at independent work with drywall, attached to "fleas" (also called bugs and seeds) - small screws with a screw in the lower part - TEX 9.5 (3.5 * 9.5 mm). They drill the metal themselves, speeding up the assembly process (no need to drill holes). Racks are fixed on each side with at least two self-tapping screws.
One point: if you are installing a partition in a high-rise building or on the first floor of your house, then together with the joint of the rack and the ceiling rail, put a special film or some kind of material that will prevent the appearance of a squeak. When people walk, vibrations occur, which are transmitted to the profiles, because of which they rub and squeak. The second option is to make the racks 1 cm shorter. It is more correct: the house will shrink and there are no unpleasant sounds.
The pitch of the racks is 60 cm or less. This distance is due to the width of the sheet of plasterboard (drywall), which is standardly equal to 120 cm. As already mentioned earlier, it turns out that each sheet is attached to three racks. So it turns out that there should be 60 cm between the verticals.
If the gap between the two racks is more than 60 cm, but less than 120 cm, a vertical profile is still placed between them in the middle, otherwise this section will "bunch" - the sheet will stagger and sag. One more point: the first rack is attached to the wall a little closer - the first sheet will be attached to the entire plane of the extreme profile, therefore the distance should be slightly less - 57.5 cm.
It is desirable to strengthen the profiles to which the doors or windows will be attached. The easiest way to do this is with a piece of wood of a suitable size. It is inserted inside, and attached to a pair of self-tapping screws. You need to use dry wood so that the timber does not twist.
After all the racks are exposed and secured, the structures are given greater rigidity using jumpers - horizontally installed pieces of rack-mount profiles. They are made in one of the three ways suggested in the photo. The third option is the easiest to manufacture and easy to assemble.
Jumpers are usually placed at the height where two sheets will join. Their edges must be fixed, so jumpers are needed there. For the rest - in increments of 60-80 cm. If the wall is large, place it every 60 cm, if it is small, 80 cm is enough. Crossbars above the doorway are required: at the height of the door frame. It is also advisable to strengthen them by putting a wooden block inside.
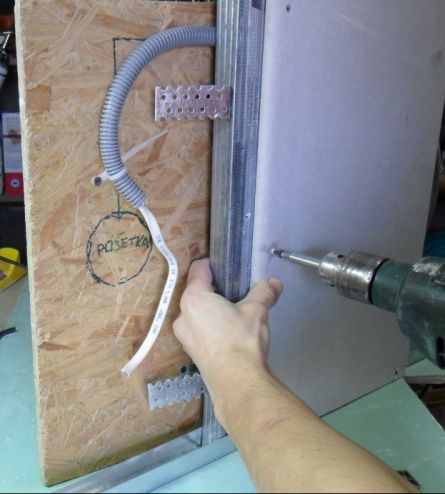
Laying of communications
After installing all the crossbars, you can start laying communications and wiring. It is advisable to mount all electrical wires in a corrugated hose. If you put the partition in wooden house or at wooden frame, it must be metallic. In houses made of non-combustible materials, in walls made of plasterboard on a frame made of galvanized steel, it is allowed to use plastic corrugated hoses made of non-combustible raw materials (there is a mark "NG").
Plasterboard cladding and heat / sound insulation
After laying the communications, they proceed to the installation of plasterboard sheets. They are mounted in the same way as for cladding. Do-it-yourself plasterboard wall cladding begins on one side. Then, on the other hand, between the profiles (bars) of the frame, an insulation and / or sound insulator is installed. After its installation, the plasterboard wall is sewn up on the other side.
Insulation for walls and drywall partitions is used as usual:
Mineral wool. This is glass wool, slag wool or stone wool (better - basalt). The most environmentally friendly - formaldehyde-free - bsalt mats. It is easier to work with them than with glass wool - no means of protecting the skin and respiratory tract are needed, they are less afraid of moisture than slag wool, they are easy to cut and hold well, without additional fasteners due to their high density. Their disadvantage is the high price. The cheapest of these heaters is slag wool, the average price is glass wool, and stone is the most expensive.
Styrofoam. To obtain good characteristics for sound and heat insulation, a layer of 5-7 cm is sufficient (density from 35 kg / m3). It is cheap, easy to install, retains heat well and does not conduct sound well. The disadvantage is that rodents love it and when it burns, it releases toxic substances.
Expanded polystyrene. One type of foam. It differs in the closed shape of the cells, due to which it has even better characteristics: it is denser, has excellent heat-insulating properties and dampens sounds well, rodents do not like it, fungi do not develop on it. It is cut with a hacksaw, can be installed by a rasp. Does not support combustion. The downside is the high price.
In principle, it is possible to use other heaters, but the listed ones are the most popular.
How to cut drywall
When making drywall walls with your own hands, you will have to cut sheets: they do not always become whole. To do this, you will only need a sharp stationery knife (for paper), a long, even object - a ruler, board, bar, level, rule, etc. And a wooden block a couple of meters long, but it is not necessary, it is just easier with it. That's all. A jigsaw may be needed when cutting curved lines, but there will be a lot of dust.
The sequence of actions is as follows:
draw a line on the front side with a pencil along which you need to cut off the drywall;
we apply a ruler along the line (a bar, a board) and cut the cardboard with a clerical knife;
put a bar under the cut line;
we tap on the shorter side with our palm, which causes the plaster to break along the cut line;
break the sheet along the entire length of the cut;
bend the broken piece, cut the remaining whole cardboard.
It's really very simple. The main task: to mark correctly. There are no further problems (unless the sheet is broken).
Not all subtleties can be described, some are better to see. We have selected videos in which there are features of working with drywall. Basically, they relate to the assembly of the frame from profiles. This is really the most time consuming part. And on how correctly the frame will be made, it depends how flat the wall or partition will be.
How to make a plasterboard false wall
How to make reinforced racks in the partition. This method of assembling the frame is non-standard, but that does not mean that it is wrong. The racks are really stiffer. This is necessary if you build a full-fledged from drywall interior partition... Amplification will not hurt here. The disadvantages are that it will take more time, and the cost of such a frame is higher.
Which profile is better: smooth or ribbed. There are different models of profiles on the market, including those with uneven and rough walls and sides. With the same metal thickness, it is more rigid, which seems to be good. But how good is he at work? Watch the video.
Plasterboard partition from start to finish. Here the installation of the partition is filmed step by step. Everything is quite accessible, you can take it as a basis and build walls from drywall with your own hands.


Drywall - optimal solution for creating . Plasterboard walls are lightweight, do not violate the structure of the building, in contrast to brick walls... They are installed to replace old walls, with a complete redevelopment in accordance with a new design solution, or to delimit the space in the room. You can install new walls on your own. This requires drywall and metal profiles or a wooden frame.
Types of profiles for drywall
There are special metal profiles for drywall on sale. They are more durable, installation of plasterboard sheets to profiles is easier. Metal profiles are attached to the walls with self-tapping screws. There are two types of profiles for sheathing wall planes:
CD - bearing profile, it is he who holds the sheets of drywall on the wall. Its side baffles are highly rigid. It is installed along the perimeter of the wall.
UD - auxiliary profile, inserted into the main one and serves for transverse fastening of sheets. It forms the plane of the wall. The thicker the profile itself, the more reliable the frame will turn out.
Arched profile. Such a profile bends easily, it can be given any shape.
Profiles for the construction of partitions differ in size. The profile width is selected in accordance with the design of the future wall. The inside of the structure can be, as well as laid cables for the power supply and telephone line. They are marked accordingly:
UW - guide profile, sets the direction of the future wall. Fastened to the floor, ceiling and walls, which will adjoin the partition.
CW - rack profile, reinforces the frame. It is installed vertically in increments of 40 cm. Plasterboard sheets are attached to it from both sides.
Additional fastening systems are also required to fasten the profiles. They are used to fasten the profile to the wall and to each other. For this purpose, use:

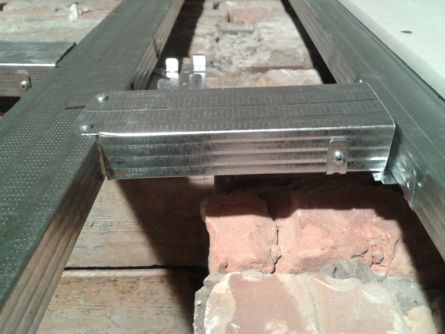
Mounting bracket - a metal plate that easily bends in the shape of the letter P. The middle part of the plate is attached to the wall, and the ends are bent in the desired direction to fix the profile.
Fast suspension used in cases where the length of the bracket is insufficient. This fastening system consists of two parts: a knitting needle with an eyelet at the end and a suspension. It is used for mounting a CD-profile. Not recommended for use on walls.
CrabCD connector used for cross-linking cross-linking. It is snapped into the profile and fixed with self-tapping screws. One fastener requires 8 self-tapping screws.

CD connector designed to increase the length of the bearing profile. Attached to the profile with self-tapping screws.
Two-tierCD connector used for mounting profiles to wooden bases and mobile systems. Mobility means a change in the size of the base under the influence of external factors: humidity, temperature and others.
You can cut drywall sheets with a special knife or an electric jigsaw. Self-tapping screws are easier to screw in with a screwdriver. To connect the profiles to each other, small self-tapping screws are used, which are popularly called fleas. They are not suitable for slabs - they are too short. To fasten the profile to the wall, use self-tapping screws about 7 cm long.
Features of mounting a wooden frame
For a wooden frame, you will need rails of about 2.5 × 4 cm, which are used for the cross-bars. The parameters of the rails can be changed depending on the thickness of the future plane. For and places of joining of drywall sheets, wider slats are used, the width of which is approximately about 8 cm.
For mounting rails to concrete wall dowels are used, and self-tapping screws for fastening to wooden bases. Drywall is attached to the wood with self-tapping screws, but nails can also be used. They are pre-soaked in drying oil to prevent rust. The timber frame is only suitable for dry rooms.

Wooden slats must first be treated with a septic tank to protect against mold and insects. For this purpose, both water-based and azure-based products are suitable. There are universal septic tanks that additionally protect the wooden frame from fire. The tree for the frame is selected even. It should be free of chips and knots. The thickness of the slats is selected depending on the future load on the wall. The thickness of sound and noise insulation is also taken into account.

Install the slats on the wall using a level and a square. First, the slats are installed around the perimeter, controlling them by level. The planks are screwed to the wall with self-tapping screws. If it is supposed to hang heavy objects on the wall, it is better to attach the frame with self-tapping screws 10 cm long.

After installing the supporting wooden profiles, the vertical posts are fixed. It is recommended to keep a step of about 40 cm. You can install them wider, but the distance between the posts should not exceed 60 cm. The edges of the drywall sheet should be clearly laid in the middle of the post. If insulation will fit into the space between the racks, the distance is respected along its width.
Installation of a frame from a metal profile
Before attaching metal profiles, you need to mark the wall. Lines for mounting the bearing profiles are drawn. The width of the marking line depends on the thickness of the profile plus the thickness of the drywall sheet. When marking vertical bearing profiles, it must be borne in mind that the corners in the walls are uneven. If the structure is vertical, the dimensions of the markings at different joints may differ by several centimeters. Layout parameters are checked by level.

Types of metal profiles for plasterboard installation
Along the first line of the bearing profile marking, the remaining parameters of the structure will be equal, therefore, it is necessary to clearly lay in it the required thickness of the finished drywall wall. If all walls in the room are to be covered with plasterboard, they try to make the corners clearly straight. After marking the first line, the ceiling and floor are marked, then the opposite wall. Be sure to check the finished markup at the end for the verticality of the structure.

A sealing tape is laid under the profile at the points of abutment to the walls, ceiling and floor. The first to attach the UW-profile guides to the floor and ceiling, securing them with dowels. An impact screw is driven into the plastic dowel. The thickness of the screw must be greater than the diameter of the dowel. Then the vertical posts from the CW profile are installed.
The same profiles are attached in places where doors and windows will be installed. When installing each profile, the verticality of the structure is checked. It is recommended to additionally strengthen the profiles, which are intended for the formation of window and door openings, with wooden beams.

The wooden beam is fixed with self-tapping screws inside the profile. If AU profiles are used, no additional stiffness is required. The top and bottom of the doorways are formed using a UW profile.
Fastening drywall to the profile
Wall plasterboard is suitable for walls. The sheets are installed first in the corners, then all subsequent ones from the corner are laid. Sheets that are installed end-to-end to the corner must be prepared. A 5 cm wide end chamfer is removed on them. A knife is used to adjust the size of the drywall. The sheet is placed on a flat surface, for example, on a table, outlined in size and cut.
Perform with an electric jigsaw along a predetermined line. Files for metal are picked up to him.
Holes are easy to cut with an electric jigsaw
To attach the sheet to the profiles, take self-tapping screws 3.5 × 35 mm. Self-tapping screws are fastened in increments of 10-25 cm. The sheets are installed so that there is a gap between the floor and the sheet 1-1.5 cm wide. The sheets are fastened along the profile according to the bottom-up and top-down principle. The top sheet is adjusted in height if necessary. The stripes are put in a checkerboard pattern: on the first strip the top is adjusted, on the second strip the bottom is added and adjusted.
When laying wires inside the wall, through-holes are made in the profiles in the places where the cable is pulled. It is recommended to protect the cable with a corrugated pipe in order to ensure fire safety.

Mineral wool is used for soundproofing walls and walls. It is placed in the space between the profiles end-to-end without gaps. Mineral wool is placed before. In the walls, it is laid after sheathing one side. It is not necessary to additionally fix the insulation to the wall. After that, the second side of the wall is sheathed.
This sheet material is currently the most popular for cladding internal partitions, and the installation of a plasterboard wall is the simplest and most productive in construction. Therefore, it makes sense to consider what is wall cladding with this material in more detail.
The first action before the start construction works, is the layout of the premises. If it is decided to install drywall for surface finishing, some points should be taken into account.
The standard sheet sizes of this material are 1200 - 1300 x 2500 - 4800 mm with a thickness of 6.5 to 24 mm. At the same time, almost every size is designed to fulfill its specific task.
To reduce the complexity of work, reduce the consumption of fasteners and the most efficient cutting of the material, these data should be taken into account when planning the room. For example, the ceiling height is considered comfortable at 2.5 meters, then it corresponds to the size of the sheet. Often this parameter is taken as 2.53, we will indicate the reasons below. Similarly, the width of the rooms is desirable as a multiple of an integer number of sheets. Or a multiple of half the size, then the cutting of the material will be optimal.
When determining the size of the premises, it is also necessary to take into account the thickness of the internal walls and partitions, since this factor will also affect the cutting of the material. This means that we are already moving on to deeper detailing - to determining the dimensions of the lathing and the selection of materials for its manufacture. And behind each such detail lies the amount of labor intensity and financial costs.
Types of drywall
Based on the properties laid down by the developers in such building materials, the gypsum board is divided into the following types:
- ordinary drywall. Consists of a layer of gypsum dough and a cardboard cover on both sides, used for finishing rooms with humidity within normal limits. It is widely used due to ease of use, good workability, light weight and economy;
- GKL with fire-resistant characteristics. Convenient to use for utility rooms such as summer kitchens and others non-residential premises... Can be used near heating appliances, stoves and fireplaces;
- moisture-resistant drywall, which allows its use in rooms with high humidity - baths, bathrooms, toilets and others. Thanks to the use of special additives, it is protected from the effects of fungus and mold. Ideal for decoration country houseswhere the humidity is usually higher compared to urban apartments;
- fire - moisture resistant material, which is almost universal.

By purpose, drywalls are divided into the following categories:
- arched - with a thickness of up to 6.5 mm, allowing large deformations in several planes at the same time, such properties are also given to it by reinforcing additives of a fibrous structure;
- ceiling - thickness up to 9.5 mm, lightweight construction;
- wall - for wall decoration and installation of partitions, thickness 12.5 mm.
With this thickness, which is the most popular, the weight of a standard sheet of 1.2 x 2.5 meters is 30 kg.
Drywall tool
The material does not have high mechanical properties and is easily processed with a simple tool. In this case, you can use the following tool:
- saw - hacksaw for wood. Purpose - cutting drywall sheets into parts during installation;
- circular saw - for making long straight cuts when cutting;
- jigsaw - cutting out parts of complex shapes along the markings;
- construction knife - trimming the edges of parts after sawing;
- tape measure - measurements during marking and cutting;
- construction plumb - control of the position of the sheet in space during installation;
- carpentry level - the same;
- electric drill - drilling holes for fasteners;
- screwdriver - installation of fasteners when fixing plasterboard parts, assembling a frame from metal profiles;
- a set of spatulas, including narrow, medium, wide, angled metal and rubber;
- paint brush - for applying a primer;
- foam roller - for the same purpose;
- drill attachment for mixing dry mixtures;
- emery cloth No. 4 or No. 5;
- container for mixing mixtures.
This is the main set of tools with which leveling, priming, and decorative finishing plasterboard walls.
In addition, you will need materials:
- primer - to strengthen the surface of the walls;
- acrylic putty - repair and preparation of the surface of gypsum plasterboards for the application of the main leveling layer;
- fiberglass tape - serpyanka;
- fasteners for drywall - self-tapping screws of a special shape;
- insulation for laying under drywall sheets during the construction of partitions for the purpose of insulation and sound insulation;
- GKL of various sizes, including a thickness of 6.5 mm - for the creation of spatial shapes of parts; 9.5 mm thick - for ceilings; 12.5 mm thick - for wall cladding, up to 24 mm thick - for laying floor coverings with dry screed.

Assembling a wall from gypsum board
To build a wall from this material, you will first need to build a base for it - a metal or wooden frame for drywall. The choice of material for the wall is not an idle question. With the seeming benefit of using wood, here the developer faces many difficulties associated with the properties of the material:
- the need for antiseptic treatment of every detail, which will help get rid of the risk of developing rot or fungal diseases. Fire protection, especially if hidden electrical wiring will be laid inside the frame, which most often happens. In addition to timber processing, electrical installation must be placed in a flexible corrugated hose made of special materials;
- careful selection of material based on straightness and the absence of screw deformations;
- changing the size of parts with fluctuations in the humidity regime in the room, which is especially important for suburban buildings with periodic visits, which results in warping of the frame and swelling of the wall surface.

All these difficulties will inevitably require, in addition to material costs, a lot of time.
All these shortcomings are free metal framesmade of galvanized steel in the form of bent perforated profiles.
Several types of them are produced, designed to perform various structural elements:
- Ceiling profiles, designated as CD, with cross-sectional dimensions 60 x 27mm.
- Ceiling guide profiles CW 28 x 27 mm.
- Rack, UD - 50 x 50, 75 x 50 and 100 x 50 mm.
- Guide profiles with dimensions 50 x 40, 75 x 40, 100 x 40 mm.
The standard length of the guide profiles is 3 meters, for ceiling and rack-mount profiles - 3 or 4 meters.
U-shaped straight hangers for connecting ceiling and CD profiles are produced as auxiliary parts.

In addition, you will probably need corner framing profiles and, possibly, arched ones.
A frame made of a metal profile for a wall begins with marking its location. It is made on the floor, and then transferred to the ceiling using a plumb line and a paint cord, which will ensure the strict verticality of the structure.
The construction of a wall or partition must begin with the creation of a frame, using UW guide profiles and CW rack profiles.
The fastening of the base parts must be carried out in increments of at least 60 cm.
When choosing the pitch of the racks, it should be remembered that the dimensions of the drywall sheet are multiples of 600 mm, therefore, the racks are set, focusing on this parameter. Attention! At the location of the door on the floor, you need to break the frame.

- on one side of the frame, you need to stretch a vapor protection film, for which a polyethylene film with a thickness of about 200 microns is used. It is pulled over the frame and secured with construction tape;
- you need to understand how to fix a drywall sheet. Important! For this work, self-tapping screws of a special design are used.
- Pay attention to the shape of the screw head. It allows, without destroying the surface of the coating, to fix the sheet flush.
- in a similar way, install the rest of the wall cladding on one side, making a cutout under the doorway;
- the openings between the racks need to be filled with insulation, which simultaneously acts as a soundproofing device. Otherwise, the double hollow wall will act as a resonator, amplifying sounds. For this purpose, various materials are used, both slab (minelite) and roll, such as isover, a thermal insulation device of more than 2 layers will entail the need for a three-dimensional frame. Wall insulation and soundproofing will allow living to be quite comfortable;
- before sheathing the second side of the frame, you need to install a second layer of steam protection, proceeding in the same way as for the first side;
- drywall sheets are sewn over the vapor barrier with screws 6 or 8 mm in diameter. They are installed in increments of at least 250 - 300 mm. Therefore, performing this operation manually with a screwdriver is not possible, you cannot do without a screwdriver.

Attention! Cutting galvanized frame profiles must be done with a hacksaw on a broomstick manually. Using a hand sander burns out protective layer, subsequently the metal in this place will actively corrode. After cutting, the end must be painted over with a special protective paint, 85% consisting of finely dispersed metallic zinc.
Plasterboard wall alignment
Often, during construction or repair, the layout of the surface of a wall or partition is much easier to accomplish using gypsum board than plaster. Usually this is also done using a frame, when the drywall is attached to the wall on the profile. Before attaching the profile to the wall, you need to determine the point of its closest location to the wall and install floor and ceiling guides. Then the installation of racks will not cause problems, since they are all structurally already remote from the walls.
As a result of the work performed, a smooth wall is obtained and it remains only to prepare its surface for the application of the topcoat.
There is a way how to level the wall with drywall without a frame. It should be noted that the surface quality of the base must be sufficiently high. Before fixing drywall to a wall without profiles, you must carefully remove all protrusions that may interfere with this. Installation technologists can be as follows:
- attach a piece of plasterboard to the wall and drill the mounting holes. At the same time, traces from the drill will remain on the base surface, which will be marks for the mounting holes;
- remove the part and use these marks to drill holes for installing the plastic inserts;
- apply to the wall adhesive composition on a cement or plaster base, level with a comb trowel. You can also use polyurethane glue;
- put the part in place, fix it with screws.
Knowing how to glue drywall to a wall, you can easily cope with the rest of the coating.
Surface putty
For the final preparation of the plane of the walls for the finishing coating, its finishing with putty is used. This is done like this:
- primer with the recommended composition, gluing corners and joints with serpyanka;
- applying a primary layer of putty, sanding after drying;
- finishing the surface with the finishing compound of the putty, drying, grinding;
- thorough cleaning of the surface of the walls and the entire room from dust;
- finishing primer of walls for the final coating.
Knowing how to make a drywall wall, any developer can cope with this task on their own. You just need to correctly use the information received here.
At the same time, the invited specialists will perform this work at a price per square meter from 600 to 800 rubles. However, in any case - good luck to you!


