A do-it-yourself mansard roof is a great opportunity not only to save on design and work, but also an opportunity to improve the aesthetic performance of your home, as well as to use the attic space more rationally.
This material will consider the design features, its types, as well as the advantages that a mansard roof has. You will also learn how to make a mansard roof, what are the main stages of this process, and what should be taken into account when carrying out installation work.
In many cases, the installation of a skylight requires modification of the roof rafters that form part of the roofing system. This can be the hardest part of installing a sunroof. To maintain system integrity rafter roof, it is important that during the construction of the rafters, the load on these rafters is transferred to the new support rafters.
If you need an explanation of the roof rafter construction, you can find more information at. A common mistake made by the DIYer is to remove part of the support rafters, not replace additional elements support because the roof still feels and feels as strong as it did before the rafters were cut.
Calculator mansard roof at this moment is in development, soon it will be possible to carry out calculations for the mansard roof online. For now, we offer to use the free calculation of the gable roof, as well as the online calculation of the hip and pitched roofs.
Builders never add more stuff than is necessary to match the code, and the code is based on weather eventsthat can only happen once every hundred years. Figure 1 shows the roof truss system after the hole has been cut to fit the hatch.
There are several important points to highlight. Figure 1 shows a detail of the roof structure for setting the clearance. Install two main rafter supports before cutting existing rafters. This will help prevent roof sagging that can occur when cutting out old rafters. The new horizontal elements surrounding the skylight hole rest on rafters that extend through the support. Oven hangers are designed to load vertically on the bottom of the hanger, as in the case of floor or ceiling beams. Using a beam hanger would transfer the load to the side of the beam hanger rather than the bottom. Always use double pieces to surround the opening in the roof. Another common mistake is not starting the horizontal element for new rafters. The roof rafter system is based on the use of the force that occurs when constructing a triangle. Without the bottom of the triangle, actual support drops sharply. For a more detailed explanation of how the rafter system works, visit the page on Cathedral Floods. Figure 1 - Configuration of the roof truss structure.

Mansard roof installation
Buy or rent a pneumatic or electric nail gun. The vibration created by driving the nails into the rafters will cause the roofing nails used to hold the shingles or other roofing material to loosen. The use of a nail gun completely eliminates vibration.
Rafters with extension behind the wall panel
When you try to install new support elementsnails will protrude from the roof and are used to hold the roofing material in place. Use a hand sander or rotary tool with a chopper attachment to remove protruding end nails and in the path of new rafters. Don't try to pull the nails out. Some DIYers will try to remove nails with a side cutter or a pair of nippers. Both of these tools have an inherent problem besides the fact that cutting nails by hand is difficult and that is that the nippers or side cutters will leave a small piece of the nail sticking out of the roofing material.

Before installing the skylight, this contractor constructs a curb around the roof opening and installs a curb that sparkles into the shingles. A skylight allows significantly more light than a vertical window, so even a small skylight can make a room look larger and more airy.
Materials used to create a rafter structure
When planning an installation in a skylight, be sure to consider the path of the sun. Skylights on the southwest side of the roof collect direct sunlight facing north or east may not receive direct sunlight. Any skylight that receives direct sunlight should become a heat trap on hot days. So, if you plan to install a skylight facing south or west, make sure you plan for ways to control the heat gain. Some manufacturers sell remote-controlled shades or Venetian blinds for their skylights - opting for them would be one way to minimize the problem.
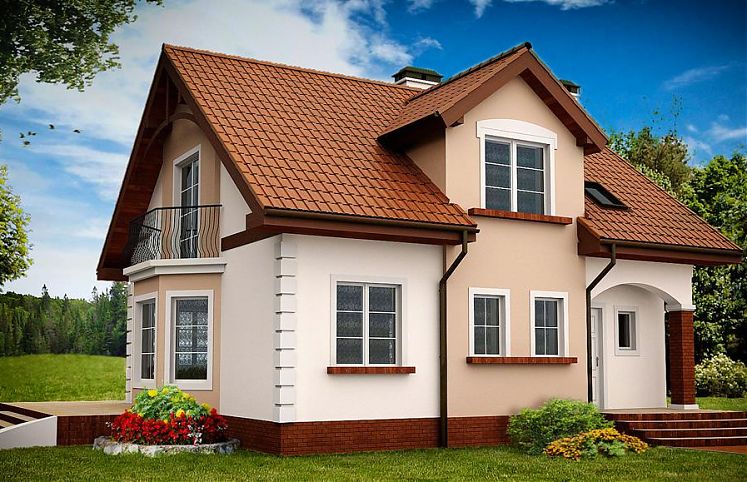
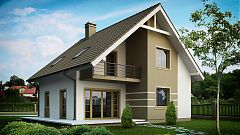
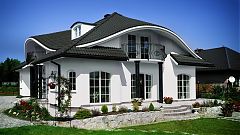
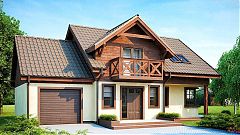
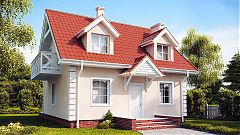
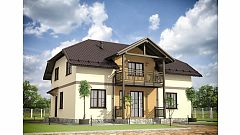
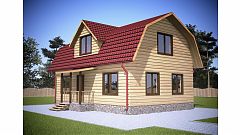
Mansard roofs - types and features
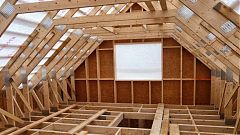
To begin with, let's take a look at what the attic is. So, this is a living space just below the roof. Its arrangement is much cheaper than the construction of a separate extension to the house or an additional floor. There is no need to make significant structural changes to the building, which is also important. However, the arrangement of the attic is not uncommon and in newly erected buildings it is very often used for living rooms, libraries, bedrooms, study rooms, children's rooms, etc.
Another is to choose a ventilation opening that can be opened to allow hot air to escape. One important fact to keep in mind: if you want to install a skylight in the loft room above, you will need to build a light shaft. This attic has a built-in light shaft frame that will flood light from the roof to the room below. Now that the cropping is finished, the drywall is added to the inside of the light shaft.
Mansard roof insulation
The shape of the light shaft controls the propagation of the natural light beam. A shaft that splits on all four sides scatters light over the widest area; a perpendicular shaft with vertical sides focuses the light directly below. A shaft that is swollen on one or two sides only sends more light towards the forked sides.
Depending on the type of roof, the following types of attic roofs are distinguished:
- Single-pitched - the inclined plane is fixed on load-bearing walls with different heights. The most simple and inexpensive option.
- Gable - characterized by the presence of two slopes, with a versatile divergence.
- Half and hip - there are four slopes for more rational use of the available area.
- Broken lines are the most popular and common option, providing the greatest space inside. Despite some complexity of construction, such mansard roofs are becoming more and more popular.
- Roofs in the form of a cone, dome and pyramid are relevant for buildings with complex configuration.
Make sure any clearance you intend to install will comply with local codes for load, wind resistance and related factors. Building permits are required for installation in most regions. Sizing and positioning a roof window in an attic so that it captures the view requires careful planning. The slope of the roof will affect correct placement. A low-calorie roof will require a taller window than a steeper roof with the same look. Roof window manufacturers have diagrams that list recommendations based on roof slope.

Phased glass installation
Here's what you need to set the skylight. Your toolbox should include a circular saw, hammer, flat bar, tin scissors, and a utility knife. This is not an easy project as it involves cutting the roof and installing new structural elements, as well as installing drywall and finishing the ceiling under the hatch. Roofing paper and metal flashing light must be installed correctly or the roof will seep around the hatch. If you have good carpentry skills, follow the manufacturer's directions exactly; otherwise, hire a professional.
Main advantages:
- Substantial expansion of housing space.
- Enhancing the overall aesthetics of the home.
- Insulation of the attic insulates the house as a whole.
Disadvantages:
Types of rafter systems
The instructions provided here will give you an idea of \u200b\u200bhow to work. Some skylights use different ways installations and different types flashing. From the inside, drill a hole for the locator where you want the center of the hatch to be, and then work on the roof to cut the hole with your circular saw.
Figure 1, Cutting and Framing the Roof Hole for Clearance. Secure the hole so that it is structurally sound in accordance with building codes. Be sure to support the ends of the roof rafters before cutting and removing them! Install the top beams perpendicular to the rest of the beams.
- Additional costs for the arrangement.
- The inability to install standard windows.
- Complex construction process.
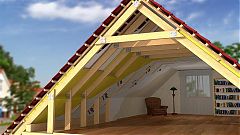
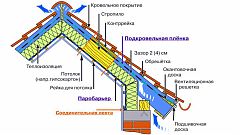
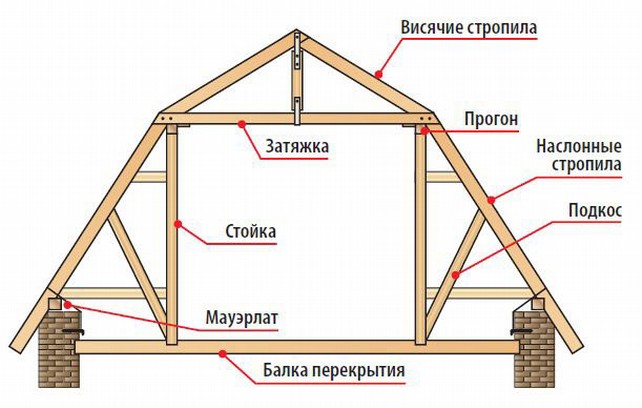
The mansard roof structure includes the following elements:
- Roof - the basis of the entire roof, which protects the structure from atmospheric manifestations.
- Lathing - boards holding the roof and insulator.
- Ridgerun - the outside of the roof structure.
- Rafters (layered) - stiffeners that give the structure the required strength and reliability.
- Internal supports - vertical beams for additional stability.
- Mauerlat - the base on which the entire roof truss system is mounted.
- Diagonal bevels - a beam connecting the vertical posts and longitudinal beams with rafters.
- Insulator - a multilayer layer to maintain the required temperature regime. Includes noise, heat and vapor barrier.
If the skylight is installed above the attic, you will also need to cut and lower a hole in the ceiling of the room below it, as well as lower the light shaft through the attic. Note. If you are unfamiliar with common carpentry practices or are installing a large skylight that will require the removal of multiple rafter structures, contact a professional builder.
Figure 2, Positional roof. Install the sunroof in place, centered on the hole, and secure it to the roof with nails or screws. Cut off strips of roofing paper about 8 inches wide and thread them under the shingles. Install the bottom, then the sides, and then the top. The idea here is to lay the chunks on the roof with the chunks that are on the roof so that the water will be spilled properly. It will be difficult to sneak up paper under the tiles.
Use a flat bar to lift any roofing nails that will get in the way, being careful not to damage the shingles. Rotate the roof or roll your nails horizontally into the gap rather than vertically into the roof. Then slide the individual tread pieces flashing under the shingles. Start at the bottom on each side and work through. Interfering elements should overlap each other by 4 inches or so. Attach glittering items to the hatch, not the roof.
These pieces are designed to fit snugly against the lumen and ensure that no water can enter between the stepping blink and the lumen. Attach the bottom part first and then the side parts. Install the top by sliding it under the roof and securing it to the skylight. Skylights have been used for over a century to provide indoor daylight. Early skylight systems consisted of plate glass in metal frames and often included both an external lantern and a decorative "diffuser" or "spotlight" interior.
The main stages of building a mansard roof with your own hands
Like the construction of any other building, the device of a mansard roof begins with a preliminary design of the structure. For a simpler and more accurate calculation of the main components, as well as obtaining a drawing, you can use our online calculator.
Most modern lanterns now consist of insulated glazing, stripped in aluminum frames, which are in many configurations. Roof windows represent engineering systemsthat are assembled from standard or custom extrusions provided by hatch manufacturers and, for example, manufactured by glazing manufacturers, but have common design elements required to complete them. This page uses the term skylight to describe prefabricated sloped glazing systems.
Mansard roof device - differences and features
In the construction industry, the term “skylight” is often applied to relatively small, custom-made modular skylights, often with plastic glazing. These block boxes are not specifically addressed on this page. Below are the short descriptions typical elements of lanterns.
In the process of calculations, the angle of inclination of the slopes, the total weight of the roof, the step of laying the battens and rafters, the total length of the spans, and much more are determined.
It is important to remember that the scheme of the attic roof provides for a preliminary calculation of the ceiling height - it must be at least 2.5 m.The break line, to achieve this indicator, must have a height of about 2.8 m - this includes the height of the finished floor, the size of the installed insulation and the internal plating.
Accessory elements: rafters extending from the sill to the ridge, crossbeams between the rafters and pressure rods that clamp the edges of the glass to the rafter. The pressure rods are often covered with rafter covers to hide the mounting heads and protect them from rainwater.
Thermal power
Functionally, skylights are roofs and are therefore subject to a higher volume of rainwater and are much more susceptible to water leakage than vertical filtration systems. Even for new, well-sealed roof assemblies, some leakage outside the exterior glazing is inevitable. Similar to windows and curtain walls, skylights undergo winter condensation when the surface temperature of the interior glass surfaces drops below the dew point for interior conditions. Leakage and condensation must be collected and led to the outside using a continuous drainage system consisting of interconnected condensate drains and threshold drilling.
The arrangement of the sloped roof guarantees the maximum increase in the available space with the required internal height around the entire perimeter. The angle of the lower rafters is 60 degrees. An arbitrary slope angle is possible for the upper ones, but always taking into account the wind and snow load in the region. And you should not forget about the aesthetic aspect.
If the frame of the attic roof provides for straight roof slopes, this will significantly affect the width of the room towards its reduction.
At the end of the calculations, it is the turn of the choice of materials. For installation you need the following:
- A bar made of wood with a section of 50x100 mm and more;
- Board 150x50 mm;
- Unedged board;
- Fasteners - screws, nails, etc.
- Steel corners, sliding fasteners;
- Annealed wire, with a cross section of 3-4 mm.
Mansard roof installation
Answering the question of how to build a mansard roof, it is important to remember that its arrangement provides for strict adherence to the main production stages. All work should be carried out in the following order:
- Mauerlat installation - here it is important to first attend to the arrangement of anchors or studs, embedded in 2 m steps into the base of the structure. Holes are drilled under the anchor, after which the timber is laid and fixed with nuts;
- Installation of floor beams - it is important to follow the correct sequence of actions. First of all, the end end beams are mounted with their alignment horizontally, after which the intermediate beams are laid according to the existing level (for the plane indicator, you can use a nylon cord, a level or a level);
- Installation of the attic roof continues installation of support posts and their vertical alignment. For fixing, special jibs are used, followed by the installation of horizontal runs. The number of racks should correspond to the number of floor beams along the parallel planes of the attic to be equipped;
- Installing the rafter system - in exact accordance with the previously prepared template. Inclined legs and girders are set according to the drawing and fixed on vertical supports. The connection is carried out by means of boards or steel fixing pads;
- Sewing gables - the entire surface of the roof is sheathed with a lathing board, while leaving free window openings, vents, etc.
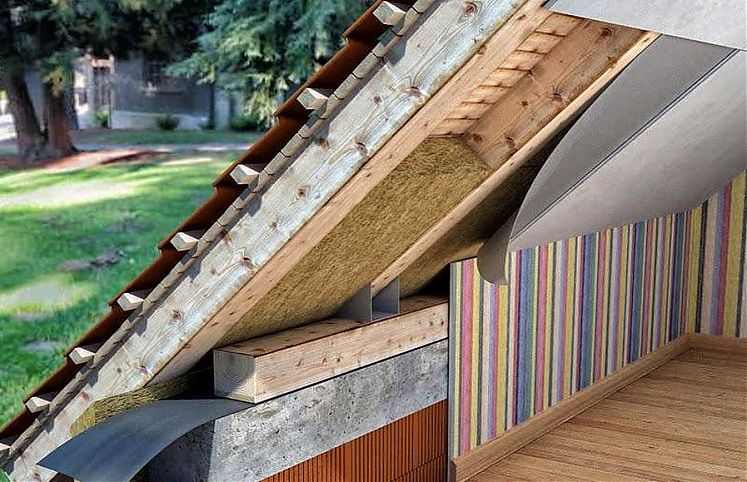
- Roofing cake - not a single attic roof can do without it. The vapor barrier is laid at the bottom of the rafters and fixed with brackets. Above there is a layer of heat insulator, above which, at a step of 0.5 m, a crate is mounted. On top of the rafters, the waterproofing is laid.
- The final stage - installation of roofing... Its type depends both on the wishes of the owner and on the general aesthetic requirements for the building, as well as on the climatic conditions that are characteristic of a particular region.
That's all, actually. The answer to the question of how to build a mansard roof with your own hands has been received. This process is not the easiest, but with due patience, attentiveness and strict adherence to the above recommendations, nothing is impossible.
The attic in the house is always interesting, beautiful and profitable. However, not every master will undertake to do all the work on his own. Reasons: ignorance of technological subtleties and a complex rafter system of the attic roof. But you can build an attic yourself, the main thing is good project and a sober assessment of their own strengths, financial capabilities. And we will tell and tell you what types of rafters there are, and we will analyze the device of the rafter system of the attic roof of various types.
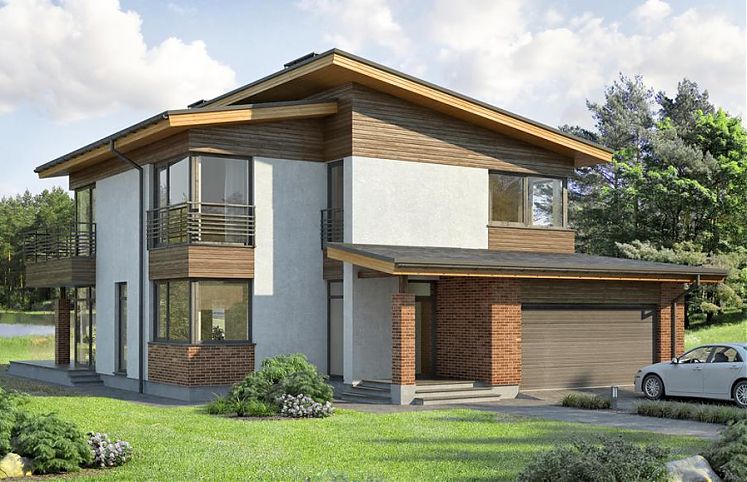
Types of mansard roofs
Drafting a project should take into account all the nuances. With the wrong miscalculations, the developer risks getting in the end not what was planned to be done. The simpler the roof, the more convenient it is to do it yourself. Roof types are:
- Gable, where the slopes descend on both sides;
- A broken line, consisting of two or more slopes of different angles of inclination;
- Hip with a triangular shape;
- Half-hip - end-type slopes are located approximately half the distance of the height;
- Dome for buildings of a polygonal or round shape;
- Vaulted - in section, such a roof has the shape of an arc.
Mansard roofs are distinguished as ventilated and non-ventilated. The type is selected depending on the climatic characteristics of the region, for example, in zones with big amount precipitation is better to build ventilated facilities.
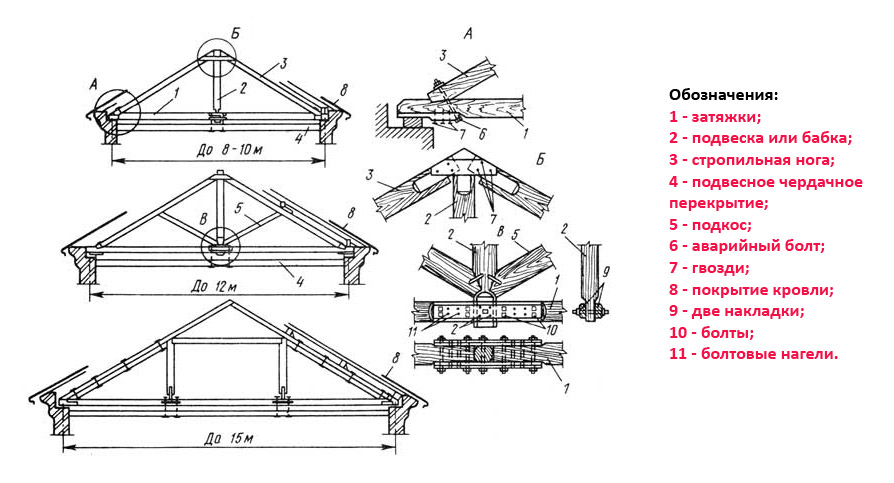
Types of rafter systems
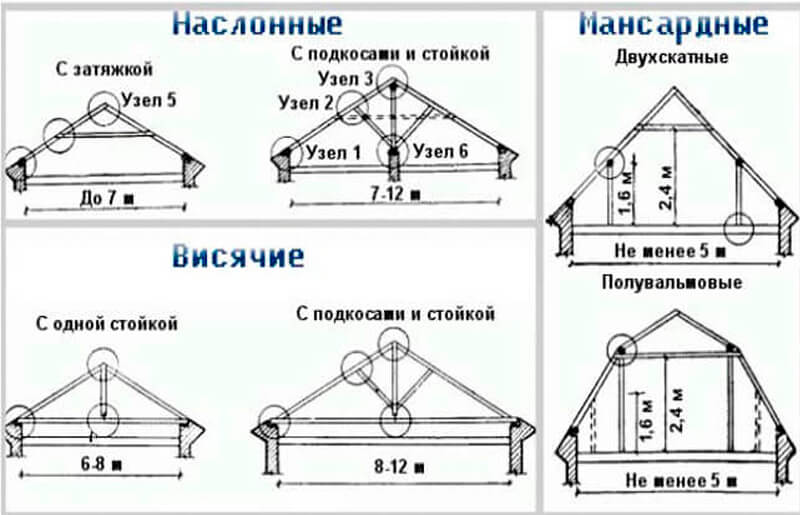
Rafter system the mansard roof is selected depending on the layout of the building and differs as follows:
- Rafter roof system the attic is equipped in the case when the load-bearing partition passes in the middle of the building. The structure redistributes the weight load and is suitable for buildings where the distance between the outer wall panels and the inner support system does not exceed 7 m.
- Hanging truss systems applicable in the absence of internal partitions, walls. Supported by a Mauerlat and a ridge girder, they are suitable for buildings where the distance between the outer walls and the structure does not exceed 14 m.
- Combined rafters mansards are most often needed in buildings where columns are arranged instead of partitions. It turns out that part of the structure of the rafters rests on the columns, and part is carried out in a hanging version. The absence of auxiliary elements, a reduction in the load on the foundation and no obstructing elements are the main advantages of the system, therefore this option is used most often.
Important! The types of rafter systems are selected at the design stage in order to correctly calculate the required foundation strength. In the case when the decision to build an attic arises at the final stage of the construction of an object, an accurate diagram of the roof truss system and a complete recalculation of the mass of the house, taking into account the new data, will be required. The process cannot be neglected, especially in areas with weak soil. Otherwise, in the end it will turn out that the house will quickly sag, and groundwater will render the foundation unusable in a short time.
Structural features of the rafter system
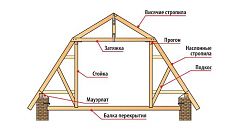
The main nodes are not much different from the usual gable roof:
- Mauerlat is the base of the roof that carries the weight.
- Rafters - elements of the system that form the inclination of the slopes. The top is fixed to the ridge, the bottom - to the Mauerlat or rack.
- Stance - an element that supports the ridge or the back of the rafter leg.
- The braces are needed to strengthen and support the rafter legs. The brace has an oblique cut and serves to prevent the bending of the rafters under the weight of the mass.
- Tightens - a horizontal tie of a pair of rafters placed at the top or bottom.
Important! The rafters are often made from the finest timber. A timber is purchased with a moisture content of no more than 15-18%, it is pre-treated with anti-rotting compounds, antiprenes.
Assembly diagram of the truss system for the attic
The attic rafter system is quite troublesome, so it is better to entrust the assembly to the master. But if this is not the case, tips and videos will help you complete the simplest design yourself.
- On top harness Mauerlat timber is laid on the walls. If the house is a log house, you can get by with the upper crowns, reinforced with brackets.
- Mount the floor beams. Mounting on Mauerlat or wall panel projections. The simplest fastening is without extension, support on the walls, but with extension, this is when the beam is carried out beyond the perimeter of the house to equip the overhang. In this case, the distance between the end of the beam and the wall panel should be at least 0.5-1.0 m.
- Vertical racks are mounted. To do this, the middle of the floor beam is determined, then equal gaps are laid from it - the distance should be equal to the width of the attic room.
- The puffs are attached to the racks, and it turns out that each pair of racks looks like the letter "P".
- Installation of the lower rafter elements is carried out with fastening on the rack. Fasteners - self-tapping screws or nails, on the Mauerlat fasteners in the form of a movable fastener slider, which compensates for the shrinkage manifestations of the bar.
- The installation of the rafters of the attic roof of the upper part is carried out with the connection of each pair with a metal plate or bar.
- Final treatment includes styling waterproofing membrane, lathing. The lathing for soft roofing material is solid, for profiled sheets and other hard material - sparse.
The proposed installation of the rafter system is the simplest. It is quite possible to equip such a structure with your own hands, you just need to make correct calculations, rafter system, mansard roof drawings, diagrams will help you complete the work without errors.
Rafters with extension behind the wall panel
This option is used with a small amount of internal space. You will have to support the rafter leg on the top floor beam. Mauerlat is not needed here, but reinforcing braces are required. To strengthen the base, you can fill in a reinforced concrete belt. The fastening of the floor beams to the monolithic belt is carried out with anchors, into which the support posts are cut to the maximum thickness of the beam.
Important! The external structure forms the cornice: for wooden houses width from 0.5 m, for made of concrete and stone - from 0.4 m.
Scheme of work:
- Install the extreme floor beams that form the outline of the overhangs. The section of the beams is 150 * 200 mm.
- Along the cord stretched between the extreme beams, the remaining beams are mounted: the distance between them is equal to the step of the rafter legs. Insulated roofs require a rafter pitch of 0.6 m, in the case of installing rafters with a specified pitch, they can be made from a bar with a section of 50 * 150 mm.
- Having cut out the spikes, prepare the supports.
- Install the corner posts and secure them with temporary supports.
- Determine the place of the support points of the beams with a plumb line and select the holes for them.
- Install ordinary posts and a pair of bearing supports in the centers of the attic pediment.
- Lay girders from boards 50 * 150 mm. Fasten the purlins with corners.
- Connect the supports with bars, also fixing them with corners on the girders.
- Fasten the crossbars, for which temporary fastening with an inch is suitable. The deviation from the edge of the frame is 300-350 mm.
- Make a template for the bottom row of rafters: attach the blank board to the end of the purlin and the beam, determine the place where the excess is cut, try on and hang.
- Mount the end rafter posts.
- Make a template for the top of the rafter legs.
- Try on a template and build a tier, how the rafter system will be, photos of the attic roof will clearly show the entire structure.
- If the templates fit perfectly, make the required number of rafter legs, mount them in place, reinforce the crossbars with a headstock to avoid sagging and rigidly sew them to the ridge area. The lower part does not require rigid hemming, it should be free.
Final completion - installation of the gable frame, sheathing and roofing material... If it is not entirely clear how to make this project, watch a video from professionals, the material will help you understand the intricacies of construction.
Attic from frame modules
Mansard roof rafter system which implies a variant of frame modules is much simpler than the previous one. On the ceiling, not groups of individual supports are mounted, but ready-made block modules of the side walls of the future attic room. Such structures of mansard roofs, their rafter systems allow you to work not at a height, but below, calculating and measuring every step. Step-by-step process such:
- Make the walls of the attic according to the project in advance, and the longitudinal bars play the role of running and bedding elements. Together with the racks, lay out these elements on a level platform and mark the nests for the support points of the side walls with squares - make cuts along them.
- Choose a spike on the racks.
- Connect the longitudinal beam with the uprights of the vertical direction and obtain a frame module (double). These are the future walls of the attic.
- Lift the frames up and place them in place. Temporarily secure the installed frames with spacers and then fasten with brackets.
- Select nests at the edges of the beams for mounting the lower row of rafters, if necessary, modify the nests with a chisel.
- The upper rafter tier is made on the ground, for which the blanks are preliminarily adjusted to the required elements.
- The base of the upper triangle of the attic structure is a stretch, while its length is equal to the distance between the installed planes (vertical) of the already mounted frames.
- Choose sockets along the edges of the stretch, and spikes on the lower heels.
- Assemble the rafters for the attic of the upper tier, mount the crossbar for additional fastening, and reinforce the ridge assembly with a triangular-shaped wooden plate.
- Preliminary manufacture of rafter legs in the attic will avoid work at height. You only need to cut the upper bevel, supported by the upper rack wall panel and to stretch the upper trusses.
- Try on the lower rafter part to the end, mark the spike shape zone on the lower heel, cut out the spikes according to the drawing made.
Now all that remains is to get upstairs and lift all the rafters. First install the trusses, securing them to the upper trim of the walls, and then install the lower part, attaching them to the ceilings (beams) with brackets. It turns out a completely comfortable floor, the rafter system for which was assembled on the ground. To make it easier to understand the task of building an attic roof, a modular rafter system, watch the video. All other steps are performed according to the standard scheme of a conventional gable structure, the attic and rafter system is shown above.


