There are the following main types of foundations for a house, which can be chosen during its construction:
- tape;
- columnar;
- pile;
- as monolithic slab.
In addition, each of these species has varieties that may differ in the depth of the laying, material or method of device. And each of them can be optimal for building a house from a certain type of materials and depending on the characteristics of the soil on the site and the conditions of its occurrence.
For example, strip foundation can be buried or shallow, monolithic or prefabricated, consisting of ready-made blocks, reinforced or unreinforced, concrete, rubble or rubble concrete. A deep foundation of this type is most often chosen when building a house made of heavy materials (brick, stones) and in the case of a basement under the house. Shallow ones are usually chosen for a house made of lighter materials. In addition to the weight of the house, the choice of one or another type of strip foundation depends on the properties of the soil (heaving, strength, water cut, etc.), the depth of freezing and the level groundwater Location on.
The columnar foundation can have rectangular or round pillars, be with or without a grillage (foundation beam), be buried or shallow, reinforced concrete or rubble concrete. Foundations of this type, most often, are chosen for a light house made of aerated concrete (aerated concrete, foam blocks) or wooden (from a log, timber, frame, panel board) if a basement is not planned under the house.
The pile foundation can differ both in the type of piles (screw, driven, bored), and in their size and section (round, rectangular), as well as in the presence or absence of a grillage. Such a foundation is distinguished by the least time spent on its construction and, like the columnar one, is mainly used for buildings with light weight.
The foundation in the form of a monolithic reinforced concrete slab is the most costly, but it can be used practically for a house from any kind of materials, if the device of other, cheaper types is impossible or impractical due to the characteristics and conditions of the soil on the site.
Foundation device for the house
Before making a foundation for a house, you need to choose its optimal type, the construction of which will be most appropriate for the specific conditions of your site, taking into account the weight and properties of the material of the future house.
Depth of the foundation under the house
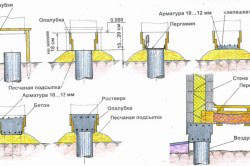
For the amount of work with its device great importance also plays the depth of the foundation under the house. If a deep foundation (strip, columnar) is chosen, then its depth should be no less than the depth of freezing in a given area (preferably 20-30 cm more than it). Therefore, if the depth of freezing in a given area is large enough, then the costs of building this type of foundation will be large (especially a strip one).
If the choice is made on a shallow foundation (strip or columnar), then its depth can be only 0.6-0.7 freezing depth, and 40-50% of it is the height of the sand (sand and gravel) cushion on which it is installed such a foundation.
The depth of pile foundations is usually not less than the depth of soil freezing (usually more by 0.5 m), to the level of occurrence of strong layers.
Foundation stages
The foundation for a house, no matter what type you choose, consists of several stages:
- alignment and layout of the site;
- taking out and marking its size and position of all main elements;
- earthworks (making trenches, holes, drilling wells or excavating the entire area - in the case of a monolithic slab);
- formwork device;
- laying (filling or laying) of the foundation itself.
The technology of laying the foundation for a house depends on the type chosen and the weight of the material from which it will be built.
Laying the strip foundation
When laying a strip foundation, the sequence of work depends on its type: whether it will be monolithic, prefabricated or rubble, buried or shallow.
In the manufacture of a monolithic reinforced concrete strip foundation, after marking its dimensions, trenches are dug to the selected laying depth, a sand and gravel cushion of 10-15 cm is arranged below, a formwork is installed on it, a reinforcement frame is mounted and concrete is poured. If the soil on the site is strong, then the formwork can be installed only for the ground part of the tape (basement), and at the bottom, the trench walls can play its role. The width of such a foundation is determined by calculation, but should be less than the width of the walls of the house under which it is being built.
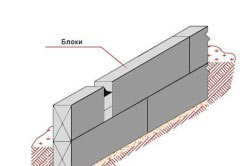
If the strip foundation is prefabricated, from ready-made concrete blocks or rubble, then the trench is arranged with a greater width, so that it is convenient to lay blocks or rubble. Such laying is performed, as a rule, on a cement mortar with dressing of the seams. After the end of the laying, backfilling of the empty space of the trench is performed.
When laying a shallow strip foundation, a sand and gravel cushion is laid at the bottom of the trench, which fills 40-50% of its height. The pillow is arranged in 2-3 layers with abundant moisture and tamping of each layer.
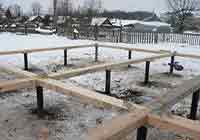
Laying a columnar foundation
When laying a columnar foundation, the axes of the future foundation and the location of the pillars are marked, which are located at the corners of the building, at the junction of the walls and under the walls at a distance of 2-2.5 m. The cross-section of the pillars is determined by calculation. It can be round or rectangular. In the first case, wells of the appropriate size are drilled under the pillars, and in the other, holes are dug.
Pillars of this type of foundation can be with or without expansion at the bottom. In the first case, the pit is arranged along the width of the shoe, and for the construction of the main part of the post, a formwork is installed in it, which is poured and hardened with concrete. If the pillars are made without expansion in the lower part, then the walls of the pits, with pre-laid waterproofing, can be used as formwork. Before pouring concrete, a reinforcement frame is installed inside the formwork.
After the pillars are made, a grillage (foundation reinforced concrete beam) is arranged on them, or the lower strapping of the house can be installed directly on the pillars. The grillage is arranged to evenly distribute the load from the weight of the building onto the pillars and is simply necessary when building a house from aerated concrete or foam blocks. During the construction wooden houses both options can be used.
Pile foundation laying
Device pile foundation in many ways it is similar to a columnar foundation, with the only difference that instead of pillars, piles are used, which, as a rule, are installed at a great depth and can be:
- screw;
- bored;
- hammer-in;
- hanging.
The piles can be installed using special equipment or manually. The second method is usually used for small light buildings and relatively shallow piling depths. As in the case of a columnar foundation, a grillage can be arranged along the piles, or the lower strapping of the house (usually cobbled or frame) can be laid directly along the piles.
Laying the foundation in the form of a monolithic slab
For the construction of such a foundation, it is necessary to select the soil under its entire area to a depth of 15-25 cm thickness of the slab and the height of the sand and gravel cushion 25-40 cm. The thickness of the slab depends on the weight of the house that is planned to be built.
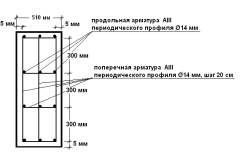
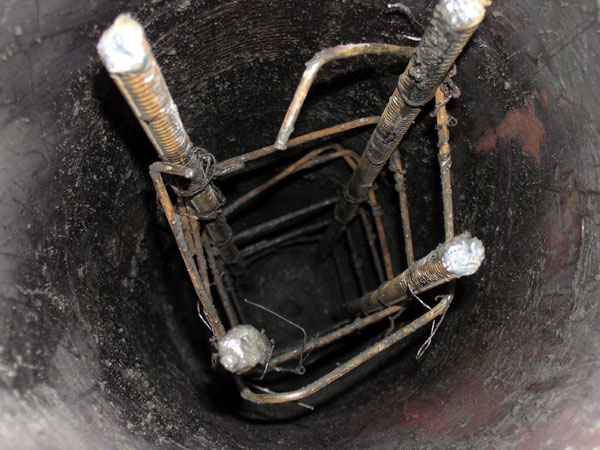
For the construction of such a foundation, a large amount of reinforcement is needed, from which the slab frame is made in the form of a lattice with cells of 20x20 cm. Usually such a frame consists of two such lattices. First, the lower part of the frame is made, from two rows of reinforcement, laid perpendicularly and tied with soft knitting wire. On the lower lattice "chairs" are installed - stands for fittings with a height of 10-15 cm and the upper part of the frame is mounted on them. In addition, reinforcing belts can be made along the contour of the walls.
A side-formwork is installed along the contour of the future foundation and concrete is poured.
Foundation for a wooden house
Because wooden houses differ in their relatively low weight, then more economical types of foundations can be chosen for them: shallow tape, columnar or pile.
Belt shallow
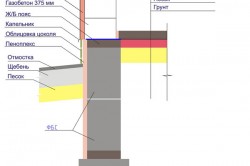
 Shallow tape foundation for wooden house they are usually built if the site has weak or non-porous soil. Structurally, it is a continuous reinforced concrete tape, at least 30 cm wide and about 80-90 cm high (including the basement), which is built on a 35-40 cm sand cushion, under all the load-bearing walls of the house. Moreover, its ground part (base) should be at least 50 cm with good horizontal waterproofing and ventilation holes (air vents).
Columnar
 A columnar foundation for a wooden house is used to reduce the cost of its construction, since in this case the bearing part of the foundation is not solid, but in the form of separate pillars located at a distance of 1.5-2.5 m from each other, in places of greatest loads and on long runs.
Depending on the properties of the soil on the site columnar foundation it can be buried, laid below the freezing depth (on highly porous soils) or shallow (on weak and medium porous soils), with a depth of pillars of 0.6-0.7, the depth of freezing and the height of the sand-gravel cushion at their base is 0.4-0, 5 m.
The crown bar can be laid directly on the posts, on a layer of horizontal insulation. For a more even distribution of the load from the weight of the house along the pillars, a reinforced concrete foundation beam (grillage) can be arranged and then the lower crown of the house will already fit on it.
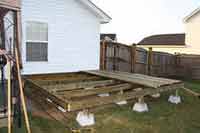
Pile
 Recently, pile foundations for a wooden house have become widespread. The use of such a foundation greatly reduces the time for its construction. It, as well as columnar, can be with or without a grillage. The piles can be installed manually or using special equipment. Piles can be screw or bored, metal, concrete, asbestos-cement or plastic pipes.
Piles can also be made according to a comparative new technology TISE. With this technology, wells under the piles are drilled with a special drill, which makes an expansion at their base. After pouring the expanded base with concrete, an asbestos-cement pipe of the required length is lowered into the well. After that, a reinforcement frame is mounted in the pipe and concrete is poured. A reinforced concrete grillage is arranged along the finished piles.
One of these types of foundations may well be used as a foundation for a house made of timber or logs. It should be remembered that regardless of the type chosen, the height of its base for a wooden house should not be less than 0.5 m. This is necessary to protect it from getting wet lower rims during the period of melting snow or heavy rains. In addition, holes (air vents) must be provided in the basement for ventilation of the underground. These conditions must be observed for any wooden houses, regardless of whether it is a foundation for a house made of logs or beams.
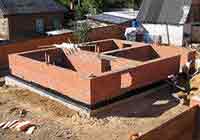 Since a house made of bricks or natural stones has a rather large weight, then under it the best option there will be a strip or foundation in the form of a monolithic slab. In the event that the soil on the site is weak or non-porous, then the foundation for a small one-story brick house can be arranged as shallow, with a depth of 0.6-0.7 freezing depth in this area. In this case, the height of the tape below ground level should not be less than 0.5 m, and the height of the sand and gravel cushion should be 35-40 cm.
The width of the strip foundation for a brick house is determined by a special calculation, but should not be less than the thickness of the wall that it holds.
Foundation for a house with a basement
If it is planned to build a foundation at the base of the house, then regardless of its weight or wall material, a strip foundation will have to be built. In this case, the foundation for a house with a basement is best constructed as a monolithic reinforced concrete.
In addition, such a foundation can be rubble concrete or rubble. The stones that will be used in this case must be durable and moisture resistant. It is impractical to use conventional grades of limestone-shell rock (15-35) for laying the basement foundation. To do this, you can use only recrystallized limestone of grade 100 or more, or granite, as well as other solid rocks.
The depth of the foundation, in this case, must be at least 0.3 m below the basement floor level.
Sometimes it becomes necessary to make an extension to the house and many are interested in how to properly make the foundation for it. In this case, it is recommended to make a foundation for an extension of the same structure as was made earlier for a house, because if the foundations are of different designs, then their shrinkage will be different. In addition, it matters how long ago the house was built and what type of extension is planned.
The following types of foundations for an extension to a house can be distinguished:
- monolithic with rigid docking to the main one;
- independent with an expansion joint device;
- columnar or pile.
What foundation would be the best option depends both on the weight of the extension itself and on the characteristics of the soil at the place of its construction.
Extension foundation with rigid coupling
 It is advisable to arrange this type if the shrinkage of the house is over and non-porous soil lies at the base. In addition, such a foundation for an extension is suitable if the main foundation is strip and it is assumed that the extension will have a common roof with the house. If the main foundation is columnar, then in order to use a rigid joint, it must have a base of sufficient width and height.
The sequence for arranging such a base is as follows:
- The depth and dimensions of the main foundation are determined;
- A trench is dug (for tape) to the depth of the main foundation;
- At the base of the house, holes are drilled for the docking fittings, so that it can freely enter them. The depth of the holes is their diameter in cm multiplied by 35. The holes must not be through. If the width of the foundation is not sufficient for such a length, then it is chosen less, but then the reinforcement must be split in the hole. For this, a slot is made at the end of the rod, a wedging insert is inserted there and the reinforcement is hammered until it stops.
- After the reinforcement is installed in the holes, the formwork is made for the base of the extension. A reinforcement frame is installed in it, which is attached to the rods fixed in the main foundation, and concrete is poured.
Foundation for an extension to a house with an expansion joint
Such a foundation is constructed if the extension has a separate roof and is a separately constructed base with a device between it and the base of the house of the so-called expansion joint with a thickness of about 2-3 cm.For the construction of such a joint, any moisture resistant thermal insulation material (roofing material, polystyrene, foam, sealant, etc.). To compensate for future shrinkage, the base for the extension is arranged slightly higher than the main one.
Column foundation for an extension
 If the main foundation under the house is columnar and the extension will be built from light materials, then the base under it is made columnar. Such a foundation can also be rigidly attached to the pillars of the main one using a reinforced foundation beam, or it can be independent.
The foundation is the basis of any house made of bricks, logs, blocks or timber. The foundation determines how long the walls of the house will stand and how comfortable living in it will be. If the foundation (base) is incorrectly calculated or made, the walls will begin to be covered with cracks, then sag, which will lead to the destruction of the entire structure. From the article, you will learn how to make a foundation for a house with your own hands, which type of foundation to choose, what to look for during design and land work, what mistakes are most often made and how to avoid them.
Why do you need a foundation
For a clear understanding of the requirements for the foundation of the house, which they are going to do with their own hands, it is necessary to figure out what type of foundation is needed and what exactly it does. Any soil, except for hard rocks, has a low specific strength, that is, the ability to withstand a certain pressure on a limited area. When the specific pressure is higher, the mass of the load pushes the soil and goes deep into the ground. The specific strength of closely spaced soil areas is often different, therefore, the shrinkage of the walls will occur by different amounts. If this happens, then the wall will begin to collapse under its own weight. This fully applies to walls, both from blocks and from timber.
Tip: To avoid uneven settlement of the walls, it is necessary to reduce the specific pressure on the ground and ensure its uniform distribution over the entire base area.
Types of foundations
To build a private house with your own hands, use the following types of foundations:- slab;
- tape;
- columnar;
- pile screw;
- combined.
Platen
A foundation of this type is used in those places where the soil has a minimum specific strength (sands, soft clays, soils with high moisture content). It allows you to distribute the mass of the structure over the entire construction area, due to which the specific load is reduced tenfold. This is the most expensive type of base and is suitable for walls made of blocks, beams or other materials. The main disadvantage is the weak attachment to the ground.

Tape
This is the most common type of base. It is built in the form of a tape up to 2.5 meters deep (depending on the water table and average winter temperatures), following the contours of the walls. The base is 2–4 times wider than the wall. In terms of construction costs, it is comparable to a screw base, but withstands heavier walls. The main disadvantage is that it is difficult to do it yourself because of the need to dig a large trench.
Columnar
This type of foundation came about as a result of the desire to make strip foundations cheaper. Its depth is the same as that of the strip base, but it is not made with a solid strip, but with separate posts (pedestals) of various sizes. This allows you to make the base below the depth of soil freezing. In order to evenly distribute the mass of the wall over all the pedestals, they are connected from above with a grillage - a concrete belt, the height of which is 20–100 cm. The main disadvantage is the high demand for correct calculation... Any mistake during the design phase will lead to the destruction of the base and cracking of the walls.
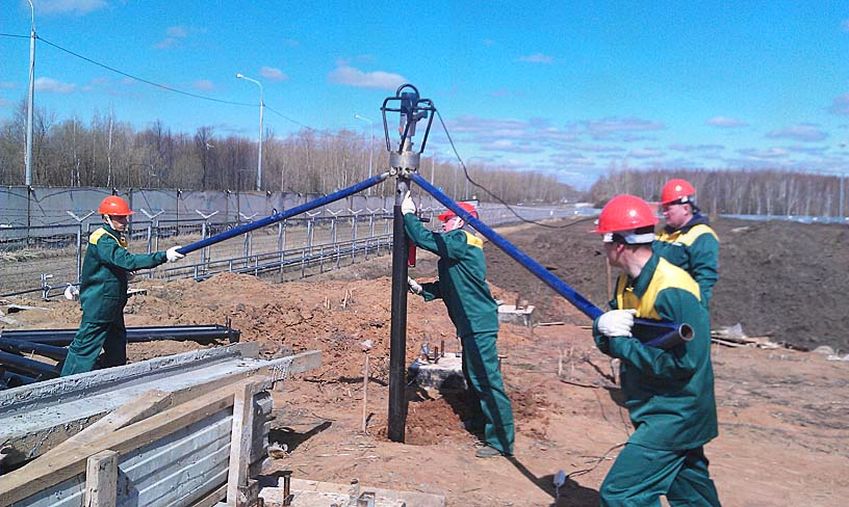
Pile screw
This is the most popular type of base for a house from a log or bar, which is built by hand. To make a pile foundation, you need a team of one builder and 2-4 helpers. A pit is dug in the ground, then a hole is drilled with the help of a garden drill and a steel pile is screwed into it, then they are connected to each other with a steel or concrete grillage. The main disadvantage is its low bearing capacity, which makes it not suitable for walls made of blocks or bricks.
Combined
This type of base combines the best features of any other. For example, by combining pile and slab foundation, you can make a base with a huge bearing capacity and tight binding to the terrain. Therefore, it is used for houses made of blocks, beams and any other materials.
How to choose the type of base
To find out which type of base is best, you need to determine what you will be building your house from. For a bar or log, a pile screw or columnar foundation is ideal. Houses made of bricks or blocks are better to use a strip, columnar or combined type of base. You also need to consider the type of soil. For a house from a bar, which is built on sandy or marshy soils, a combination of a pile screw and a tape or slab base is optimal. To build a block or brick house on the same soil, a combination of a pile screw and a slab base is optimal.
Advice: when choosing the type of base, you must first focus on its functionality, then on the possibility of self-production and only then on the price. If, first of all, focus on the price, then most likely the base will not withstand the weight of the walls.
The main stages of foundation construction
The main stages include:- determination of depth;
- layout;
- land works;
- creating a pillow from sand and gravel;
- installation of formwork;
- reinforcement;
- pouring concrete;
- screwing in piles.
To determine how deep the base should be, it is necessary to add 1 meter to the freezing level. You can find out the depth of freezing from the table or other sources. In order to create a foundation with your own hands, it is necessary to carry out planning, that is, mark it out on the site. During planning, keep in mind that the width of the trench for the strip base should be at least 60 cm wider than the foundation, this is necessary for the correct installation of the formwork and subsequent insulation. It is very difficult to carry out earthwork for a house made of blocks or bricks with your own hands - their volume is too large. If you have 4-6 loyal and strong friends, then you can dig a trench yourself.

Sand and crushed stone pillow
For slab, strip and columnar bases of houses made of blocks or bricks, it is necessary to prepare a pillow of sand and gravel. To do this, compact the bottom of the trench or foundation pit with a vibrating plate (you can rent it at most hardware stores). Then add a 10 cm layer of sand and compact it. After that, fill in a layer of crushed stone 10–15 cm thick. Crushed stone fraction 40–60 mm. Compact it and fill in a 10 cm thick layer of crushed stone. Crushed stone fraction 20–30 mm. Compact it and fill in and compact a layer of crushed stone 5 cm thick. Fraction 5-15 mm. This order of laying crushed stone is called splitting and provides more efficient load distribution than a single layer of any fraction.
Formwork and concrete pouring
To create formwork with your own hands, you need boards, old entrance doors, doors or walls from old cabinets. Keep in mind that a huge load will affect the formwork, so support it with wooden blocks or reinforcement driven into the ground. Fix the upper part of the props at the required distance using nailed bars or strong steel wire. To build a foundation with your own hands, use fiberglass or steel reinforcement. It is necessary to create both horizontal and vertical grids with a mesh size of 10-30 cm. For pouring with your own hands, use concrete with a minimum water content. To improve its fluidity, add plasticizers that are sold at any hardware store.
Tip: If there is an asphalt plant nearby, try ordering concrete there. Just discuss its composition in advance.
To screw in piles for a house from a bar with your own hands, prepare:
- strong steel bar (half shaft from a Soviet rear-wheel drive car is suitable):
- two steel pipes 2-4 meters long;
- two plumb lines or levels;
- 2-4 assistants;
- shovel;
- garden drill.
Independent construction of the pile-screw foundation
Determine where to place the piles. The distance between the piles depends on what type of grillage you use. With concrete or steel grillage up to 4.5 meters, with wooden grillage up to 3 meters, without grillage not more than 2 meters. Dig a pit up to 50 cm deep, then drill a hole to the full depth of the pile. Insert the pile into the pit and hole, then insert the steel bar, put the pipes on it, and instruct the assistants to rotate the entire structure. Always check verticality using two plumb lines or levels. When the pile reaches the specified depth, cut it at the level of the lower beam or log. Determine the cutting height using a level and a rope, which must be pulled along, across and diagonally across the foundation. Then pour concrete into each pile to protect it from rust and weld the grillage or heels to secure the lower crown.
- Types of strip foundations
- Territory marking
- Excavation
- Trench preparation
- Monolithic foundation
- Prefabricated foundation for the house
Strip foundations are characterized by the same cross-sectional shape around the entire perimeter of the house. Despite the high consumption of materials, significant labor intensity and large volume earthworks, thanks to a simple technology, this type of base is widespread in individual construction.
Types of strip foundations
According to construction technology, there are 2 types of strip foundations for a house:
- monolithic - a solid reinforced concrete tape reinforced with a steel bar structure .;
- prefabricated - from prefabricated blocks (brick, reinforced concrete blocks) or rubble stone.
The general scheme for the construction of this type of foundation for a house:
- earthworks - digging trenches;
- installation of formwork - removable, non-removable;
- fill concrete mortar or laying of individual elements with mandatory reinforcement;
- dismantling of formwork, moisture protection.
When self-cooking concrete, several rules are required:
- use only clean sand and crushed stone of 1.2-3.5 cm and 1-8 cm fractions, respectively;
- the ratio of cement, sand, crushed stone - 1/3/5.
First, dry components are mixed, then water is added to them. The addition of plasticizers will provide the concrete with the necessary fluidity, which will greatly facilitate the work. Manufacturers usually indicate the instructions for use of the additive on the package. Use of agents as plasticizers household chemicals unacceptable!
Concrete is poured into the trench in horizontal layers with the obligatory compaction of each. If necessary, the foundation can be poured in parts. To ensure a tight adhesion of the new layer to the already set concrete base required:
- clean it from debris, pollution;
- remove the surface layer of cement milk with an iron brush or other available means;
- dust the surface.
The casting ends at a level of 50-70 mm from the upper edge of the formwork. Until complete maturation, concrete is protected from moisture (from rain) and from losses: it is covered with polyethylene, moistened. The minimum ripening period is 28 days.
- Stage 1: creating wells
- How to make a foundation from ready-made piles?
- Stage 1: marking and setting the perimeter
- Stage 2: piling and concreting
- Stage 3: concreting and welding of heads
- Summing up
The value of the foundation for a house is very difficult to overestimate, since the quality and durability of the finished building depends on it. For these reasons, it is so important to approach its construction with special care. It is important not only to determine in advance what kind of foundation the house will have and to prepare everything construction Materials, but also get acquainted with how the construction process is going. Only then will it be possible to complete all work successfully and in a short time.
How to make a strip foundation?
Most often, a strip foundation is chosen for a house. It is advisable to arrange it on dry, non-porous soils. It will become a reliable support for the building. To prepare the following:
- sand;
- cement;
- crushed stone;
- shovel;
- formwork boards;
- nails;
- level;
- a hammer;
- master OK;
- knitting wire;
- waterproofing material;
- rammer;
- fittings;
- bricks;
- spacer bars;
- building level;
- pegs;
- construction cord;
- grater;
- roulette.
Back to the table of contents
Stage 1: carrying out markings and land works
You need to start with marking. After all, if it is not fulfilled, then it will be impossible to make the foundation of the house in accordance with the parameters present in the project documentation. It is necessary to start laying out the construction site by marking the first point. You will need to hammer a peg into it. After that, a line is measured from it, equal to the width of the future structure (according to the design documentation). Its end is also marked with a peg. Another line is drawn from this line, equal to the length of the future building. Here you also need to be guided by the data from the project documentation. Then a connecting line is drawn.
Having done this, you will need to make sure that the markup was done correctly. To do this, using the level, the diagonals of the resulting rectangle are measured. They must be the same. If it turns out that the marking was done incorrectly, then it will need to be redone, if it was done correctly, then the construction cord is pulled over the pegs.
Next, you need to perform internal markup. As a rule, the strip foundation is made 30-40 cm wide.Therefore, it will be necessary to retreat from the outlined perimeter such a distance and install the pegs, and then pull the construction cord. Then you can start creating a pit. It will need to be dug out based on the markings produced. Its walls and bottom should be flat, without strong protrusions. In this case, the depth of the pit should be lower than the passage of groundwater. Their level directly depends on the region in which the house is being built. In this case, one should start from the following parameters 1.2-1.5 m.
When the pit is completely ready, a pillow is built at its bottom. It is desirable to make it not only from coarse sand, but also crushed stone, then it will turn out to be of better quality. In this case, it must be formed in layers. First, part of the sand is poured to the bottom, then it is moistened and carefully rammed. Next, gravel is laid out and leveled. After that, sand is again laid on it, which is again moistened and rammed. It is necessary to carry out such work until the pillow becomes the required height. The following is considered optimal: 15-20 cm. Such a gravel-sand cushion will increase the strength of the strip foundation, and also prevent its destruction due to heaving of the soil.
Back to the table of contents
Stage 2: reinforcement and waterproofing of the foundation
It is impossible to make a high-quality base for a house without reinforcement. Therefore, at the next stage of building the foundation, it must be carried out. But first of all, bricks will need to be laid on the bottom of the pit. Then reinforcing bars are laid on them. This must be done in such a way that a grid is made of them, that is, they will need to be laid out at some angle relative to each other. After that, the joints are fastened with knitting wire. This must be done carefully and slowly so that you get a reliable and durable bandage of the rods. This approach will make the reinforcement flexible and durable, which means that it will not deform under the influence of soil freezing. However, you should not use welding during this. After all, it will not allow you to create a durable and flexible reinforcing mesh.

Next, you need to perform waterproofing. Here you can use roofing material. Such modern material is perfect for such work. It will provide high quality and durable waterproofing. But it will be necessary to lay it out along the bottom of the pit with an overlap. The joints of the sheets of roofing material will need to be glued with masking tape 2-3 times.
Having done this work, you can start creating the formwork. It is better to make it from edged boards. You need to mount them with nails. Make sure that their heads are present on the outside of the formwork so that the aesthetic characteristics of the foundation do not decrease in the future. So that it does not move when pouring concrete, it will need to be fixed with supports and pegs.
Back to the table of contents
Stage 3: preparation and pouring of concrete
It is necessary to start work at this stage with the preparation of concrete. It is recommended to use high-quality cement (M300-400). Crushed granite and coarse sand should be used as filler. They must necessarily go without admixtures of limestone, clay and brick broken, since such materials will reduce the grade of concrete and minimize its frost resistance. As for the proportions, they should be as follows: 1 part of cement, 4 parts of crushed stone and 3 parts of sand. Water must also be part of the concrete. It must be added in such a way that the plasticity of the solution allows it to be laid, and not poured.
It is important to remember: the harder the concrete, the stronger it is.

This means that when preparing it, you cannot use an excessive amount of liquid, so as not to reduce its high performance.
It is required to lay concrete in the formwork in layers. This will make it better. Each layer should be about 8-10 cm, which will need to be bayonetted, tamped and leveled. All this will allow you to get a base for a home without any voids, it will be distinguished by high strength and long service life.
When the concrete is completely laid out in the formwork, it will need to be left for 28 days. During this time, he will have time to fully grab. But it is important to carry out a number of activities during this: in sunny and hot weather, the surface of the foundation will need to be moistened, and in rainy weather, covered with geotextile or plastic wrap. After the specified period, it will be possible to remove the formwork, and then carry out further construction of the house.
Back to the table of contents
How to make a columnar foundation?
If there is deep-freezing heaving soil at the construction site, then it is inappropriate to create a strip foundation yourself. He will not be able to withstand all the loads and will come out quite expensive. The ideal option here is to build a columnar base. To build it, you will need the following:

- shovel;
- asbestos-cement or metal pipes;
- rods for reinforcement;
- sand
- cement;
- pegs;
- container for mixing the solution;
- roulette;
- building level;
- master OK.
Back to the table of contents
Stage 1: marking and earthwork
Here, as in the first case, you must first mark the site according to the design documentation of the house. First of all, its perimeter is outlined, and then pegs are placed in those places where it is planned to install supports. They must be at a certain distance. It is considered optimal 1.5-2 m. Moreover, they need to be done not only along the outlined perimeter, but also inside it. This is the only way to create a reliable and stable columnar foundation for your future home.
When the markup is completed, you can proceed to earthworks. They need to start by digging holes for metal or asbestos pipes. Their diameter must be the same as that of the supports. In this case, it is imperative to correctly calculate the depth. It is required to make it more than the level of soil freezing.
After creating the holes, you should proceed to the device in them a sand cushion. It should have a height of about 10-15 cm. It will need to be thoroughly moistened and tamped. It must be of high density, since only then can it be reliably installed on it.
Back to the table of contents
Stage 2: pipe installation and concreting

Now you need to mix the concrete. It is made on the basis of sand (3 parts), cement grade 400 (1 part) and water (1/2 part). The consistency of the solution should be approximately like sour cream. Then you should take a level and a pipe, the latter is installed in a prepared hole, and a little solution is poured into it. After that, the support is slightly raised so that part of the concrete is distributed over the sand cushion, and then it is leveled vertically. Thus, all pipes must be installed.
Then you can start reinforcing the pillars. For this, metal rods are taken and installed inside the pipes. Usually, from 3 to 5 pieces of rods are consumed for each. They should go deep into the ground, and their upper part should rise 20-30 cm above the support. When this work is completed, one by one, all the pipes are completely filled with concrete. The resulting space between them and the pit is covered with soil, which is then carefully rammed. After that, the columnar foundation is left for 7-14 days to set. Then it will be possible to create a grillage on it.
Back to the table of contents
How to make a foundation from homemade piles?
On soft soils optimal solution becomes the construction of a pile foundation for a house. It is characterized by high strength and durability. It is also important that such a foundation can be organized without carrying out land works, which occupy long time... It is arranged using piles, they are long rods that are immersed in the ground. But it is important to consider that their purchase is quite expensive, so those who wish to save money on the construction of this type of foundation for a house make them on the spot. This option is the most optimal. To build a foundation with homemade piles you will need the following:

- hand drill;
- reinforcing bars;
- roofing material;
- roulette;
- pegs;
- cement;
- vibrating unit for concrete compaction;
- sand;
- container for mixing the solution;
- soft steel wire.
Back to the table of contents
Stage 1: creating wells
First of all, you must make the wells for the piles yourself. To do this work correctly, you need to carry out the markup. Construction experts recommend placing piles at a distance of 2-2.5 m. Accordingly, it is necessary to install pegs, where drilling will be carried out in the future, based on these parameters. Then you will be able to get a reliable and solid foundation.
Next, you need to take a hand drill and use it to create the required number of wells. Their depth should be below the occurrence of groundwater. However, they should go at a slight angle. If after that it turns out that there is water at the bottom, then it will be necessary to pump it out. A pump can be used for this.
Back to the table of contents
Stage 2: creating concrete and piles
When the wells are ready, formwork will need to be installed in them. It must be done not from boards, but with the help of roofing material. It is rolled into a pipe, which must have the same diameter and length as the borehole, and then pulled together with soft steel wire. Then it is carefully installed into the prepared pit. This formwork will need to be done for each well. If you do not use it, then this will lead to negative results in the future, they will affect the strength of the pile foundation. The thing is that when concrete is poured into a well into which a pipe made of roofing material is not placed, cement milk leaves it into the ground. As a result, the piles are not very reliable because of this. In addition, their surface after setting will turn out to be rough, and, as you know, the forces of frost heaving have a much stronger negative effect on it than on a smooth one. Accordingly, for this reason, mother-in-law and defects will appear on them, this will lead to their early destruction.
When pipes made of roofing material are placed in all wells, you will need to make a spatial frame from reinforcing bars. Here it is recommended to use metal rods with a diameter of 6 mm. To create one frame, you will need to take 3-4 rods, which must be fastened every 500 mm with peppercorns. It is necessary to install such a frame in a pipe so that it rises 40-60 cm above the well.
Now you can start preparing the concrete. It must be made of high-quality cement (M400), pure river sand (3 parts) and crushed stone (2 parts). Water is added to these components gradually. It is necessary to ensure that the consistency of the concrete does not become too liquid, otherwise it will lose its strength characteristics.

It is necessary to supply the finished solution to the wells in portions. Each layer should be approximately 50 cm. It is important to compact the concrete during this. In order to do this as efficiently as possible, you need to use a vibrator installation. In addition, the placed solution will need to be pierced to exclude the possibility of voids in the piles. This is done using a reinforcing bar. After that, you will need to wait a few weeks for the concrete to set. Then it will be possible to arrange the grillage and erect the frame of the house.
Any building is based on a solid foundation. The durability of the entire building depends on the correct choice of the type of this structure. As a house, taking into account all the nuances, so that it will serve for more than a dozen years?
Literate construction work involves the analysis of several factors:
1) the type and structure of the soil;
2) selection and correct calculation of the required materials;
3) reliable hydro and thermal insulation of the finished base.
Correctly building the foundation for a house means choosing the right device technology, taking into account all the conditions and thinking over important details. The process should not be interrupted due to suddenly discovered circumstances or inconsistencies.
The strip foundation is the most common construction for central Russia. There are several advantages to such a base:
- the possibility of building on their own;
- low costs of labor and materials;
- inside such a foundation, a basement or subfloor can be equipped;
- belts running under all load-bearing walls and places of high stress provide a high level of strength;
- durability of operation.
It is impossible to build a tape-type foundation on heaving soils prone to flooding. You can find out the features of the soil available on the site from specialized organizations conducting geological exploration.
Important: data on the depth of water will be needed not only during the construction of the foundation, but also when planning the water source on the site (well, well, or centralized pipeline).
In order to build a solid foundation for a house on tapes, you will need the following materials:
- sand-cement mixture;
- crushed stone or gravel;
- water into solution;
- unedged boards for the manufacture of formwork;
- wire for knitting the frame;
- reinforcement rods;
- bars for spacers;
- brick;
- waterproofing material;
- nails.
The master will need the following tools: shovel, level, cord, hammer, level, tape measure, trowel. A container is required to prepare a concrete solution.
Important: if strip base should be of decent size, it is more expedient to purchase ready-made concrete with mixers or buy a deep vibrator.
Commencement of works: site marking and excavation
Any foundation construction begins with the marking of the site. According to the project data, the master must take out the corner and intermediate points of the future foundation to the terrain. The locations of the points are marked with pegs. The width between the two hammered pegs is, which must always be greater than the width of the bearing wall. All pegs hammered along the perimeter are connected with a cord or twine.
The accuracy of the marking must be checked with a level, which is used to measure the diagonals of the resulting rectangle. All diagonals of the future base must be equal. If there are arithmetic deviations even by a few mm, the marking starts again until an accurate control measurement is obtained.
After you are done with the outer markup, you can move on to the inner one. The width of the belts is usually between 30 and 40 cm. Inside the marked perimeter, a pit must be dug to the depth of the belts. All walls of the pit must be flat, without protrusions and depressions.
Important: the depth of excavation for the strip foundation must always exceed the groundwater level.
Each region of the country has its own value of the soil freezing point, the information is graphically depicted on the map.

Usually, a pit is dug to a depth of 1.2 to 1.5 m. This is quite enough for non-porous and not subject to flooding. Next, you need to form the formwork in the direction of the passage of the belts. For this, an unedged board and pegs are used. The boards are fastened to each other with nails.
After the end of the formation of the bottom of the foundation, a cushion of sand and crushed stone (or gravel) is arranged, which is carefully compacted and wetted with water. Experts advise tamping each layer of the pillow separately: first sandy, then gravel. The optimum height of such a flaky "pie" is from 15 to 20 cm. The need for a sand and gravel cushion is due to the frosty function during the change of seasons. A well-compacted base under the foundation will reliably protect it from the expansion of individual soil layers.
Reinforced frame formation and base waterproofing
If the master wants to form a support for the house according to all the rules, he must know that the tape structure must necessarily have a reinforced frame. The bottom of the pit is lined with bricks on which reinforcement rods are laid. A mesh should form from the reinforcing bars, i.e. they are stacked crosswise. At the joints, the reinforcement is tied with a special wire.
Important: knitting of reinforcement requires caution and accuracy from the master, do not overtighten the fasteners too much.
It is the flexibility required when knitting the reinforcement that determines the manual nature of the work. The use of welding will speed up the process, but does not guarantee the strength of the future foundation.
After tying the reinforcement cage, it is necessary to lay a waterproofing layer. Most often, roofing material is used, which is distinguished by its durability and affordable price. When laying roofing material, the sheets are overlapped, and the places of their layering are glued with tape. This will increase the reliability of the waterproofing and prevent the penetration of groundwater.
Making concrete and pouring the foundation
Concrete is made independently or purchased from specialized firms. If the master chooses the first option, it is recommended to purchase only high-quality cement (grades M300, M400). The aggregates should be coarse sand and crushed stone. The table of the ratio of all components is shown in the table.
 Table of the ratio of concrete components when using cement M400
The better the materials used to prepare the solution, the stronger the finished base will be. An important point is the connection of water with cement, when a certain water-cement ratio (W / C) must be met. This indicator, along with the grade of cement used, is extremely important for the strength characteristics of the base. If concrete is made using gravel, the practical W / C values \u200b\u200bare shown in the table:
Table 1. W / C values \u200b\u200bfor various grades of cements and concrete mixtures on gravel
| 100 | 150 | 200 | 250 | 300 | 400 | |
| 300 | 0,75 | 0,65 | 0,55 | 0,50 | 0,40 | — |
| 400 | 0,85 | 0,75 | 0,63 | 0,56 | 0,50 | 0,40 |
| 500 | — | 0,85 | 0,71 | 0,64 | 0,60 | 0,46 |
| 600 | — | 0,95 | 0,75 | 0,68 | 0,63 | 0,50 |
Externally, the readiness of concrete can be determined by the tubercle of the mixture at the end of the shovel. If it does not creep or drain, then the required rigidity has been achieved.
Important: the lower the fraction of concrete solution fillers, the more water will be required.
The ratio of water depending on the fractional size of plasticizers is shown in Table 2.
Table 2. Approximate values \u200b\u200bof water consumption (in l / cubic meter) in the manufacture of concrete from materials of different fractional structure
| Gravel, mm | Crushed stone, mm | ||||||
| 10 | 20 | 40 | 80 | 10 | 20 | 40 | 80 |
| 185 | 170 | 155 | 140 | 200 | 185 | 170 | 155 |
In order for the foundation under a private house to be as strong as possible, it is necessary to prepare concrete with the highest rigidity. The harder the solution is in terms of its parameters, the more durable the base of the house will be.
Concrete is poured into the formwork in layers, each layer is carefully leveled and pierced to get rid of air bubbles. A deep vibrator can be used, but it can damage the reinforcement cage. Bayonetting concrete is an important procedure that increases the strength of the poured foundation.
The mortar poured into the formwork gains its strength within 4 weeks. During this time, the foundation needs additional protection: if it is sunny and dry, it must be covered with polyethylene and watered regularly. If it's rainy and damp, just cover it with foil or geofabric. When the strip base is completely hardened, the formwork is dismantled.
Building a foundation on pillars
Are there any rules for the construction of a columnar foundation? Firstly, you need to know some of the nuances: it is advisable to choose such a base on heaving soil with a deep freezing point. Moving ground belts will not withstand constant deformation, and support pillars will serve property owners for decades.
For the device of the columnar base, the master will need the following materials:
1) pipes made of metal or asbestos cement;
2) fittings;
3) sand-cement mixture;
During the construction process, you will need a container for preparing a solution, a trowel, a shovel. To mark the terrain, you will need a level, tape measure, pegs and a construction cord.
Implementation of marking and soil operations
The marking sequence is similar to work on the construction of a strip-type foundation. In the same way, the points of the location of the pillars are taken out to the terrain, using the design documentation of the development. Location of supports: in the corners of the house and in places of the highest load (load-bearing walls, stairs, walkways, etc.). The optimal distance between the posts is from 1.5 to 2 m.
When the marking is completed, you can come to excavation under the posts. The diameter of each pit is equal to the section of the pipe. The depth should be below the freezing point of the soil. When the pits are ready, a sand cushion with a height of 10 to 15 cm is arranged in them. It is carefully compacted and moistened.
Important: the denser the pillow under the pillars, the stronger the future foundation.
Installation of pillars and pouring concrete
After completing the operations on the device of the pillow under the supports of the future base, concrete can be prepared. A solution is prepared in the same proportions as in the case of a strip foundation. The consistency of the ready-made concrete should resemble thick sour cream.
- an asbestos-cement or metal pipe is installed in the pit;
- a little concrete solution is poured into the pipe;
- the pipe is lifted so that the concrete is distributed over the sand bed;
- the pipe is leveled with a spirit level in a vertical position.

According to the above algorithm, all the pillars are installed. Further, their reinforcement is carried out. 3-5 reinforcement rods are laid inside the pipes in such a way that they go deep into sand pillow, and the top - towered over the pillars by 25-30 cm. When all the supports are reinforced, they are poured with concrete. If holes remain around the supports, they are thoroughly covered with soil and compacted well.
Concrete in pipe supports sets within 1-2 weeks. After this period, you can proceed to, which will fill the space between the corner supports and increase the reliability of the foundation being erected. Subsequently, bearing walls will be placed on the grillage.
Building a foundation on homemade piles
Is there a different type of foundation for a house on unstable ground? The way out of the situation is the device of the pile foundation. The main characteristics of such a structure are: durability and high strength, the ability to withstand high loads.
A distinctive feature of construction is the absence of a tedious stage of excavation and formation of a foundation pit. Such a base is attached to piles immersed in the soil. The cost of finished piles is not affordable for every master, so many people prefer to make these products on their own.
During the construction process, the following materials will be required:
1) fittings;
2) cement with sand;
3) steel wire;
4) roofing material;
The preparation of concrete will require a special container and vibrating unit. On the ground, the locations of future piles are marked with pegs using a tape measure and a level. You will need a hand drill to make grooves.
Well formation
Independent drilling of wells occurs already in the places of the markings taken out to the site. The step from one pile to another should not exceed 2.5 meters. The required number of holes is drilled with a hand drill. If water appears in the well during drilling, it must be pumped out with a pump.
Piling and concrete production
After the formation of all the piles, a formwork made of roofing material rolled into a tube is inserted into them. Diameter homemade pipe should be equal to the cross-section of the future pile. A soft steel wire fixes the size of the roofing felt bundle, after which it is carefully inserted into the hole.
In this way, blanks are made for all wells. The purpose of the formwork is to preserve the strength of self-made piles, to prevent the absorption of cement milk by the soil. In addition, if you pour the mortar directly into the ground, the pile will have an uneven surface. All rough bases are more susceptible to frost heaving forces than smooth ones without flaws. A fragile foundation will begin to collapse very quickly, thereby reducing the life of the building.
After immersing the formwork in the wells, it is necessary to make a spatial reinforcement cage. For this, reinforcement bars with a cross section of 6 mm are used. To form one frame, you need 3-4 rods, fastened every 50 cm to each other. Having installed the structure in the well, it is necessary to see its top above the earth's surface. The height of the protrusion is from 40 to 60 cm.
Then you can move on to the production of concrete. The manufacturing technology is described in the section on the strip foundation, repetition is unnecessary. The solution should be fed into the well in batches, filling approximately 0.5 m each time.
Important: filling the wells with a solution must be alternated with its bayonet, removing excess air.
Bayonetting is performed with a reinforcement rod. To improve the quality of work, you can use a vibrator, but very carefully so as not to damage the reinforcement contents.
Within 2-3 weeks, the concrete will gain strength, after which it will be possible to start building the grillage. The tops of self-made piles are not cut, they provide better adhesion of the grillage structure and the piles.
Construction of the base on finished piles
What are the main points of building a foundation from prefabricated, factory piles? The wizard will need the following set of materials:
- scrap metal;
- 2nd pipe;
- a mixture of sand and cement;
- metal piles;
- ready-made heads;
- anti-corrosion coating;
- water.
From tools and equipment, you need to have a shovel, tape measure, level, welding machine and grinder on hand.
Stages of work
Traditionally, construction begins with landmarks. The step between the piles is up to 3 m. Then they start screwing in the piles. This can be done manually, involving several assistants, or order drilling of wells from a specialized company. The second option is preferable, but it costs a lot of money.
The depth of the wells should exceed 1.6 m, this prevents them from bulging during periods of seasonal soil deformation.
Important: if an obstacle is encountered on the path of the pile, you need to try to get rid of it and continue working. Only 100% fully installed pile ensures the strength of the base.
The screwed-in piles are carefully cut to an equal height of protrusion from the ground, after which the products are concreted. A ready-made solution is poured inside the piles, this prevents corrosion of products in the soil. The final stage is welding the heads and covering the joint with an anti-corrosion agent.
There is no need to wait for the final with this method of construction, it is fashionable to move on to the grillage device and subsequent operations.


