The waterproofing of the bathroom does not bother the lucky ones who have recently purchased housing in a new house, since the necessary measures were taken during construction. However, if more than 15-20 years have passed since the dwelling was put into operation, the waterproofing of the bathroom requires a complete reconstruction. This article will tell you what the threat of ignoring the problem of dealing with moisture, how to solve it, and also whether you can do it yourself.
Possible options
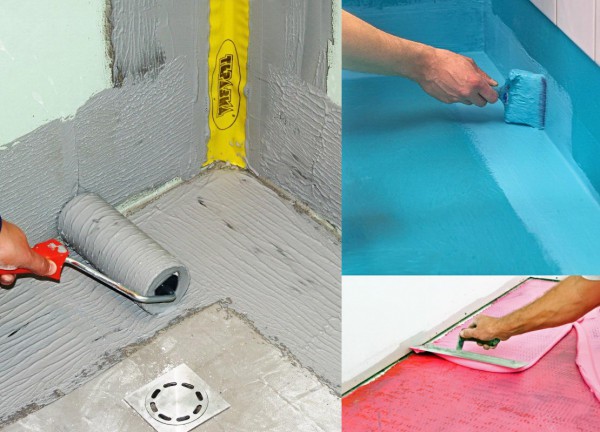
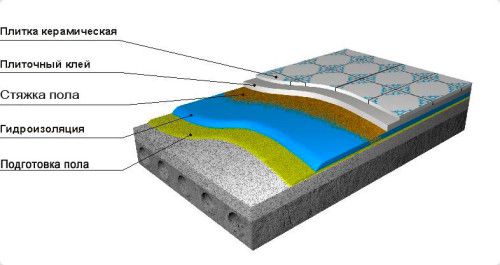
Waterproofing a bathroom consists in installing a hydro-barrier that protects the floor and wall areas most exposed to moisture from moisture. There are quite a few places in the bathroom that require protection. The so-called "wet zones" include the area adjacent directly to the bathroom, toilet, washbasin, areas of passage water pipes... According to the method of application, waterproofing in the bathroom is:
- Liquid, obtained by multilayer application of a cement-polymer mixture;
- Oleechnaya, for the creation of which roll materials based on bitumen are glued to the protected surface;
- The coating, consisting of repeatedly applied layers of bitumen or polymer mastic.
![]()
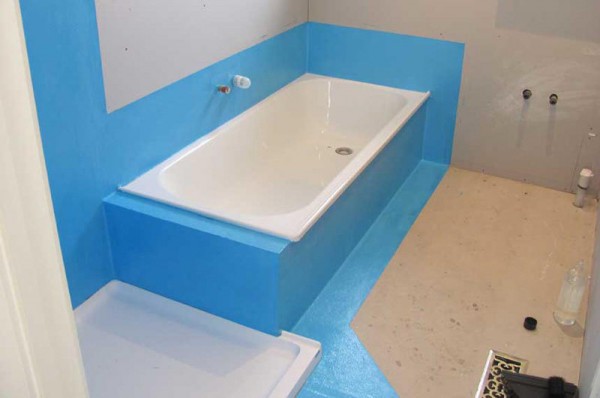
The choice of material determines the types, methods of organizing waterproofing for the bathroom, often financial possibilities are the limiting factor. If, during a major overhaul of a bathroom, the budget does not allow resorting to the services of a team of professionals, a high-quality DIY installation is possible. For those who wish to fulfill waterproofing works independently, the simplest option is the combined use of mastic and a self-adhesive material in the form of a roll based on bitumen.
Hydro barrier tasks
It is obvious that the global goal of a waterproofing device for a bathroom is to protect against excess moisture. If the work is done with high quality and in accordance with the technology, it will save you from the following troubles:
- The spread of fungi and bacteria. Did you know that some types of harmful microorganisms not only spoil the appearance of the room, lead to premature wear of the finishing materials, but also cause serious illness from the inhabitants of the house? Reliable waterproofing around and under the bathroom contributes to a healthy microclimate in the home;
- The risk of flooding the neighbors. A faucet with water left on, a washing machine breakdown, an inopportunely bursting pipe would cause discord with the neighbors from below and would threaten lawsuits if it were not for the timely installation of waterproofing;
- Maintaining aesthetic appearance. The hydro-barrier device will prevent premature destruction of finishing materials, which means a longer service life and a delay in repair.
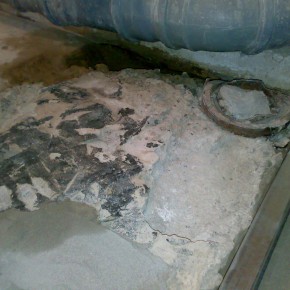
Reconstruction of waterproofing during a major overhaul is necessary and should begin with a complete dismantling of the old, worn out layer, only then the moisture protection measures will be effective.
Okay way
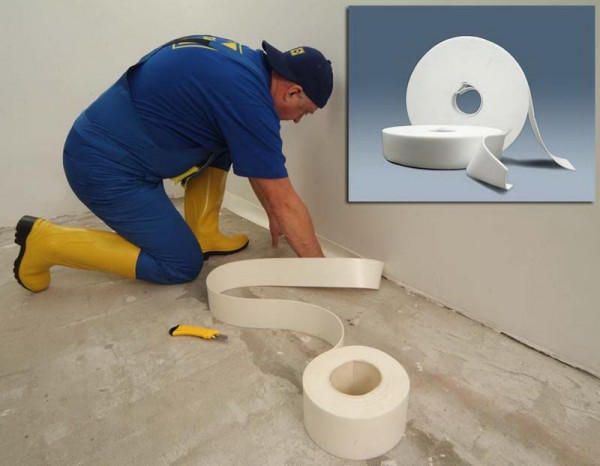
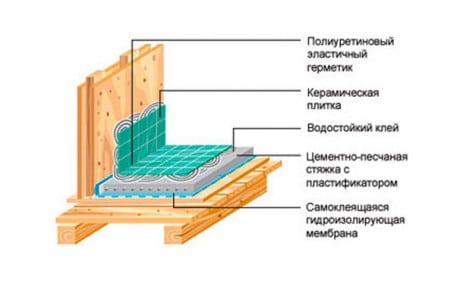
Laying the waterproofing of the floor in a gluing method is carried out using roll materials impregnated with bitumen. Self-adhesive and weld-on samples are presented in stores. For the welded ones, a gas torch is required, and from the self-adhesive ones it is enough just to remove the protective film. It is easier to install materials with an adhesive layer with your own hands, but the price is higher. The most democratic option is roofing felt, however, there are more durable and easy-to-use materials of a higher price category.
To perform waterproofing work with a pasting method, you must:
- prepare the bathroom: remove the old flooring to concrete, level with cement, wet clean and dry;
- Prime well;
- Cut the roll material into strips according to the size of the bathroom, heat it with a burner and thus glue it to the concrete floor;
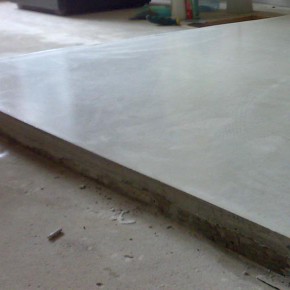
- After hardening, pour the screed and lay the decorative coating with your own hands or with the help of hired workers, usually this role is played ceramic tile.
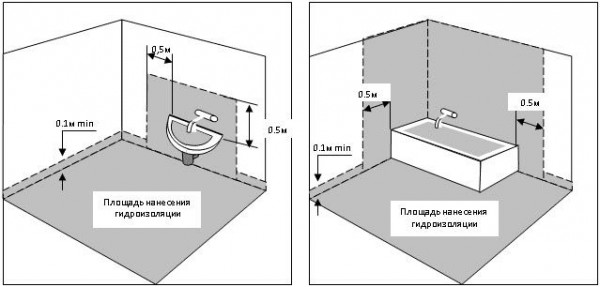
Please note that during installation, the sheets overlap each other by 10-15 cm, make an approach to the wall at a height of 20 cm or more. In no case should you place a prick joint between the wall and the floor, since leaks will inevitably occur in this place.
Coating method
Laying with a coating method consists in applying several layers of a mixture based on bitumen or polymers. These materials have a stable consistency, they become solid in the open air during the drying process. They are applied with a wide brush in a thick, uniform layer on the floor surface with a 15-20 cm approach to the walls, and all "wet zones" are also treated.
It is not recommended to use bitumen in small, unventilated rooms, since it is diluted with gasoline or solvent to obtain the desired consistency, any carelessness can lead to fire or poisoning with toxic vapors.
To protect yourself, you can use a rubber-based polymer mastic. Waterproofing the bathroom floor with rubber materials is performed after leveling, priming and dust removal. Complete solidification occurs within 6-8 hours.
Application of polymer mixtures
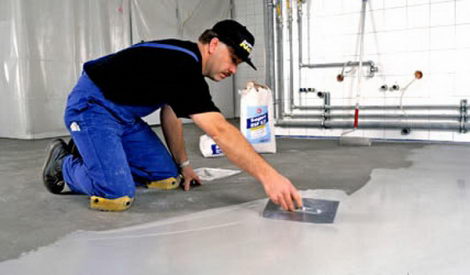
Special waterproofing polymer mixtures almost 90% consist of very fine purified river sand, the remaining 10% includes cement, polymers obtained in the chemical industry. In stores, these compounds are sold in paper bags with a capacity of 5 to 25 kg. The prepared mortar penetrates into every crack and unevenness of the concrete floor, hardening, it expands and becomes solid due to the presence of cement in the composition.
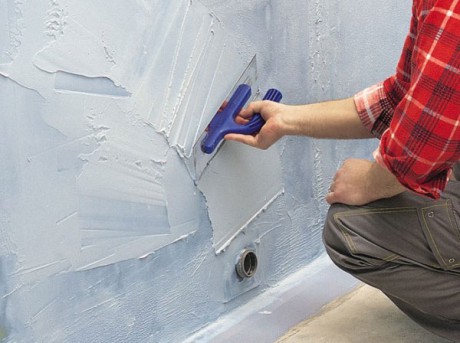
Laying the polymer composition is similar to applying plaster; this requires a spatula, trowel. Using a spatula, the mixture is applied to the wall, and with a trowel it is leveled and rubbed. A significant plus of this method is its versatility, it is optimal for floors, walls, and other wet areas. Before starting work, the concrete floor should be cleaned, leveled, primed and wiped with a damp cloth. Once dry, you can start to apply the waterproofing.
DIY installation
Remember! Waterproofing in bathrooms and bathrooms is unacceptable when using polyethylene-based films, since they do not have sufficient strength and do not let steam through. Regardless of the choice of material, the following sequence of work must be observed:
- Dismantling a layer of worn out decorative coating, screed, old waterproofing layer up to concrete base;
- Leveling the floor with cement mortar, eliminating chips, cracks and pits;
- The next stage is wet cleaning, which is necessary to remove dirt and dust. After this event, the bathroom is left to dry;
- Applying a primer on a waterproofing surface for more confident absorption or adhesion;
- Creation of a layer of bituminous mastic using a wide brush. The entire floor should be treated with an approach to the wall and "wet zones", joints and seams;
- Fit the pipe cut-in points with rubber liners;
- Lay the roll material following the recommendations. Smear the joints between the sheets with bitumen or polymer mastic. Close the room during solidification to prevent dust penetration;
- Pour the screed from a special mixture, level the floor and install the decorative coating.
This completes the waterproofing of the bathroom floor. The quality of the work done by yourself will be shown by further operation. It is recommended to install a hydro-barrier during each major overhaul of the bathroom, then its service life will reach 15-20 years.
Video instruction for waterproofing
Pouring a screed in an apartment means leveling the floor plane into one level. Indeed, no one wants to walk the steps between two adjacent rooms, much less stumble. Of course, for some guests, I would leave a couple of traps, but this is just a joke. In the houses built by the communists, the so-called san cabins were often used - a construction in which the floor level in the bathroom and toilet is below the floor level of the entire apartment.
Once upon a time, I began to find out why this was done. The answers seemed somewhat far-fetched to me. Several centimeters of the drop, allegedly served as protection against leaks, bath overflow, and so on. But the bath itself has overflow protection, and let's say a pipe break suggests two options.
You are at home - that means you turn off the incoming tap to the apartment and wait for the emergency gang; You are not at home - then a "container" for several buckets of water will help little. In my opinion, the argument is rather weak so as not to level the entire floor under one level during the overhaul. Unfortunately, we assume, but the realities laid down by the builders dictate otherwise.
The company, which replaced the risers several years ago, was creative. The cast-iron sewage system was dismantled, and the new fan riser was taken out where it was more convenient.
There is one point, namely, the height at which the fan pipe is located, sets level at which If the floor level is lower, the toilet will not work.
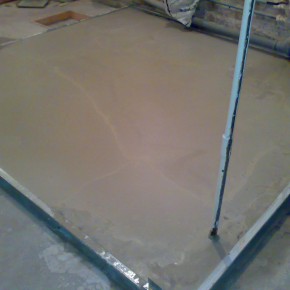
Of course, you can lay out a separate podium for him, but this is still not beautiful and the aesthetic component will be violated. I had to make sacrifices and fill it with a minimal layer. The universal equalizer with the promising name "Horizon" was suitable for its characteristics.
The thickness of the layer is from 5 to 40 mm., Quick drying and a guarantee of operation for 15 years (I am ashamed to give a guarantee of 15 years ...). So. we fasten the 60/27 mm profile around the perimeter of the future bathroom. Ideally, the profile should serve as both a formwork (prevent the solution from flowing out) and a beacon that sets the level of the fill.
Be sure to prime the surface well before applying the leveling compound.
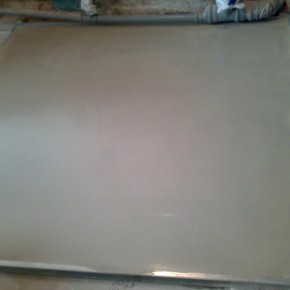
I had to do it in two stages: the first pouring is a rough alignment + the realization that the solution is too liquid and flows out of the cracks that I did not pay attention to. Then picking up the leaked part, flattering reviews, a break for drying and the final pouring.
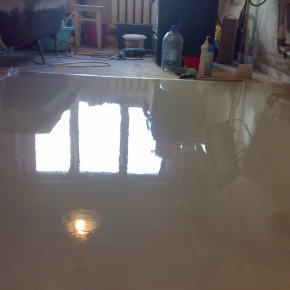
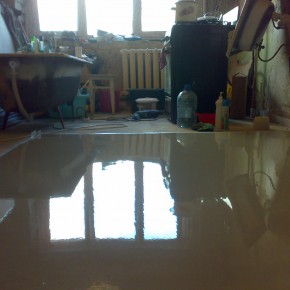
The next day we delete the profile, check the level of what happened and mutter under our breath "nothing, I will bring out these joints with tiles", you announce out loud to your wife that everything is EXCELLENT.
Waterproofing a bathroom is necessary for many reasons, this is compliance with hygiene standards, and the safety of walls and floors, and protection from possible losses.
Many people believe that all the waterproofing of the bathroom is ceramic tiles tightly laid on a concrete screed, but in fact this is completely insufficient. A tile covering can successfully complement the existing waterproofing, but it cannot replace it. In a few hours, water seeps through the thickness of the tiles or through the seams, as well as through the technological holes intended for plumbing or sewer pipes.
High-quality waterproofing, carried out in accordance with SNiP, increases the service life of plumbing equipment, postpones the need for repairs in the bathroom or toilet and increases the hygiene of the room.
Waterproofing device, methods and materials
Bathrooms installed in wooden houses and city apartments need waterproofing, but the measures for its implementation are slightly different.
The waterproofing device in the bathrooms can be carried out using two methods - the first is the coating with sealing compounds, and the second is the use of roll sealants.
Various mastics are used to seal the bathrooms: bitumen-rubber and bitumen-polymer, liquid rubber, synthetic roll-on sealants reinforced with fiberglass, two-component cement-polymer compounds, acrylic and polyurethane one-component compounds, vapor barrier self-adhesive films, bitumen, primer and parquet.
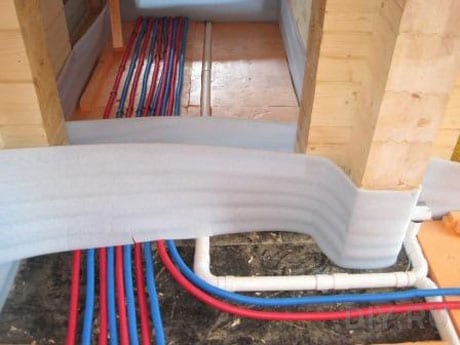
Simultaneously with the waterproofing of the floor in the bathroom, it is possible to install the "warm floor" system, in this case all joints are sealed even more thoroughly and additionally glued with a special tape. It should be noted that the materials used for waterproofing in conjunction with a warm floor must have the properties to perform their functions at elevated temperatures. Waterproofing is applied over the screed, under the adhesive layer, in order to simultaneously protect both the screed and the cable.
With the help of coating materials, the walls of the bathroom are also waterproofed.
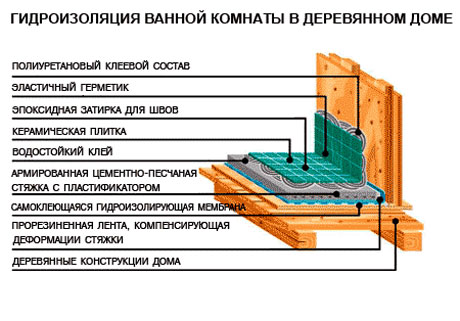
Waterproofing a bathroom in a wooden house
Waterproofing of a bathroom wooden house even more important, since the tree is more prone to rotting, and the high humidity, which is a direct consequence of poorly performed waterproofing work, quickly leads wooden structures in disrepair. The work is further complicated by the fact that wood can change its shape and size due to fluctuations in temperature and humidity.
Previously, the main material used for waterproofing sanitary facilities in a wooden house was ordinary roofing material, which was wound around the protected structures. It quickly exfoliated, its waterproofing capacity was practically zero in this case. Currently, for the same purposes in construction there is a large assortment of bituminous mastics.
The most optimal way to carry out waterproofing work is to carry them out directly at the stage of construction of a bathroom, and not to eliminate existing shortcomings. To do this, on the first floor of a house under construction, a concrete monolithic slab is poured with holes necessary for entering a water supply and a sewer outlet, all plumbing fixtures are mounted on it. The floor level in the bathroom should be slightly lower than in the rest of the house. Also, the floor device must include its insulation.
When installing a bathroom on the second floor, the distance between the beams is reduced, and the beams themselves make sections larger than the others, so that the floor can withstand the weight of the concrete screed. When pouring the screed, the first layer of mortar is poured, waterproofing is laid on it, so that it captures not only the floor, but also the base of the walls, and then another layer of cement mortar is poured. A topcoat is mounted on the hardened concrete, usually for bathrooms it is ceramic tiles or linoleum. If the linoleum does not consist of one solid bush, the seam is sealed by hot welding.
Another option for installing a floor in a bathroom is laying boards on top of a concrete screed with linoleum finishing. Before laying, the boards themselves are impregnated with a special compound that reduces the damage to the wood by the fungus. In this case, linoleum is cut out in such a way that its edges are bent upward by about twenty centimeters. The joints are carefully sealed, the same is done around the perimeter of the bathroom. We should not forget about the ventilation device in the walls.
When installing waterproofing in an already built bathroom, you should carefully coat the base of the floor with bituminous or other effective sealant, and on top of this layer, install the topcoat. New in the decoration of bathrooms and toilets is the use of the so-called thermowood, which does not absorb water and is practically waterproof.
Waterproofing a bathroom in a multi-storey building
Waterproofing the floor in the bathroom of a city apartment is more simple, since the base of the floor is always ready, it is not subject to deformations, and you do not need to arrange it yourself.
A feature of waterproofing in a multi-storey building is the device of waterproofing and vapor barrier at the same time.
Vapor barrier protects the floor from moisture penetration from below, and waterproofing from above. In this case, the floor is protected from the destructive effects of high humidity from below, and at the same time, the neighbors below can be sure that they will not be flooded if a pipe breaks through on the floor above or a similar nuisance occurs.
For the waterproofing device, the existing base is carefully leveled, all irregularities, especially sharp protrusions, are smoothed out, before applying the sealing compounds, preliminary moistening with a damp sponge is performed.
Correctly made waterproofing of a bathroom is a guarantee of a long service life of the building structure itself, plumbing equipment and finishing coatings.
Moisture is the main enemy of building structures, therefore, waterproofing a bathroom is the first task that must be solved when building a residential building. Moreover, if this house is built of wooden materials.
The penetration of moisture from the "wet" areas of the apartment into the rest of the premises is fraught with many problems. The main one is an increase in humidity in general, which leads to the appearance of foci of mold, and this does not improve the microclimate in the house in any way. Most of building materials, which are used in construction and repair, contains organic substances, and this is a breeding ground for fungal diseases and mold. If wallpaper is pasted in adjacent rooms, especially vinyl, it is almost one hundred percent chance of getting a breeding ground for microorganisms under them.
Water destroys building construction... Over time, it can damage and brickworkand even concrete, not to mention wood or plaster. Swelling and scattering of the plaster and putty layer, paint and whitewash, the appearance of white "efflorescence" resembling salt or fluff - a typical picture of poor-quality waterproofing of wet rooms. Meanwhile, there are many ways to avoid these unpleasant phenomena.
Even in a wooden house, you can equip a real "palace of ablutions"
How does waterproofing work?
There are many materials that can protect premises from moisture from the outside, but they all work according to approximately the same principle: they are applied to the surface and create a coating that does not allow moisture to pass through. Some of today's waterproofing coatings go further and manage to leave the substrate breathable, i.e. passing air through the smallest pores, which are not enough for moisture penetration. Thus, two tasks are solved at once - an obstacle for water and conditions for air circulation are created.
Especially "advanced" waterproofing not only fulfills its direct functions, but is also capable of increasing the strength of the base on which it is applied over time. In a word, there are now plenty of opportunities to qualitatively protect your home from moisture.
Vertical waterproofing device
Types of waterproofing coatings
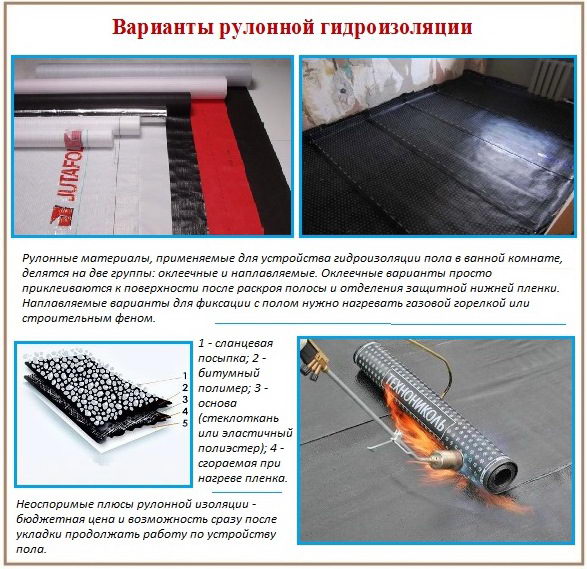
To date, several types of waterproofing materials are known, which can be divided into two groups: roll and coating.
Roll waterproofing is carried out using bitumen-based materials. These are roofing material, rubemast and other similar materials, which are produced by many manufacturers and have approximately the same structure. They represent a base made of cardboard (roofing felt) or fiberglass (more modern samples), impregnated with bitumen modified with various additives. They give the material strength, flexibility, good adhesion to the surface. Although roofing material has been used by our builders for decades as a waterproofing coating, there are many much more modern materials that are able to solve this problem much better. And the service life of roll waterproofing does not exceed 15 years.
Coating waterproofing represented by a wide variety of materials. These are bitumen-based mastics, polymer and polymer-cement compositions, penetrating waterproofing, etc. The choice of this or that material depends on the type of base on which it will be applied, material capabilities, amount of work, etc.
Bituminous mastics - compositions based on modified bitumen, enriched with polymers. They create a durable waterproof and vapor-proof coating that looks like molten rubber, which is why such materials are called "liquid rubber". Such waterproofing has a rather long service life, it is easy to apply, and is affordable for most consumers. Its peculiarity is that to protect the layer from damage, it must be laid on it. cement strainer.
Polymer mastic is easy to use and very reliable
Polymeric waterproofing compounds are made on the basis of polyurethane, acrylic or epoxy resins, due to which the waterproofing layer is very plastic. Such a coating allows water vapor to pass through, but reliably stops the water itself. These materials are safe for health, very easy to apply and dry quickly.
Polymer-cement waterproofing compositions are made on the basis of cement-sand mixture, into which polymer additives are introduced. Such materials are used for concrete, cement-sand and brick foundations. They create a vapor-permeable membrane that does not allow water to pass through. The resulting layer has good adhesion, is very flexible and durable. Polymer-cement waterproofing is made from substances safe for human health, easy to use, and can even be applied to a damp base.
Penetrating waterproofing is a new "word" in technologies to combat moisture penetration. It contains high quality Portland cement, fine quartz sand and special chemical components... When the mixture is applied to a moistened base, these substances react with the constituents of the concrete and form crystalline compounds, which tightly seal its pores. At the same time, the surface remains vapor-permeable, and over time, the strength of the waterproofing layer and the concrete base itself only increases.
Waterproofing a bathroom in a wooden house
A bathroom located in a wooden house requires increased attention to waterproofing. Moisture is the biggest danger to wood, besides fire, it can completely destroy wooden walls and floors for literally several years, and the appearance of mold is generally the worst thing for wooden housebecause getting rid of it is almost impossible. Therefore, you should not spare either time or money for waterproofing a bathroom in a wooden house.
Need to apply the latest technology and use the most flexible waterproofing materials with high water-repellency, waterproofness and good adhesion to any surface
Things to consider when working with wood
First of all, the properties of the wood itself. This material can be called living - it "breathes", passing air through the smallest pores. It swells, gaining moisture, and dries up, giving it away, wood beams can bend, expand and narrow: this is the main feature that must be taken into account when waterproofing a bathroom in wooden structure:
- Materials that can be used for this purpose must have a high ductility to compensate for linear expansion of the base without losing the integrity of the waterproofing layer.
- The waterproofing should not hinder the penetration of vapors through the wood, i.e. must be vapor permeable.
Based on the listed conditions, we can conclude that roll waterproofing is least suitable for such a task. It does not have sufficient flexibility and plasticity, does not let steam through. Therefore, it is better to abandon this option and prefer more modern materials.
Waterproofing wooden bases is a multi-layer system
Bituminous-polymer mastic can be one of the quite acceptable options. It can be used when it is planned to lay tiles on the floor, because the bituminous waterproofing layer is necessarily covered with a screed layer. In such a situation, a polymer-cement composition can also be used, which is applied to the screed from above.
If the wooden walls and floors of the bathroom will be finished with sheet or running materials - lath, clapboard, plasterboard, the base under them must undergo a waterproofing treatment. To do this, you can use polymer compositions based on acrylic resins - they adhere perfectly to wood, do not clog its pores.
In cases where the use of tiles or other finishing coatings in the bathroom is not planned, materials for wood are used - varnishes are the most convenient in this regard. They simultaneously solve the problem of giving the surface a beautiful, well-groomed appearance and protecting it from high humidity. For this, the following types of coatings can be used:
- Bituminous varnish - basically contains modified bitumen, therefore it is used in those places that will not be visible - under the bathroom, under the flooring of the floorboard, etc. This is the simplest and most cost effective way to waterproof wooden foundations.
- Priming varnish - creates a durable waterproofing coating, prepares a wooden surface for the application of parquet varnish.
- Parquet lacquer is a decorative coating that protects wood from external influences and gives it an aesthetic appearance.
- Water repelling coatings are various impregnations and compositions that are applied to wood to make it resistant to moisture.

Wood processing with special compounds significantly increases moisture resistance
Since waterproofing work in a wooden house is significantly complicated by the features of this type of structure, the best way out in this situation is to seek help from specialists. The cost of a possible mistake in such a matter is too high to risk the future of your home!
Waterproofing a bathroom in a wooden house is an important stage. You can do waterproofing yourself. As you know, the main enemy for a tree is moisture, steam, water. When it comes to the repair or construction of a plumbing unit, waterproofing should be one of the first places among the most pressing issues on this topic. As soon as the moisture level rises, it immediately leads to the formation of sources of mold and mildew. From moisture, the wood begins to rot, deteriorate, the aesthetic appearance of the material is disturbed, and so on. But if you carry out the waterproofing correctly, the presence of a large amount of wood in the bathroom will not cause you concerns about the service life of such a bathroom.
- 1 Waterproofing materials
- 1.1 Roll
- 1.2 Lubricants
- 2 Waterproofing for wood
- 3 Installation
- 3.1 Advice from experts
Waterproofing materials
In fact, all waterproofing materials used today can be divided into two large groups:
- Roll;
- Coating.
Roll
They are made on the basis of bitumen, cardboard or fiberglass. Plus, special additives are used that increase the elasticity, strength, and reliability of the material.
Rolled waterproofing has long been widely used, and also earned high marks from specialists. Nevertheless, it is not necessary to count on their long service life, since they function properly for about 15 years, no more.
Therefore, roll waterproofing gradually fades into the background.
Coating
These waterproofing materials are also made using bitumen, based on polymers and cement, as well as purely polymeric ones. Compositions of the so-called penetrating action deserve special attention.
- Bituminous mastic forms a fairly strong waterproofing base that can close access to moisture penetration. Outwardly, it looks like molten rubber. Hence the second name of the material - liquid rubber... Easy to use, affordable and requires protection with a cement screed;
- Polymer mastics are more reliable and easier to use than liquid rubber. The basis for the manufacture of the material is acrylic, polyurethane or epoxy resin. Elastic, vapor-proof mastic that retains water. The material does not pose any danger to humans, it is quickly applied, it dries just as quickly;
- Polymer-cement coating waterproofing materials in the base, as you understand, have a mixture of sand and cement, as well as special polymer additives. They cannot be used in cases where waterproofing of a bathroom in a house built of wood is required. They are designed for brick and concrete structures, that is, houses, buildings;
- Penetrating waterproofing is perhaps the most new material, which is made from high quality Portland cement, quartz sand, as well as some other components, the list of which is often classified by manufacturers. The peculiarity of such waterproofing is that the mixture literally penetrates the surface, filling all the cracks and openings with itself. It is applied on a moistened base, that is, the floor.
As you have already noticed, not every of the sounded waterproofing materials can be used in a wooden house.
Waterproofing for wood
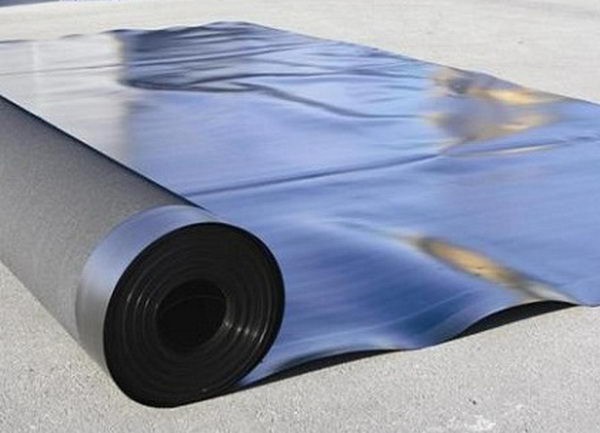
![]()
Photo of liquid glassine - according to statistics, it is most often used for waterproofing
So, your task is to choose the optimal material that will provide effective waterproofing in a wooden house. It must meet some criteria, which we will tell you about in more detail.
- Plasticity and vapor permeability. These are essential properties for waterproofing coatings for wooden houses. Consequently, roll options, due to their inelasticity and inability to pass steam, are not suitable for this task. It is best to opt for polymer-bitumen mastics.
- If you are going to carry out wall and floor finishes with slats, drywall, sheet or running material, then the waterproofing material should be based on acrylic resin. This will not allow clogging the pores of the wood, and tiles, for example, or any other finishing material can be laid on top of the waterproofing layer.
- In the absence of a lot of money, waterproofing can be done with varnishes. They will make the surface attractive, plus protect against moisture and water. Application is allowed bituminous varnish... It is necessary to process not only prominent elements of the wooden floor and walls, but surfaces from all sides.
- Using a primer varnish will create a durable surface, protect the wood from water, steam and moisture, as well as create an ideal base for further application decorative layers varnish.
- Impregnation with water-repellent compounds increases the moisture resistance of the tree, and therefore this approach is recommended.
As you can see, although the requirements are not very strict, they must be observed. With the right choice of waterproofing materials, you will significantly extend the life of your wooden bathroom, ensure excellent hygiene of the room, and also save yourself from having to carry out new repairs in a few years.
Mounting
After discussing the waterproofing materials used today, and also determining which of them are suitable for a wooden house, you should proceed to the most important thing - installation.
Best of all, when waterproofing is carried out even at the stage of construction of a plumbing unit. If this is your situation, then the sequence of actions will be as follows:
- Pour a monolithic slab into the base of the future house with the help of concrete, and also provide for special holes in it for sewage, water supply, and so on. It is advisable to choose pipes from plastic or metal-plastic.
- Install on the stove all the plumbing that will be used in the bathroom.
- On top of the concrete, boards are laid, treated with special impregnations, which help protect the material from mold and mildew. The base is coated with bitumen-based sealants, after which the finishing laying of the floor begins. If the floor is made of porcelain stoneware, it will provide excellent waterproofing. Interestingly, such a wood species as teak is not much inferior in terms of waterproofing and aesthetic properties to porcelain stoneware. Teak floors do not require special water protection. You just need to properly treat the seams between the boards with a waterproof sealant.
- The waterproofing must be supplemented with a ventilation system so that warm and humid air can escape effectively from the room. The best ventilation option is a forced system with a fan powered by electricity. Moisture removal will be effective, plus you can easily get rid of excess odors and fumes.
- A waterproofing layer made of glassine, fiberglass or hydroglass insulation should be applied not only to the floor and walls, but also to the ceiling.
- Even if the house is wooden, this does not force you to do exclusively under the tree. Wood can be sheathed with tiles, panels, and other materials. The choice is now simply huge. The most important thing is that the material is not afraid of contact with moisture, and also is not characterized by the property of easily succumbing to the process of mold and mildew formation.
Many craftsmen carry out various orders for waterproofing premises on a daily basis. And it is not uncommon to come across just wooden houses. Based on the experience they have gained, a small list of useful tips and recommendations has been formed, the observance of which significantly increases the result of the work done.
- It is recommended to use the latest materials as well as the latest technology. This allows you to achieve optimal results, as well as to somewhat simplify the task of waterproofing bathrooms.
- In a wooden house, waterproofing is best done using a coating compound. It is better not to use roll materials.
- If you have chosen polymer-cement insulation, then an increase in its strength is achieved by laying a reinforcing mesh made of fiberglass between layers of waterproofing.
- For furnishing a wooden floor, it is best to use wood species such as teak, acacia, ash or larch.
- It is better to make the base for the toilet or bathroom floor from extruded polystyrene, OSB with a thickness of 2 centimeters or more, or waterproof plywood.
- If you prefer roll-up waterproofing, be sure to overlap the wall up to about 25 centimeters high, forming a kind of pallet.
- The floor in the plumbing unit should be made lower than the floors in other rooms by about 2-3 centimeters.
- If you want to preserve the attractive and natural appearance of the tree, use protective colorless impregnations.
- Part waterproofing material linseed oil should be included.
- When the treatment of walls with protective impregnations is completed, they must be covered with waterproofing films.
Well, the issue of waterproofing can and must be solved. In the absence of experience, knowledge and skills in this matter, it is better to immediately contact the specialists. Such work will not tolerate a mediocre approach.
Do not forget to use high quality materials, strictly follow the instructions and recommendations of professionals. A wooden house has its own strict requirements regarding protection from moisture and steam, so in no case do not forget about them.
Accurate planning of each of the stages of construction and arrangement of a wooden house will allow you to achieve the best, efficient and reliable result.


