When carrying out repairs in the bathroom, we strive for everything there to be not only practical and functional, but also beautiful. But plumbing and sewer pipes on the wall behind the toilet, do not enhance the aesthetic qualities of the room. That is why many owners are wondering how to close the pipes in the toilet. You can close them different wayseg use blinds, cover with panels or drywall. However, in this case, access to the counters and shut-off valvesinstalled on pipes. Our tips, photo and video instructions from the article will help you choose the appropriate method with which you can hide engineering communications in the toilet.
Review of materials
A variety of materials can be used to hide sewer pipes or plumbing networks. For example, blinds that cover a niche in the wall. With plastic panels or drywall, you can sew up a box in which engineering communications will pass. On the web, you can find photos of various uses of these materials.
Drywall
The most commonly used method is to sew pipes into a plasterboard box. A detailed video instruction for installing the box can be found at the end of the article. This material has many advantages:
- If necessary, the structure can be dismantled.
- Execute assembly work pretty easy. First you need to build a frame from a bar or profiles. Then sheathe everything with drywall.
- It is an environmentally friendly material that is harmless to humans and animals. It does not emit harmful substances even when heated.
- With the help of drywall, you can get a flat and smooth surface, which is suitable not only for laying ceramic tiles, but also for wallpapering and painting.
Tip: For rooms such as toilet and bathroom, it is better to use moisture-resistant drywall.
The only drawback associated with using drywall is that if you replace or repair pipes, you will have to completely dismantle it and then rebuild it.
Plastic panels
You can sheathe the same box as for drywall plastic panels... This material has its advantages:
- These products are very easy and quick to mount on a frame made of timber or guide profiles.
- The material is safe for humans.
- If the box is sealed with plastic panels, then they are much easier and faster to dismantle in case of an accident than drywall. Moreover, after executing renovation works the product can be installed in the old place.
- An impressive service life while maintaining its original appearance.
- Such material is not afraid of moisture. It is easy to clean, is not susceptible to mold and insect damage.
- There are many options for colors and textures of this material on sale, so you can easily choose a product to match the style and color of your interior. There are also covers with photo prints and various geometric prints.
- After you surround the box with plastic panels, you do not need to do any finishing, because the panels have a decorative coating.
The only drawback is that this material may not harmonize well with the tiled wall cladding.
Important: when constructing a box of any materials, an inspection hatch must be made, which will facilitate access to utilities.
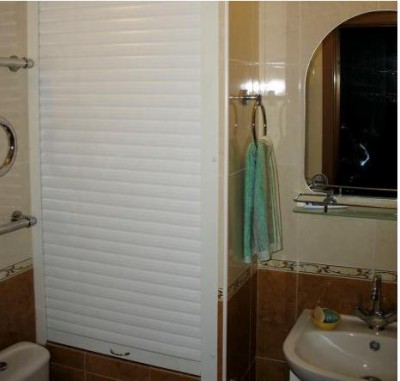
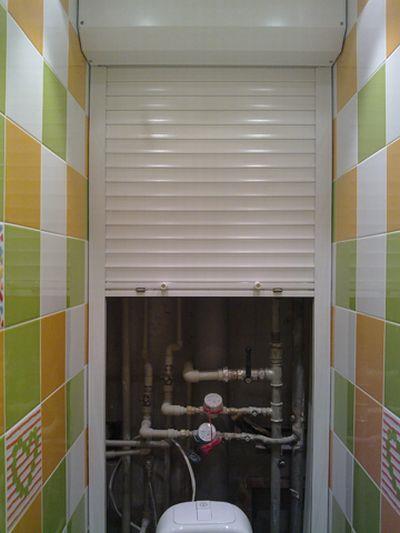
Jalousie
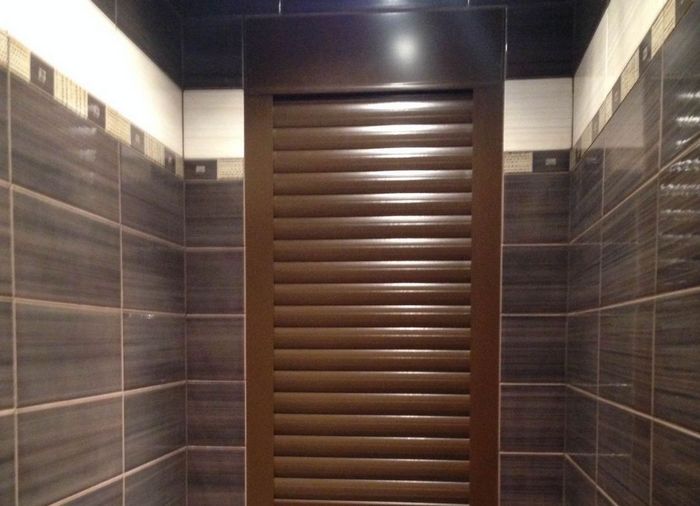
The easiest and most affordable option for hiding pipes in the toilet is to use blinds. It is suitable for small bathrooms, in which all pipes are located on one wall or in a separate niche. The benefits of using blinds include:
- They do not require complicated installation - you do not need to make a box or frame, you just need to fix the fasteners on the ceiling. Thus, you can quickly and easily close the wall where the sewer pipes and water communications pass.
- This product allows you to save indoor space.
- Depending on the size of the blinds, you can cover the wall partially or completely.
- All you need to do is lift the blinds to access pipes or water meters.
- A wide range of colors and textures, as well as blinds with photo prints will facilitate the selection of the desired product to match the color and style of the interior.
- Due to the fact that an impressive section of the wall will be closed, shelves for storage can be installed behind the blinds household chemicals and various household implements.
There are almost no drawbacks to blinds, it is important to choose products from high-quality material that will not change its color during operation. It is also important to consider that the product should be easy to clean and not absorb odors.
Homemade or ready-made box

To close the pipes in the toilet, you can use a ready-made or homemade removable box. This option also has its advantages:
- The finished product remains only to be installed (see photo below).
- If the finished structure does not fit due to the nature of the room, then you can make such a box yourself. Its production and installation will also not cause problems.
- Due to the fact that the structure is removable, there is access to engineering networks at any time.
The main disadvantage is that this is a rather bulky product that may not be suitable for your small space. Also, the price of the structure will be slightly more than the manufacture of a fixed drywall box using the method described above. There may also be problems with connecting the toilet in the case of using a ready-made box.
Installation methods

What materials can be used, we figured out. It remains to figure out how to close the pipes in the toilet using these materials. First, let's look at how to make a frame for plasterboard or plastic panels. We carry out the work in several stages (see the video at the end of the article):
- First, you need to mark the future frame on the walls of the room.
- After that, along the marking, longitudinal guides from a bar with a section of 20x30 mm or a special profile for plasterboard are attached. We attach the guides to the wall with dowels and self-tapping screws.
- After that, we install transverse bars or profiles. We fasten with self-tapping screws to the already installed guides. The step of the transverse elements is usually 30-50 cm. At the same time, do not forget that we will need to install inspection hatches. Usually they are installed in the place where meters, shut-off valves are installed, or where there is an inspection hole for cleaning the sewer. The place for the future hatch must be additionally reinforced with bars or profiles (while it is worth adhering to the dimensions of the hatch).
- On this stage you can start sewing the box with drywall sheets or plastic panels. We fasten the drywall to the box with self-tapping screws, and to fix the plastic panels we use special plastic guides and corner elements. We leave a hole for the hatch.
- If panels were used, then an access hatch can now be installed.
- If the installation of the box was carried out using drywall, then we perform it finishing using ceramic tiles, wallpaper or painting. And only after that we mount the hatch.
There are several options for the box device:
- In the form of a solid false wall. This option is suitable for small toilets where pipes are centered on one wall behind the toilet. Also, this method is applicable when installing a wall-hung toilet, since you can hide the supporting frame of the sanitary appliance behind it. The only drawback of a false wall is that in this case access to the pipes is limited and in the event of an accident, the entire wall will have to be dismantled.
- If all pipes and risers are collected in one corner of the room, then it is better to make a square box, behind which all communications will be hidden. Do not forget to make a hatch at the place of installation of meters and valves.
- An oblique false wall is made in the event that thinner pipes extend from the group of risers, which must also be hidden. In this case, making a flat false wall is impractical, since it will take up a lot of usable area of \u200b\u200bthe room. In this case, a slightly beveled structure is performed along the wall along which the pipes from the risers pass.
- If you do not know how to hide the pipes in the toilet, where the communications run in such a way that in order to hide them, you have to fence off almost half of the room, then you can use a multi-level box. In this case, the pipes are closed with a box only up to a certain height, and not for the whole room.
If you plan to use blinds, then the fasteners for them are mounted on the ceiling. In this case, the blinds themselves can cover the wall completely (from wall to wall) or partially. The second option is used when the pipes are in a niche located on back wall... The height of the blinds may also differ, depending on the features of the laying of communications. So, the louvered structure can be for the entire height of the room or only as long as the pipes are laid.
Video instructions for installing a plasterboard box in the toilet:
- Mandatory conditions and materials
- Preparatory stage
- Varieties of boxes
- False panels (walls) to help
- Conclusion on the topic
There are a huge number of ways to close the sewer riser in the toilet. When renovating a bathroom, replacing pipes and plumbing is not enough. It is necessary to create a certain design in the toilet that will hide all communications. Each person decides for himself what kind of interior he will have in the bathroom and toilet, how functional it will be. It is quite difficult to hide the sewer riser due to the large dimensions of the pipe. However, if you do close it, it will not spoil the design, it will be quiet and reduce the likelihood of an unpleasant odor in the room. The bathroom will have a pleasant aesthetic appearance, which will not cause discomfort and inconvenience associated with uncovered pipes. The best ways to implement this idea will be discussed below.
The manufacture of a special box will allow you to close the pipes, as well as gain free access to them when necessary.
Mandatory conditions and materials
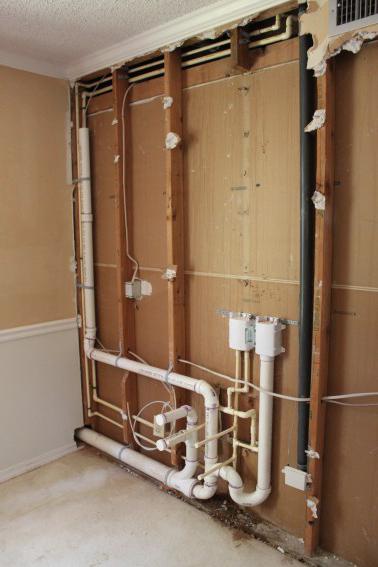
For an apartment or house, the laying of water supply and sewerage communications must be performed in accordance with the norms of SNiP and GOST. One of the main requirements that regulatory documents impose on construction works - water supply and sewerage communications must be accessible. That is, they cannot be closed. brickwork and in other ways that exclude quick access to pipes. The entire structure must be quick-detachable. At the same time, it is desirable to provide doors at the places where water meters are installed, points of entry and exit from the bathroom. This will make it possible to diagnose the state of communications and will allow repair work without dismantling the structure, and allows you not to dismantle the structure during inspections by the water utility authorities.

Before starting work on the closure of pipelines, it is necessary to diagnose all communications and eliminate the identified deficiencies (leaks, damage to pipes, protective coatings, removal of fungus from the walls).
After that, it is necessary to determine which communications will be hidden. So, in most residential buildings (like apartment buildingsand in private) the main communications are located in the bathroom, there are sewer or water pipes in living rooms rarely.
Next, you should decide on the maximum permissible dimensions of the covering structure (box). It should not interfere with the installation of plumbing and interfere with its work (for example, opening the shower doors or washing machine). To do this, you need to draw up a detailed plan with reference to the real dimensions of the room and plumbing, which will allow you to determine the size of the box and the number required material... Before starting work on the installation of the closing box, it is necessary to carry out preparatory work, which will affect both the room and the pipes.
Installation of the false panel is carried out similarly to the box. A frame is being built from metal profiles, which is sheathed with plasterboard. Then the false panel is brought to the same appearance with the rest of the walls. It can be tiled (in this case, it is necessary to calculate the load-bearing part of the structure - the tile is a heavy material), painted or pasted over with wallpaper.
Back to the table of contents
Preparatory stage

If there is no repair in the bathroom where the communications pass (or it has just finished), you should check the condition of the walls, especially where the box will be. They do not need to be tiled, but they must be primed using a high penetration primer, treated with antiseptic solutions around the entire perimeter to prevent the appearance of mold, which is often formed in enclosed wet rooms, and painted. The surfaces of the pipes along the entire length are also treated with an antiseptic (and not only those that will be closed). Treatment with an antibacterial solution must be done twice. After the first time, the walls and pipes are allowed to dry (about 12-24 hours), after which a second layer is applied.
It is especially important to restore the protective coating on metal pipes... It is recommended to replace them with polyethylene or PVC pipes... If rust or damage to the coating is found, the damaged areas must be cleaned with a file and sandpaper, primed and painted over. In the event of paint peeling, it is highly recommended to remove the paint from the entire pipe surface and prime and paint again.
One of necessary work is the application of a sealant (or silica gel) at the pipe joints to improve their sealing. This will make the joint more durable and tight, increasing the service life of the gasket in the joint. Another work required for the performance is the insulation of pipes with thermal insulation materials (thermoflex, etc.). This will prevent the accumulation / formation of condensation (less moisture is released, it is absorbed by the thermal insulation), the formation of fungus and an unpleasant odor in the box. In addition, thermal insulation partially reduces the noise of the flow of waste streams.
Fill holes and gaps in the slabs that may form after new pipes have been installed. It is better to seal them up with cement or concrete. Attention should also be paid to the taps for shutting off the water from the riser (on their technical condition). After completing all the necessary preparatory work you can start building the box. Let's consider the most common constructions.
Back to the table of contents
Varieties of boxes
On this moment most often boxes are made. There are several types of them - a regular rectangular box or multistage.
Square boxes are made only in cases where all the risers are in one corner or are compactly located against the wall (in this case, the box will act as a visual divider). To do this, a frame is mounted from profiles according to the dimensions determined in the drawings. Then it is sheathed with plasterboard - it can be easily dismantled. In this case, it is extremely important to provide for the presence of a door at the level of water meters and valves. When plastering drywall, you need to take only waterproof. It is more expensive than usual, but in a bathroom it will last longer. The door can be made of mdf board sheathed with plasterboard, or you can purchase a ready-made plastic one. In the first case, the door will not stand out against the general background, it can be painted, glued tiles, wallpaper, etc. The plastic door will be a white spot on the background of the box finish.
Multilevel boxes are used if pipes are laid along all walls of the bathroom. In this case, sheathing only the risers is impractical - the distribution pipes coming out of the box will significantly spoil the design. In this case, they are closed with separate boxes, the dimensions of which (height) are determined by the height of the pipe laying. The pipes are closed with boxes either from the floor to the height of the pipe, or from the ceiling. For the construction of boxes, a frame made of a metal profile is also mounted.
Many apartment owners, faced with the question of how to close the pipes in the toilet, solve the problem in the simplest way - they hide them behind a non-opening box made from scrap materials. This solution has one, but a significant drawback: the pipes do not last forever, a leak may occur, and they will need to be changed. In this case, you will have to disassemble the entire structure and, if the plumbers are engaged in the repair, they will simply break the pipe box in the toilet. In addition, water meters may be located in the bathroom and access to them should be constant and easy.
Solutions to the problem
The reality is that with temperature drops or insufficient ventilation, condensation forms on the cold water pipes. Doing so can damage them and corrode them, causing mold to form on the walls or leakage, leading to flooding. Even plastic pipes the toilet won't save the day.
There are two types of installation of sewer collectors - closed and open. In the first type, pipes are hidden using special structures or by gutting. This method significantly saves space and gives the bathroom an aesthetic appearance. In the second type, the pipes are freely accessible.
For closed installation, the construction market offers a large assortment finishing materials, therefore, before closing the pipes in the toilet, you should consider options that will allow you to get to them at any time. This can be a pipe cabinet, a partition, plastic panels, blinds, roller shutters or tiles. However, it should be understood that in a closed installation, certain rules should be adhered to, since non-observance can lead to leakage, flooding of neighbors or other unpleasant consequences.
Pipe cabinet
 In order to make a cabinet and hide pipes there, you need to create a drawing. The design should be thought out in advance in order to avoid buying unnecessary materials. If the sewer is located in a certain place, then it is better to design a vertical structure that can separate the area with pipes from the area with shelves. Since the standard width of the cabinet is equal to the width of the toilet, its front part should have two doors. If desired, you can divide the structure into several vertical sections, equipped with their own door. When assembling the cabinet frame, the wooden blocks are carefully attached to the wall. After that, the doors are hung and shelves are installed. To give the structure a pleasant appearance, it is pasted over with wallpaper or self-adhesive film. At the last stage, the handles are fixed on each door.
Roller shutters
 There is another option, how to close the pipes in the toilet. Due to the high cost, this option was not very popular. Roller shutters close the collector completely and harmoniously fit into the overall design of the bathroom. If necessary, they can be easily opened and you can access pipes, filters and meters. In addition, behind the roller shutters you can hide not only shelves for household chemicals, tools and other things, but also a boiler, making an original cabinet from the back wall of the toilet. With this option, the question: how to hide pipes in the toilet, disappears by itself. It is possible to install roller shutters without carrying out repair work in the room, the tiles covering the side wall will also remain intact. Toilet fittings are installed on the side wall, covering the pipes with tiles or panels. This design of pipes is especially acceptable for small-sized premises.
Partition
Another option is popular among the population, although less preferable - this is the installation of a partition. The main thing is, during installation, do not forget about the presence of hatches that provide access to the meters.  Before you sew up the pipes in the toilet, it is necessary to fix vertical bars (3x3 cm) on opposite walls. The step of the fasteners is about 40 cm. If necessary, the partition can be made of three identical parts with a mass less than the structure itself as a whole. Where the horizontal elements will join, fix the wooden transverse bars to the frame using metal screws and corners. The width of the bars should be such that it was easy to dock and fix the partition elements on them. Plasterboard, plywood or OSB are chosen as the material. And the elements of the required dimensions are cut out of the selected material, leaving room for the ventilation hole and hatches. The surface of the partition is covered with wallpaper or self-adhesive film to match the color of the toilet wall panels. Next, the elements are installed in their places and fasten them to the bars using self-tapping screws, after which the hatches are fixed and the ventilation grill is installed.
Tile
The most popular finishing material for toilet and bathroom is ceramic tile... It will successfully fit into the overall interior if the walls of the room are finished with the same tiles. Before you hide the sewer pipes in the toilet with tiles, first of all, a plasterboard box and a metal profile frame are mounted. There must be access to the meters and taps, so the size of the opening is made in such a way that replacing pipes in the toilet with an adjustable wrench or installing the meter is free. 
Advantage tile in that it is easily glued to drywall, but difficulties may arise with the lining of the opening. In this case, you should consider the procedure for performing repair work, since the wall should look solid and, for aesthetics, homogeneous. To make the result of labor pleasing, tiles with an opening are made of the same size.
The piping in the toilet is hidden in the wall; for this, a plasterboard box is assembled.
Plastic panels
One of the most simple waysplastic panels are used to hide the pipes in the washroom. PVC is a very convenient material that is not inferior in design and quality to tiles. It is lightweight, flexible, easy to operate, its main advantage is its affordable price.
Plastic panels are installed by analogy with tiles, only without the use of drywall. First, a load-bearing base is constructed for fixing the panels. In this case, metal profiles and wooden slats are used. A plumbing plastic hatch is used as a technological opening light color or choose a color that matches the color of the toilet panels.
Jalousie
 If the toilet room is small, then blinds will be the best option, since they take up a minimum of space. At the same time, they hide everything, from the ceiling to the floor. In addition, by lifting the canvas up, you can get unhindered access to all communications. And the box, which is fixed to the ceiling, will not interfere or cause any inconvenience.
Important rules
Of course, you can remove the pipes using a grinder for metal or a saw. Cut off unfortunate communications in one fell swoop, thereby improving the appearance of the toilet room. But is it worth resorting to such extreme measures if there are the above ways how to close the pipes in the toilet? But before that, you need to learn several important rules:
- It is not recommended to tightly close the sewer and all kinds of communications.
- For partitions, it is better to choose lightweight materials, they can be quickly dismantled if an accident occurs or any malfunctions occur.
- You should not build solid structures, you should put doors and windows in them. This will allow you to regularly check the condition of the pipes and there will be no need to disassemble the partition for every reason.
- In order to avoid the formation of fungus and mold, it is better to treat the elements for the structure with appropriate impregnations and solutions.
How to get rid of pipes in the bathroom once and for all
 For those apartment owners who prefer to do everything thoroughly and are not looking for easy ways, there is one cardinal way to hide pipes in the toilet - to move them into the wall. The advantage of this solution is that the area of \u200b\u200bthe bathroom will not decrease, and the smooth and even wall will perfectly fit into the intended interior. But this option is not suitable for every home. It is possible only in those buildings where the thickness of the partition allows you to gouge grooves. This method requires a complete replacement of the riser including floor penetrations. This suggests that you will have to bear additional costs, since your neighbors are the least interested in your problems.
You can, of course, just decorate the pipes. Paint them with, for example, black and white paint, or make them look like a birch grove.
In any case, the reconstruction carried out will delight the owners of the apartment and transform the house. Especially if it is made by hand, even minor flaws will turn out to be design developments or an exclusive author's solution.
The beautiful interior of the toilet room assumes the absence of foreign objects and elements, even those that ensure its functionality. Of course, unsightly communications spoil any design, so everyone wants to close the riser in the toilet in any way. And there are many ways to do this, which are described in this article.
Making expensive modern renovations in the bathroom and toilet, you want everything to be perfect: a sparkling toilet, a comfortable bathtub and a beautiful washbasin. All this is favorably emphasized by exquisite tiles, and the pleasure of contemplation is complemented by the warmth emanating from the heating built into the floor. And only pipes sticking out from everywhere spoil the picture. Of course, you cannot do without them, but you can “hide” them. Let's talk about how to close the pipes in the toilet and keep access to them in the event of an emergency.
When it comes to standard apartment with a separate bathroom, then the bulk of the pipes are in the toilet. A sewer riser, a plumbing riser, numerous taps and meters for cold and hot water - all this, as a rule, is located behind the toilet, turning and so small toilet in a kind of technical room, where a toilet was accidentally installed.
False wall
The easiest way to hide all this disgrace is to arrange a false wall made of drywall, but then you will have to push the toilet strongly forward. Quite often, the length of the toilet room is from 1.2m to 1.5m, and the false wall will take another 50 centimeters (depending on the location of the pipes). As a result, the gap between the toilet and the door will be very small. A hanging toilet can be a way out of this situation. It is installed on a special frame that can be easily hidden behind the drywall. And the cistern is installed in the same place.

Wall-mounted toilet - saves space
This toilet takes up much less space.
Important! When choosing a wall-hung toilet, be sure to pay attention to the maximum weight that this or that model can withstand, and compare this data with the weight of your family members.
This way of solving the problem has another advantage. If you make a small door in the false wall, then the free space between the pipes can be equipped with shelves and used for storing household chemicals or household items. Sometimes such shelves are made open and made of drywall, but that's another story.
Important! Opposite the meters and main valves, there should be a removable panel that will allow you to easily take readings from the devices and, if necessary, shut off the water supply.
The only, but very significant drawback of such a system is the difficult access to the pipes. Many repairmen claim that by installing a pipeline made of modern materials, you don't have to worry about leaks. However, practice shows that “there is a hole in the old woman too,” which means that high-quality material can fail.
Square box
If all the risers are located in one corner, you can close them with a square box.

Square box
This will save you some space, but it's not always convenient.
In this case, a window is made at the level of valves or meters.

Box with door
The door for it can be made independently from aluminum profiles and fixed on the "piano" awnings, or you can buy a ready-made plastic one.
Oblique false wall
Quite often, an oblique false wall is used to mask pipes, which is located at an acute angle to the side or rear wall.

Oblique false wall
This is especially useful when branches from thinner pipes protrude from the main riser to the side. In this case, it is not necessary to build a full-fledged wall of drywall, but rather simply "mow" the existing one a little. In this case, the toilet simply shifts slightly towards the opposite box.
Multilevel box
Quite often, the pipes in the toilet are located in such a way that if you close them all with one wall, you will have to fence off almost half of the room and there will simply be no space left. In this situation, you will have to "fence" a multilevel structure, each of the elements of which will "mask" one protruding section of the pipe. Here are several ways to close the pipes in the toilet - photos of structures of different shapes will help you imagine how you can do this in your apartment.

Three-level box

Complex box design

Two-level box
It is a little more difficult to build such a box than all the previous ones, but it will save more space, and you will also get convenient shelves for the necessary little things.
Material selection
What to make a box from? Let's figure it out.
Drywall ... Given the close proximity to pipes, on which condensation periodically appears, which inevitably leads to an increase in humidity, it is necessary to choose a moisture-resistant material. The indisputable advantages of drywall are ease of installation and a variety of applicable decorative finishing... It can be painted or tiled.

Drywall box
But there are also disadvantages. In an emergency, for free access to the pipes, the structure will have to be completely dismantled, and then rebuilt, most often, from new materials. Agree, not very convenient.
Plastic panels. The second most popular material. Its disadvantage is that the box will stand out from the rest of the walls. On the other hand, the variety of shades of plastic allows you to perfectly match the color of the tiles.

Plastic box to match the tiles
And in an emergency, the box is easy enough to disassemble, and then put in place.
Roller shutters ... By installing roller shutters instead of one of the walls of the plasterboard box or replacing them with a false wall, you will solve the problem of emergency access to the pipes. Thus, you will hide pipes, get excellent access to valves and a cabinet for storing small things.
And for families with small children, such a system has another plus - each mother carefully monitors that her baby does not get to the bottles with poisonous detergents and cleaning agents. The shutters are locked with a key, which means that the chemistry hidden behind them will be completely inaccessible to the little weasel.
Before hiding the pipes in the toilet, it is better to draw a plan of the room on a scale, put all the pipes on it and try to "draw" different options for the location of the box. Then it will be easier for you to understand which one will help you save more space and look more organic.
Open pipes in the toilet are not only unaesthetic, but also additional problems associated with cleaning. Cleaning pipelines takes a lot of time and needs to be done regularly.
You can simplify your life by hiding the pipes under drywall or plastic panels.
4 ways to hide pipes in the toilet
Before starting work, you need to decide on the method of masking based on the size of the toilet and the location of the pipelines.
- In a cramped space with pipes along one wall, you can hide the pipes behind. It reduces the size of the room by an average of 40 centimeters, so it is necessary to install drywall at an acute angle to two load-bearing walls.
- The riser and pipes located in the corner are easier close behind the box... It is mounted from plasterboard or PVC. If the pipes are placed in two corners or diverge at the bottom, the box can be made multilevel. This method is more time consuming.
- A large toilet will allow build a full-fledged closet, which will disguise pipelines and serve as a storage place for household chemicals and cosmetics. Such a cabinet is quite simple. A frame made of wooden bars is mounted on the wall, then cabinet parts made of chipboard and sheathed with moisture-resistant material (for example, plastic) are attached to it.
- The fastest way to disguise is installation of roller shutters... You only have to mount a small box near the ceiling, where the blinds will be installed.
The fastest way to camouflage is to install roller shutters. You only have to mount a small box near the ceiling, where the blinds will be installed.
Materials that will be needed to close the pipes in the toilet into a box
A false wall and a box are the most common way to mask pipelines in a cramped apartment.
For work you will need:
- a sheet of wall drywall or PVC (optionally, a sandwich panel);
- profile and dowels for them (on average, three for each rack and guide);
- self-tapping screws for metal;
- putty and finishing materials (this can be tiles, wallpaper, paint or emulsion).

To determine the material for the cladding, it is necessary to take into account the humidity in the room, financial capabilities and skills in construction.
On a note... You can use a sandwich panel coated with polymer or already sheathed with plasterboard. This will shorten the work time, since you will not need an independent frame sheathing.
Of the tools you will need: tape measure, level, drill, screwdriver, knife for cutting drywall, sandpaper for cleaning the sections, a spatula and, if necessary, a brush for finishing works.
To decide on the material for sewing, it is necessary to take into account the humidity in the room, financial capabilities and skills in construction.

When installing drywall, do not allow it to touch the pipelines. Condensation on the drywall will significantly reduce the durability of the box.
- Drywall can absorb moisture, and this is fraught with the appearance of mold or mildew. However, it is easier for them to sew up and it costs less. The price of a standard sheet is 215 rubles (Knauf) (you can read more about the dimensions of GCR sheets and the calculation rules).
- Sheathed with plastic (PVC) harder, but it is moisture resistant and durable. In addition, PVC does not require finishing work - the panel can be of any color. The price is correspondingly higher. But do not forget that by purchasing PVC, you can save on wallpaper or tiles. The price of packing panels for ten sheets is from 700 rubles (size 1 by 6 meters, thickness a centimeter).
- Sandwyh-panel, in addition to moisture resistance, it also has such an important quality as the ability to retain heat. After all, its base is made of insulation (expanded polystyrene, polyurethane foam or mineral wool). The cost is comparable to plastic panels - from 800 rubles per square meter (one centimeter thick).

The installation of the box always starts from the bottom of the wall. The profile (bottom guide) is cut to size and fixed to the floor with dowels
Getting started
- Do-it-yourself frame installation for a box always starts from the bottom of the wall. The profile (bottom guide) is cut to size and attached to the floor using dowels (what types of profiles are there and which one to use for what we told you).
- Vertical side profiles (load bearing) are set in level, focusing on the horizontal profile already attached at the bottom. And they are also fixed with dowels.
- If the box is solid, another vertical profile is installed in the center. It will be convenient to attach plasterboard or PVC to it (the width of the latter is only one meter).
- Drywall (or plastic) of the required size is mounted to the finished frame (for more information about the installation of the frame from the profile, see) using self-tapping screws. The pitch between the screws is twenty centimeters.
- On a finished drywall box you can glue the tilesany color and texture - it looks beautiful, lasts a long time and is easy to use (easy to wash and clean from dust). The average price per square meter is from 98 to 1200 rubles. In addition, a special glue is required (the average price is 980 rubles for 15 kilograms, consumption per square meter is 2.5 kg).

The scheme for laying tiles on a frame in which pipes are hidden
- A cheaper option is and painting... The main disadvantage of this finish is the need for cosmetic repairs. The average cost of enamel is 170 rubles per kilogram, emulsion - 250 rubles per bucket of 14 kilograms. A primer is also required under the paint. Its average price is 320 rubles per 10 liter bucket.
- Often boxes pasted over with wallpaper... This finish is the fastest to complete. The disadvantage is fragility. And paper wallpaper also absorbs moisture. More reliable vinyl wallpapers (the average price per roll 0.53 centimeters wide and 10 meters long is 350 rubles). Additionally, you will need wallpaper glue (190 rubles per liter).
- If the sheathing was made with PVC, additional finishing is not required. Therefore, the box will cost exactly the same as paid for the plastic and the profile for the frame.

Installation of the box will cost an average of 1,300 rubles (with a conditional wall height of 2.5 and a width of 1.5 meters).
You can do the work yourself in one or two days (it all depends on the drying of the putty, primer and paint).
A master's work costs from 125 rubles per square meter. That is, for a wall of an estimated size of 2.5 by 1.5 meters, you need to pay 416 rubles. The master will install the box in about one day (without priming and painting).
Video instruction


