Self-pouring the foundation for the house does not present any difficulties, even someone who has never encountered construction before will cope with it. To do this, it is enough to observe the order and sequence of all stages of laying any foundation, which we will talk about in this article.
Everyone has probably heard the phrase “They don’t save money on the foundation!”. So I will say with great confidence that you can save money on pouring the foundation for a house, of course, within reasonable limits, and later in this article I will tell you how.
The very process of laying any foundation involves several stages:
In this article, I will tell you in detail and step by step about pouring the most popular today - strip foundation and about the distinctive features of the stages of pouring other types.
Filling the foundation with your own hands
There are several types of strip foundations, but the do-it-yourself pouring technology is almost the same for everyone.
Sand bed-pillow under the foundation.
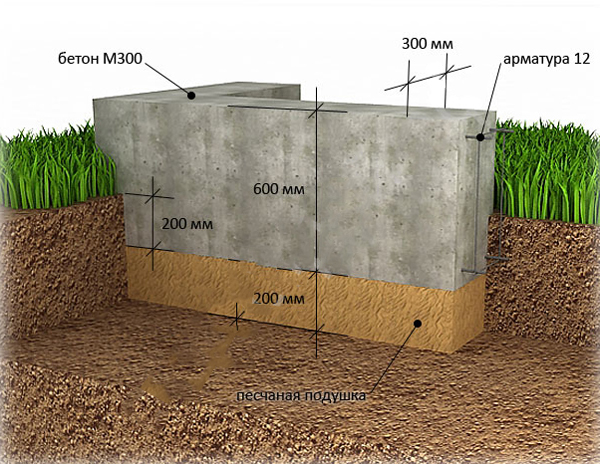 Sand cushion under the base of the foundation.
 The foundation pillow is made of washed sand, without various admixtures of clay, etc.
Sand, in contrast to the soil in which the foundation is laid, is much less susceptible to heaving and will evenly distribute water under the foundation, which will eliminate uneven shrinkage of the foundation.
Sand is poured into a trench and rammed. The layer of such a sand cushion should be at least 20 cm.
If you do not have special devices for tamping sand, then you must at least spill it well with water before pouring it.
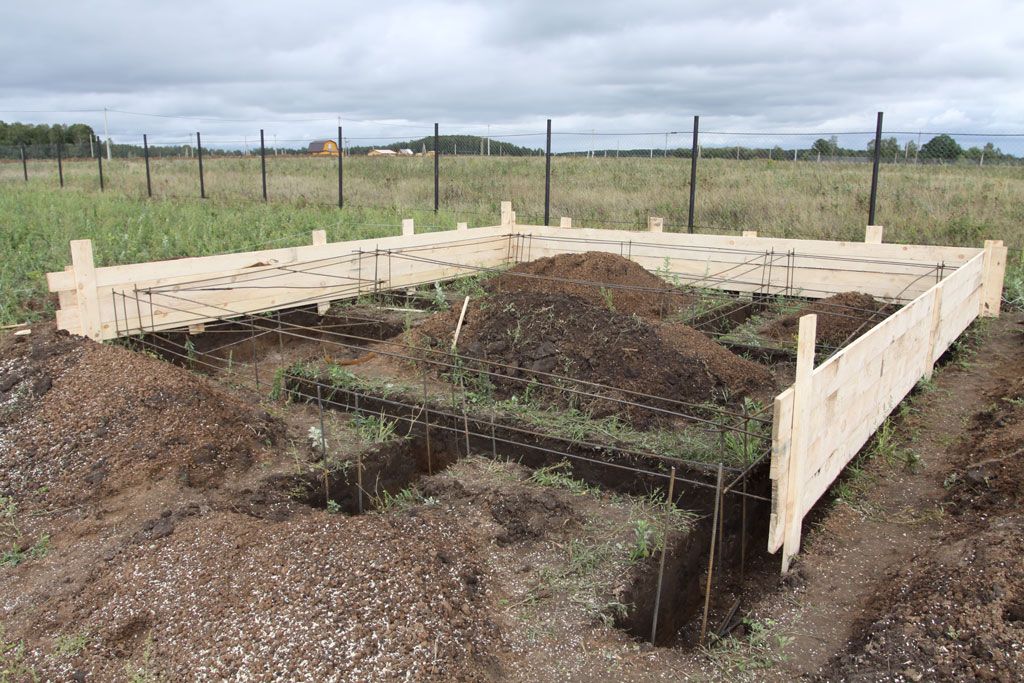
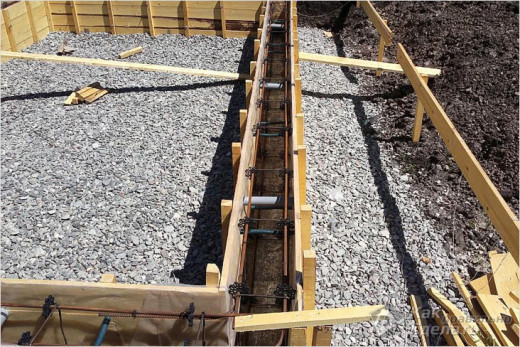
We build the formwork and reinforce the future foundation.
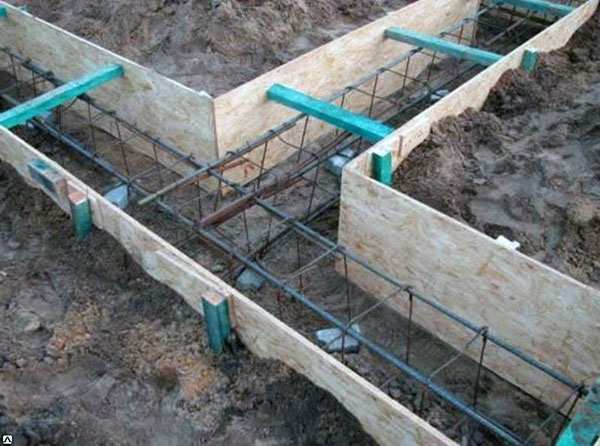 We construct formwork under the foundation and reinforce the future foundation.
 For the reinforcement cage, reinforcement with a diameter of 8-14 mm is used, and in order to more accurately determine the diameter and amount of reinforcement, you can use the calculation of reinforcement for a strip foundation. With it, you will select the correct diameter and amount of reinforcement for your foundation.
As a rule, vertically laid rods with a diameter of 8-10mm, and horizontal longitudinal rods 12-14mm. The rods along the trench are always thicker, because they will be subject to a large load, and they, in turn, must cope with it.
In what way to knit the reinforcing cage, in a trench or next to a trench, and then lower the finished frame into it, you must decide for yourself how it will be more convenient for you. The disadvantage of knitting reinforcement in a trench is that if the trench is not wide enough, you will sprinkle it with your body.
Use a thick knitting wire to connect a one-piece rebar. For good softness, the steel wire can be kept on fire for about 30 minutes and allowed to cool. After that, it will become softer.
Formwork for the foundation, if necessary, is constructed using boards, 10-20 cm wide, and 2.5-4.0 cm thick.
When constructing the formwork, it is necessary to exclude large holes in the formwork, and rigidly fix it. Opposite formwork panels must be tied together with studs, thus preventing the formwork from expanding when pouring concrete.
The corners of the formwork must also be rigidly fixed, because these are the weakest points.
Fill the future foundation with concrete.
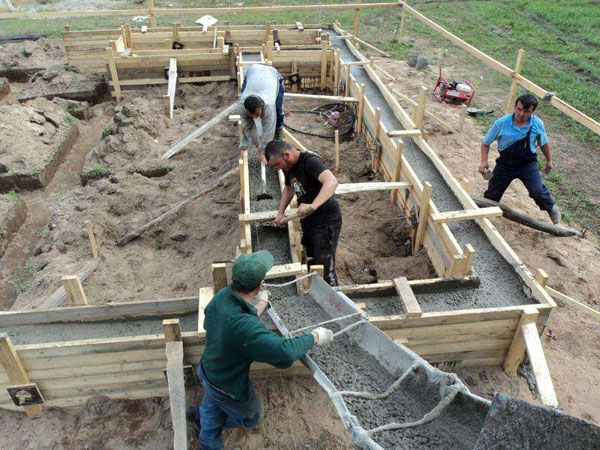 We fill the foundation with high-quality concrete.
 Pouring concrete for any type of foundation is the same. As a rule, with large volumes, purchased concrete is poured, since a monolithic reinforced concrete tape can be achieved only if the foundation is poured at a time.
And so, everyone preparatory work spent, now it is necessary to pour concrete into the future foundation for the house.
For pouring, concrete of the M200 - M400 brand is used, which depends on the composition of the concrete.
Pouring concrete into a trench always starts from the corners, and then the rest of the voids are filled.
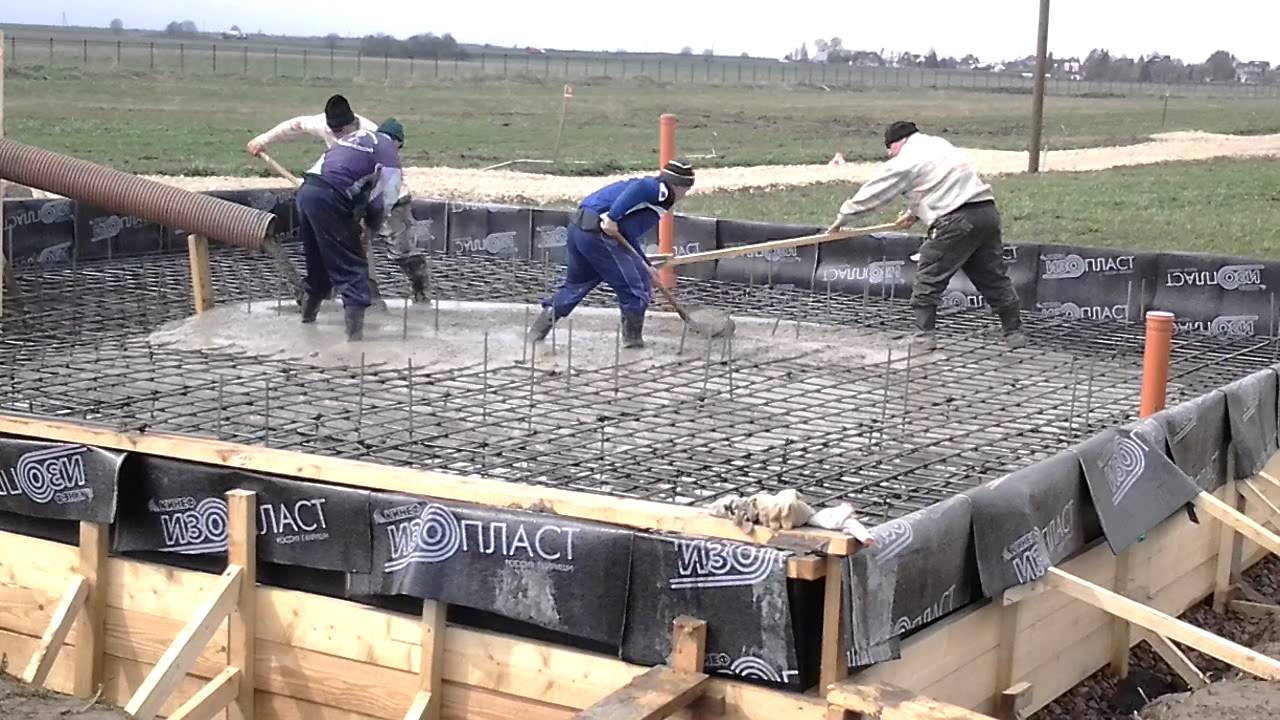
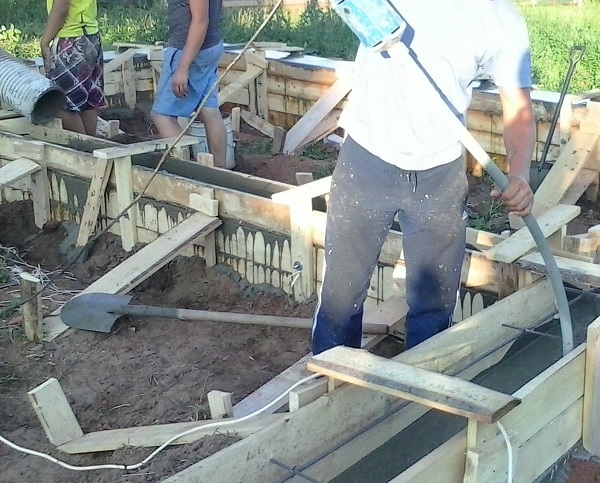
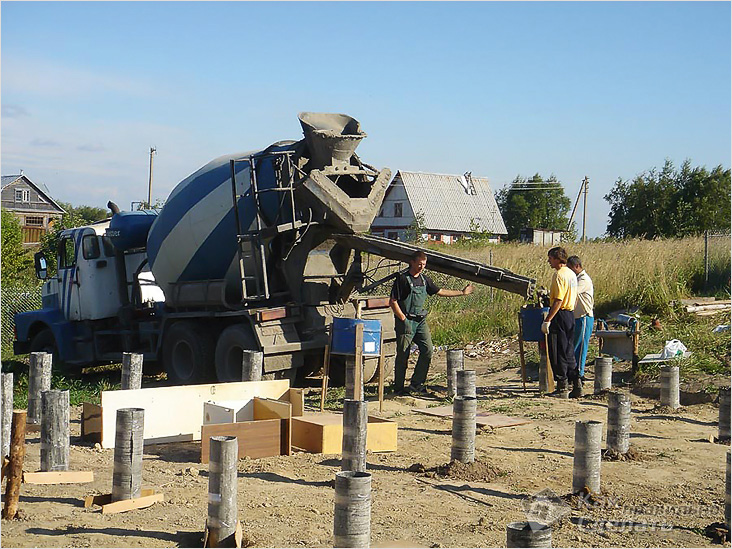
The ideal conditions for pouring the foundation under the house is the automatic mixer access to all corners of the house.
The mixer drives up to the corner and the pouring process begins. At this time, one person must hold the gutter, guiding it, and the other (preferably two) - help the concrete evenly spread over the trench using a shovel, for example.
In order to expel air from concrete, it is necessary to use a deep vibrator, if there is none, then it is necessary to vibrate using improvised methods. You can vibrate with a bayonet shovel, this vibration is called the bayonet method. A good result can be obtained by tapping with a hammer on the reinforcement frame, or on the formwork (not much!).
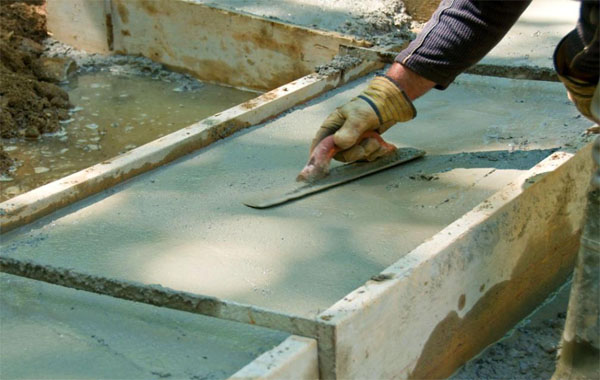
After the trench is filled with concrete, it is necessary to trim the concrete in the right places before the concrete has “set”. After the concrete began to "crumble", it is not advisable to touch it.
As I said, it will not be difficult to fill the foundation for the house, on this stage we examined in detail the casting of a strip foundation, the stages of which in most cases are suitable for casting any type of foundation.
Important points in the construction of the foundation for the house.
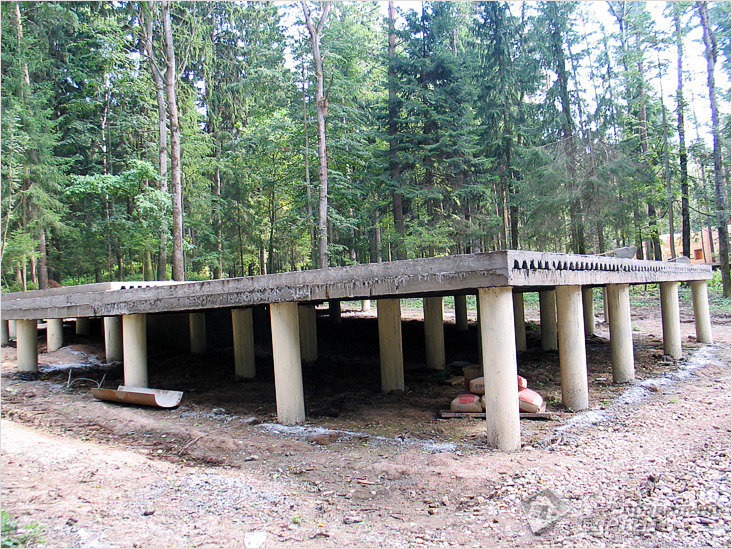
Distinctive feature columnar foundation is that the foundation does not consist of a monolithic tape, but of pillars that are connected with a monolithic tape.
In this regard, after marking, the pillars are drilled using an auto-drill or a hand drill, the pillars are reinforced with reinforcement with a diameter of 10-12 mm, with the release of reinforcement 15-20 cm above the level of the post.
After pouring the pillars, a formwork for the grillage is constructed, connecting all the pillars, a reinforcing frame is created and concrete is poured into the formwork.
It should be recalled that the columnar foundation is constructed for light structures and in "good" soil.
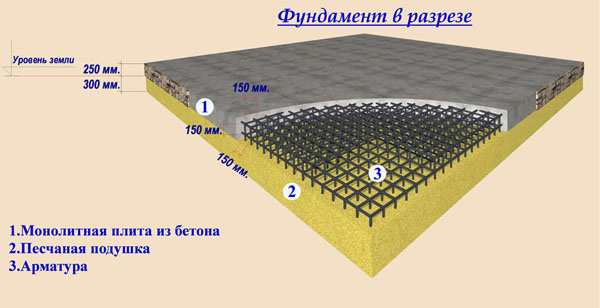
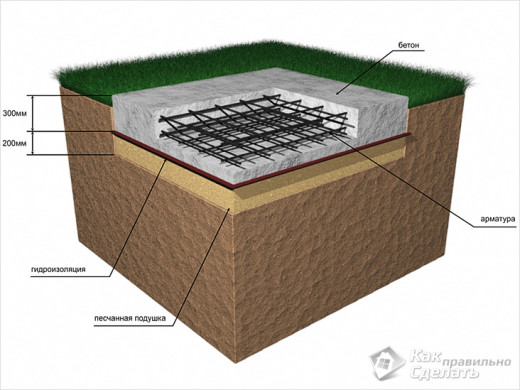
Distinctive feature monolithic slab is that such a slab is located under the entire structure, and not just under the walls of the house.
In general, it's not a difficult process with your own hands, but it requires a responsible approach, and I believe that it can be transferred to a separate article.
One of the types of a monolithic slab is a slab foundation with stiffeners; the technology of pouring this type of foundation is not much different from the usual one.
The markings are made around the perimeter of the house, then the soil is removed under the future house, to the depth of the future slab + the thickness of the sand cushion.
Then you need to build a sand or sand and gravel cushion, followed by tamping.
The reinforcement frame is knitted in two rows in the form of a mesh.
Filling occurs in much the same way as with any other type of foundation.
Depending on the use of your own labor, you can fill the foundation in three ways:
- Lay the foundation yourself, using only your own labor. This, of course, is a laborious process, but not so much that you cannot cope with it on your own. Ideally, 2-3 people will handle all the steps effortlessly.
- Use partially someone else's work for some stages of pouring the foundation. This method is most common when building houses on your own; it involves the use of hired workers at especially difficult stages of work. This will save on your own labor, but financially it will be a little more expensive.
- Entrust the pouring of the foundation for the house to professional workers. This is the most expensive method of pouring, but in this case, you will not have to do anything other than come to the site and control the process of laying the foundation, because even professionals sometimes do not adhere to a strict technology for their own benefit.
- If you hire workers to perform separate stages of pouring the foundation under the house, then it should be borne in mind that the most expensive stage is digging the soil and pouring concrete. If we talk about digging, then it's up to you to decide, this is a laborious process and whether it is worth saving on it. Well, on pouring the foundation, you can save a decent amount if you invite a friend to help. In fact, pouring concrete is a messy, but not very complicated process, which two or three of us can easily cope with in half a day, saving about 500 rubles on this. with a cube of concrete.
- On a strip foundation, you can save on deepening, if you do not have a heavy and small house (for example, a wooden one), then you can make a shallow one instead of a deep one strip foundation.
- On slab foundation you can save money by making it thinner, but with stiffening ribs. I talked about the slab foundation with stiffeners in my previous articles.
- When laying a columnar foundation, you can only save on labor, because it is already the least stable in comparison with its counterparts.
- In some cases, fiberglass reinforcement and its use will save a little on the foundation.
An independent foundation device is subject to even novice builders. The key to success is strict observance of all basic requirements, from the creation of the project to the arrangement of the blind area.
The base for the structure is one of the most important structural elements, the quality of which will ensure a fairly long service life of the structure. You can often hear that saving is not worth it. Today we'll talk about how to make the right foundation for a house and at the same time reduce costs, of course, within reasonable limits.
 Exist different types bases, but any of them has certain stages of arrangement.
We note that the construction of foundations can be performed according to the following algorithm:
- Preliminary preparation of the site and drawing markings on it.
- Arrangement of trenches or indentations for supports.
- Providing a pillow for the base of the house.
- Carrying out the reinforcement process.
- Pouring with concrete mixture.
Each type of foundation is good in its own way in certain conditions. When deciding which foundation to choose for your house, we pay attention to the geological conditions and the expected load.
Today we will focus on the most common type - strip concrete foundations.
They are suitable for almost any type of soil and are capable of withstanding considerable loads.
The technology of arranging the foundation for the house
 It is easier to fill an unburied foundation than a shallow one
Strip foundations are buried and shallow. The first is laid to a depth below the level of soil freezing. The technology for pouring an unburied foundation is a little simpler, but the algorithm for performing the work is similar.
Preparatory work
- clearing the site from all kinds of debris and excess vegetation;
- leveling the construction site by removing part of the fertile soil;
- marking in accordance with the project.
To make accurate markings, we stock up on such devices as a measuring tape, stakes and a rope.
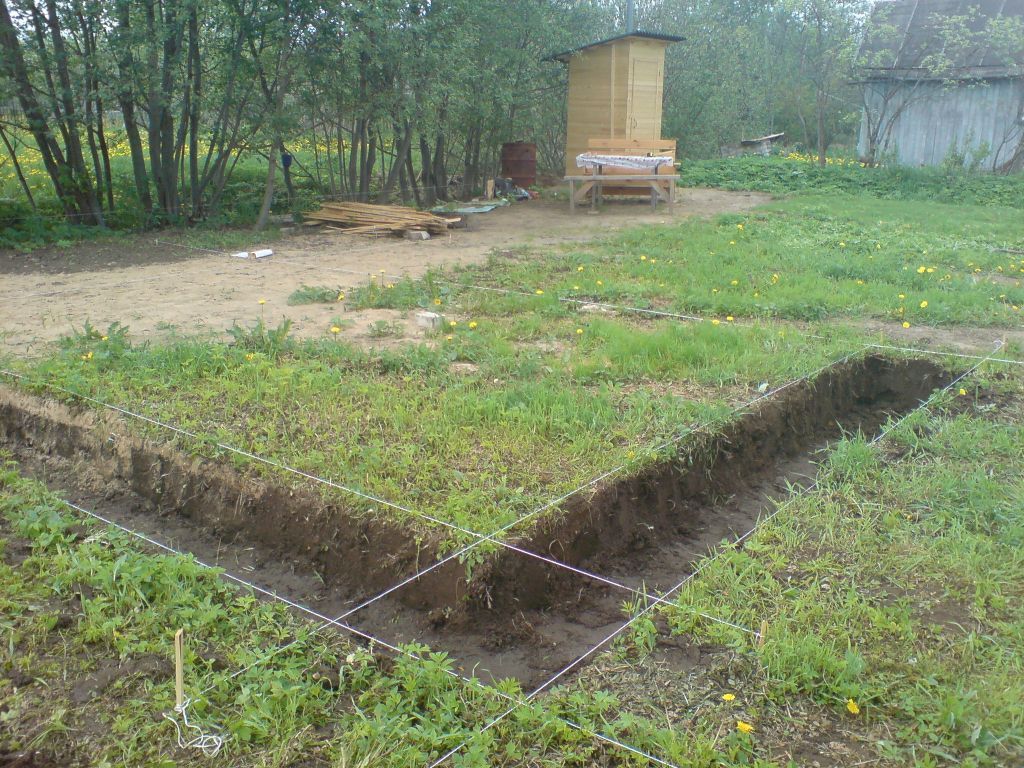 Drive the first stakes into the corners of the house.
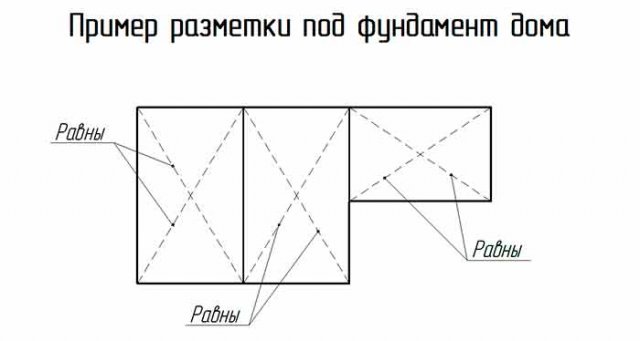
 We start by marking the outer wall. First of all, we hammer the stakes in the outer corners of the future house. As a result, we get a shape - a rectangle.
To make sure that the process is carried out correctly, we check the lengths of its opposite sides and diagonals. They must be equal in pairs. Otherwise, by moving the stakes, we achieve the desired result.
It must be remembered that the more accurately it is done, the less difficulties will arise when performing further work.
Trench arrangement
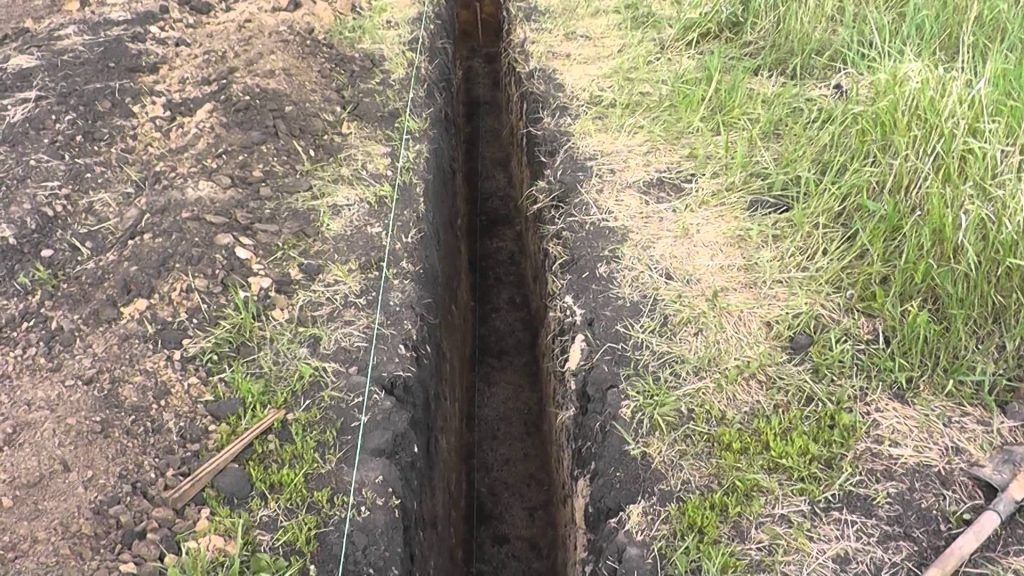
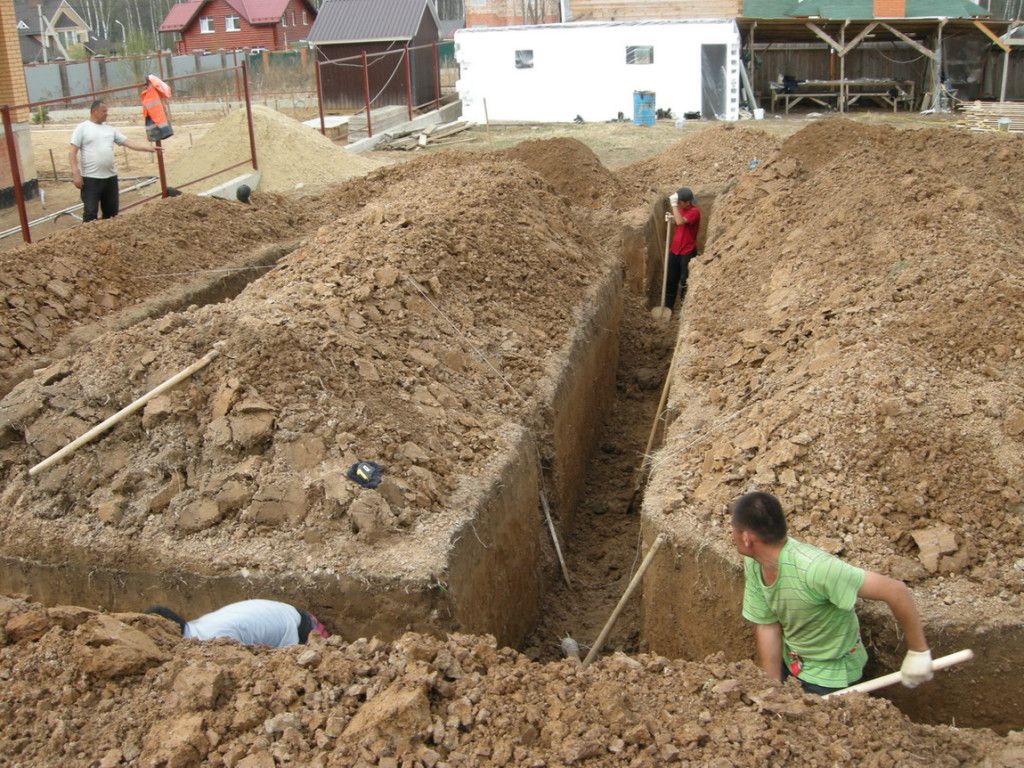 It is cheaper and easier to dig a trench by hand
 There are two ways to prepare a trench for a strip foundation: using technology and manually. Of course, using an excavator, the trench can be prepared faster and cheaper. But some nuances should be taken into account: the boundaries of the trench will be uneven, and much more concrete will be needed during pouring. It is clear that there is no need to talk about saving.
Arranging the trench manually with your own hands or with the help of hired workers will provide its clear boundaries and the required width. In the future, the amount of concrete mix will be consumed according to the project. This will help to accurately determine the volume of ready-made concrete when purchasing it.
We provide a sand pillow
 For a sand cushion, use sifted clean sand
 The sand cushion helps to more evenly distribute the load of the structure on the ground, therefore, experts do not recommend excluding this process from the general sequence of actions.
It is best if the pillow is made of clean sand that does not contain excessive clay impurities. The sand does not have the property of heaving, which allows to reduce the pressure of the soil on the sole of the base. Also, water does not stagnate in it, but is equally distributed over its entire surface. All of this will provide a more uniform.
When arranging a sand cushion, a layer of sand is poured into a trench 20 cm thick and compacted simultaneously with pouring.
Reinforcement process
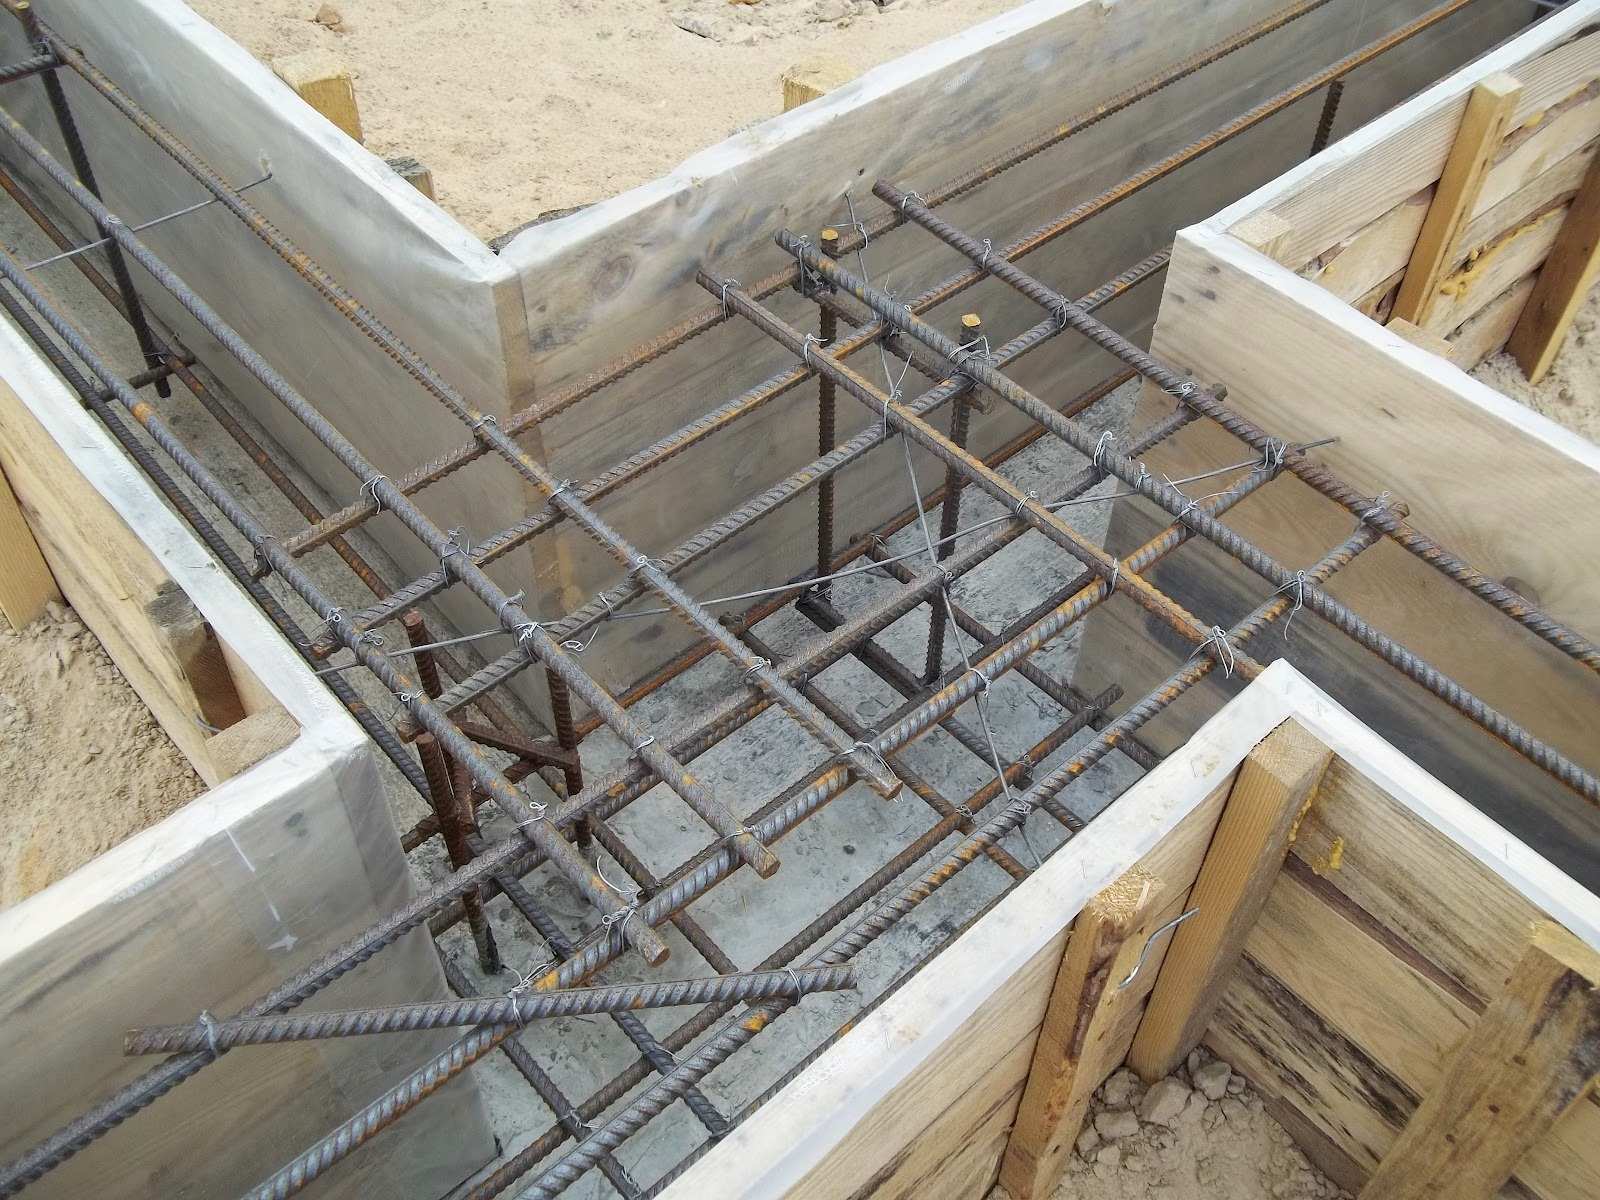 The diameter of the bar depends on the planned loads
 We make a solid foundation for the house. This property can be ensured by the process of reinforcing the strip with reinforcing rods. For reinforcing the strip base, steel reinforcing bars of various diametrical sections are used.
The cross-sectional dimensions of the bars depend on the expected load. Typically, fittings are purchased by weight. Understand the required amount the purchase of rods depending on their cross-section will help this table.

Usually, bars that are installed vertically are used with a smaller section than those that are laid horizontally. So, for example, if the vertical rods have a diametrical section of 8 - 10 mm, then the horizontal ones are 12 - 14 mm. For more information on reinforcement, see this video:
This feature is explained by the fact that more load is applied to the horizontal part of the reinforcement cage.
It is better to knit a reinforcing cage on the surface, and not in the trench itself. This will make the process much easier and prevent the trench from shattering.
Experts recommend knitting rods using a special soft wire. The use of welding is not encouraged, since the joints are not strong due to the burning of the crystal lattices, and during the subsidence of the soil, it is possible that they are broken.
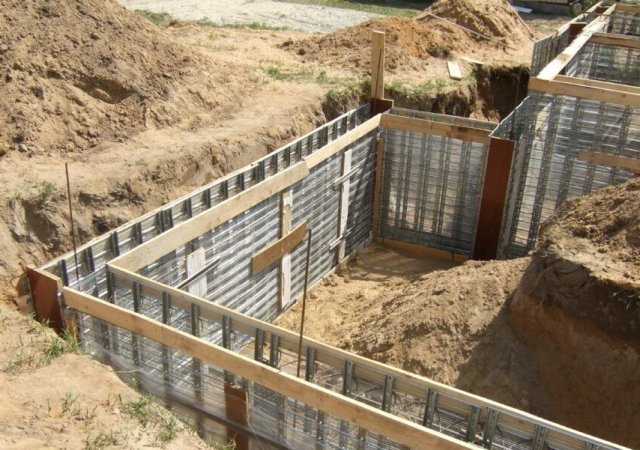
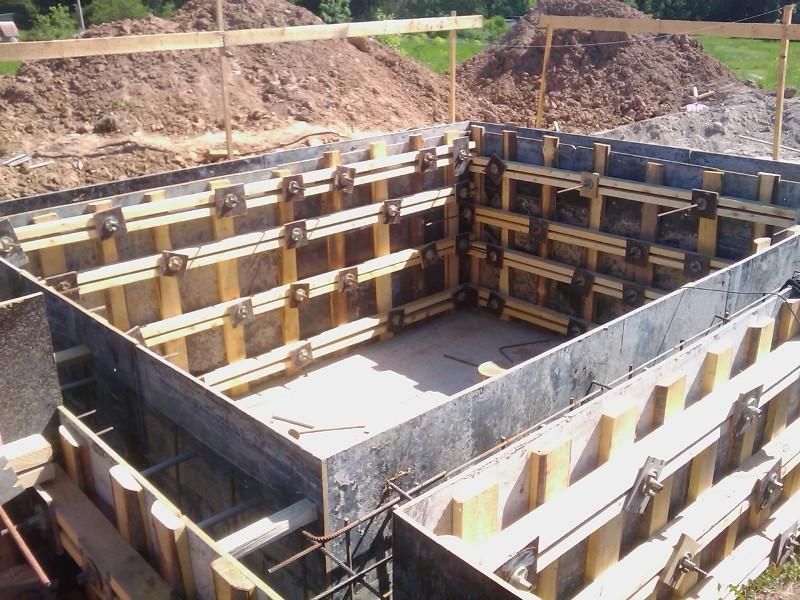 To give the strip foundation the correct shape and ensure its elevation at a certain height above the ground, it is necessary to install formwork.
Most often, it is assembled from wooden boards, the width of which is up to 20 cm, and the thickness is from 2.5 cm to 4 cm, depending on the height at which the concrete foundation will be built.
 When installing the formwork, we follow the following nuances:
- The boards should fit together as tightly as possible.
- Opposite walls of the formwork are connected with each other by special crossbars.
- From the outside, the walls are supported by supports, which ensure the rigidity of the structure.
It should be remembered that the most problematic places in the formwork are the corners, therefore we pay special attention to the corner fixings of the base.
Pouring with concrete
Pouring the foundation under the house with concrete is a very crucial moment. It is best to purchase ready-made concrete for this purpose. It has a uniform consistency and is less time-consuming, which prevents the formation of concrete joints. Only in this case the device monolithic foundation will be held at a high level. But for this it is necessary to provide free access of transport to construction site... For all the details of the process, see this video:
If you decide to prepare concrete yourself, then we will try to tell you in detail how to fill the foundation under the house correctly. We start by defining the grade of concrete. For this, concrete mix M-200 - M-400 is suitable.
It is necessary to start pouring the concrete foundation from the corners and only then fill the rest of the resulting voids.
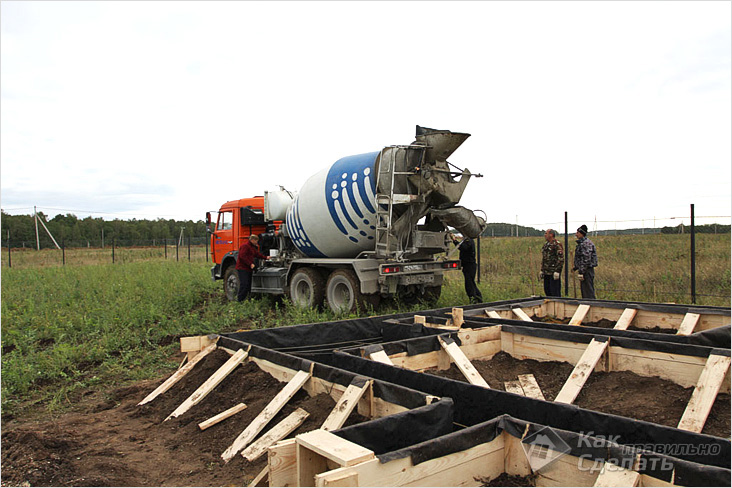
In order for the work to be argued, and the strip foundation for the future house was filled in as soon as possible, it is necessary to ensure the free movement of the concrete mixer to any point of the construction site.
When pouring, the concrete is spread in parallel using a shovel, and then, using a deep vibrator, we compact the concrete mixture.
How to fill the foundation for a house in a private construction in the absence of a vibrator? Its functions can be performed using a bayonet shovel. It is necessary to constantly bayonet and gently tap on the reinforcing frame. These simple steps will also help to distribute the concrete evenly. For information on how concrete is poured into a trench without formwork, see this useful video:
As you can see, pouring a concrete foundation is not difficult, but nevertheless, special attention should be paid to the method of distributing concrete along the foundation trench for the house. Concreting the base is completed by carefully leveling the surface.
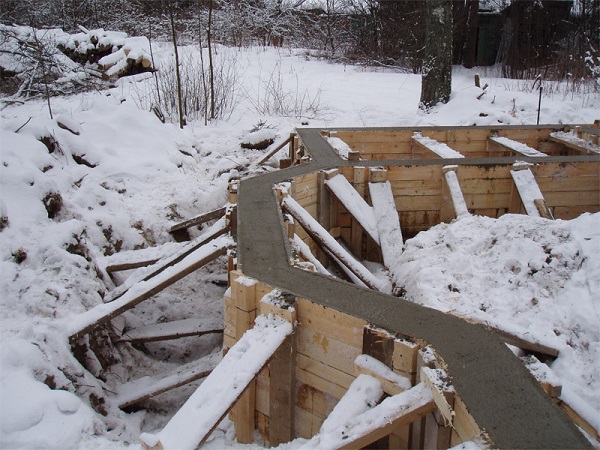
 The concrete should be poured into the trench continuously
 After that, let the foundation settle. This will take at least a month. Unforgettable watering it constantly. This will prevent cracking of its surface.
So, how to make a foundation for a house is clear from the recommendations presented in this article. It is only necessary to correctly assess the situation, decide on the project and strictly adhere to the order of the stages.
Explain how to properly fill the strip foundation to ensure maximum structural life. Before filling the formwork with concrete, it is necessary to lay a sand cushion (if necessary), tie the armored belt, and strengthen the formwork.
So that the concrete does not collapse during stripping, the inner surface of the formwork panels is covered with a film, roofing material, or covered with a hydrophobic composition (soap solution, cement or lime milk). Typical mistakes do-it-yourself concreting - the gaps in the formwork panels are more than 3 mm, rusty plaque on the whips of the reinforcement, the lack of compaction of the mixture. In this case, the house will not stand for long due to the stratification of the monolith.
Requirements of SNiP standards
It is forbidden to throw decorative concrete into the formwork from a height of more than 1 m, commercial concrete - 2 m. The recommended dump height is 0.5 m, only in this case the house will not shrink due to delamination of the base. The basic requirements for concrete work are given in (paragraph 2.10 - 2.14), which facilitates the production of work with your own hands:
- laying in one direction;
- the same layer thickness (vibration compaction every 60 cm);
- the reinforcement should be qualitatively enveloped with a solution;
- a technological break between the laying of layers for a maximum of 2 hours from the moment of mixing the concrete (during this time the lower part must be compacted);
- pouring along the upper edge of the formwork is not desirable, it is better to install it 5 - 7 cm higher below, distribute the mortar along the line drawn on the inner surface of the shield.
Please note that concrete at 25 degrees begins to set two hours after mixing, i.e. not from the moment it was poured into the formwork, but from the moment water was added. Therefore, if the concrete is made at a factory, it is necessary to order concrete with the expectation of no more than 1 hour for delivery, in order to have time to lay and compact it.
If the height of the tape is not much greater than 60 cm, it is recommended to divide it into two equal layers (for example, 80 cm \u003d 40 + 40 cm).
Sudden rain, which erodes the concrete, is the reason for work stoppages. The defective layer is removed, replaced with new concrete with obligatory re-compaction. Movable awnings, covering the flooded tape at the end of the work, allow you to protect the structure from rain while gaining strength.
Hot and cold seam
Before starting pouring a monolithic base, the time of work should be calculated. With significant volumes, it is often impossible to fill the formwork with the mixture in one go (for example, a deep band with a height of 2 m along the perimeter of 10 x 10 m). For these conditions, two technologies are used:
- hot seam - filling the tape half in depth with a layer-by-layer ramming every 60 cm in height, covering the surface with a film, resuming work the next day after the cement film has been washed off the concrete surface (after 7 hours, maximum);
- cold seam - installation of vertical lintels (wooden, plywood board) into the formwork, resumption of work only after concrete curing (8 hours, minimum)
Changing these modes is fraught with a sharp loss of strength of the strip foundation. When a new batch is applied to concrete, which has already lost its mobility, but has not yet gained strength, cracks form in the structure. Before continuing concrete works measure the strength of the cast structure, if it is slightly higher than 1.5 MPa, you can order a mixer or run a concrete mixer at the facility. Normal conditions for an eight-hour curing are considered to be a temperature of + 20 degrees, no precipitation.
The place of contact (working seam) is cleaned from the cement film in several ways:
- mechanical - scrapers, angle grinders with a diamond disc or rigging for concrete, a stream of air, water;
- chemical - special compounds called "chemical cutters" (usually acids);
- sandblasting - supply of quartz sand under pressure, then you need to dedust the surface.
The cold seam is necessarily treated with materials that increase adhesion. The most effective primers are deep penetration, strengthening concrete, changing its structure at the molecular level.
Highly effective injection isolation (e.g. Penetron products) improves waterproofing properties seam, increases frost resistance. Swellable cords made of hernite, bentonite, waterstops are a budget option for waterproofing.
The concrete poured into the formwork is saturated with air by default. After hardening, cavities, pores, and internal cavities are formed in it. Therefore, a house built with your own hands will rest on solid foundation only when compacting the mixture with a manual rammer or vibrator. The main mistakes in the construction of a monolithic foundation are the lack of compaction or an increase in the layer more than 60 cm.
Why compact concrete
The main reasons for vibrating concrete with your own hands are:
- decrease in porosity - the air escaping from the mixture increases the water resistance, the strength of the structure, the class of concrete (vibrators of low amplitude, high frequency are recommended);
- increase in fluidity (short-term) - periodic shaking of the solution with a vibrator improves the gravitational distribution of concrete inside the formwork.
In the absence of a vibrator (garden house built independently), reinforcing pins can be used. This bayonet technology is effective mainly for liquid concrete. In reinforced concrete foundation elements of complex configuration, it is recommended to re-seal one hour after laying the mixture, but before setting. With layer-by-layer pouring, the tip of the vibrator is immersed in the lower layer by 5-10 cm for uniform mixing, disappearance of the interlayer boundary.
The main requirements for working with a vibrator are:
- fast immersion + slow extraction (concrete must close on its own);
- the overlap of the circles from the vibrator by 10 cm or the step of moving the vibrating tool \u003d one and a half radius of action.
The following signs are of satisfactory sealing quality:
- quick alignment of the concrete mirror when removing the tip;
- no bubbles;
- fine-grained sand in cement laitance on the entire surface;
- termination of subsidence.
Vibrator or manual bayonet
On straight sections monolithic structures concrete is definitely easier to compact with vibrators. In narrow places, with a complex design of shields, an armored belt, the tip of a vibrating tool may not fit into the formwork, so you have to bayonet the mixture with your own hands with pieces of reinforcement. Only in these cases does the house receive the maximum possible service life.
The most demanded vibrators are of the following types:
- manual - the motor is built-in, the tip is heavy (29 - 22 kg), the working part is about 50 cm, the productivity is 7 - 18 cubic meters per hour;
- with a flexible shaft - the working body is removed, the tip length is 36 - 44 cm, the weight is 11.5 - 23 kg, the productivity is half that of the previous versions (2 - 6 cubic meters per hour).
The electric drive is built in the following models: IV 60, IV 100, IV 103. Modifications IV 47B, IV 112, IV 113 are equipped with a flexible shaft. The tip of the tool is called a vibrator head; manufacturers produce equipment with a diameter of 2.5 - 10 cm for different operating conditions. In addition to the deep versions of the tool, there are surface, external vibrators. The former are mounted on a concrete mirror, the latter are fixed to the formwork, giving it oscillatory movements.
Pneumatic vibrators are powered by a compressor and are professional equipment. They have a high resource and are designed for long-term operating conditions.
In order not to ask questions later on the forum - why the foundation cracked after pouring, we recommend reading.
Influence of weather conditions
To ensure normal conditions, the concrete should not be hot, the optimum solution temperature is within 35 degrees. With winter concreting with your own hands, the house will be provided with a high-strength base if the temperature of + 10 degrees is maintained inside the formwork for three days.
The specifics of summer concreting
In hot weather, concrete is intensely heated due to chemical processes taking place inside it. In this case, the linear expansion exceeds the permissible norm, which is fraught with the following defects:
- at the time of expansion, the volume increases;
- at the same time, setting (hydration) begins;
- after natural cooling, compression begins, which is impeded by the structure of the material formed at the previous stage.
Residual stresses lead to rapid destruction of reinforced concrete structures, the house loses its resource and strength. Therefore, when concreting in the summer with your own hands, it is necessary to use concretes, the brand of which is one and a half times the design grade of concrete, and add plasticizers.
Work is carried out in the evening or early in the morning during the least heat. The place of work is protected from solar ultraviolet radiation by canopies, awnings. Repeated vibration compaction can save surfaces with emerging cracks, no later than 1 hour after laying the mixture.
Pouring monolithic structures in winter
Already when the temperature drops to + 5 degrees, concrete will take twice as long as at + 20 degrees. The set of strength at 0 degrees practically stops, which destroys the structure of the reinforced concrete structure. Water ceases to participate in hydration, remains in the form of droplets expanding in frost. Cracking along the entire depth of the foundation strip is ensured; it will not be possible to restore the structure. The main methods for winter concreting are:
- heating concrete components - steaming sand, crushed stone (within + 35 degrees), using warm water (+ 70 degrees, maximum);
- change in the proportions of water / cement - the amount of liquid is reduced, the amount of cement is increased;
- the use of R-cements - the letter in the marking means a quick set of strength, the rate of hydration increases without loss of properties;
- the use of antifreeze - chemicals are added to the water to reduce the freezing point;
- heating of the formwork - the cable inside the foundation tape, along the perimeter, heating the panels.
Polymer films covering the poured mixture and layers of insulation create the effect of a thermos. In severe frost, greenhouses are made over the formwork.
How to care for concrete
For the house to stand firmly, it is not enough to pour concrete with your own hands in compliance with the above requirements into the formwork and remove it. Depending on the season, air temperature, it is necessary to provide conditions for curing:
- reduce shrinkage to an acceptable minimum (vibration);
- prevent sudden drying or freezing;
- prevent damage (chemical, mechanical).
For example, possible leaks in the formwork crevices must be eliminated. It is desirable to cover the concrete mirror with a film immediately after vibration compaction (burlap, tarpaulin, sawdust are allowed). In winter, it is necessary to heat the formwork and building spots in different ways.
In the heat, intense drying and dehydration occurs, dangerous with cracks along the perimeter of the tape. Therefore, periodic hydration is necessary for the first seven days. For this, it is forbidden to use jet irrigation; it is better to use watering cans or hose nozzles. Wet-drying compress will ensure the absence of shrinkage, cracking, flaking.
It is very important to use all the indicated techniques, technologies. monolithic concreting in complex. Violation of the regimes at any stage will lead to an increase in the construction budget, at least 2.5 times - it will first be necessary to dismantle the poor-quality foundation, then fill it up again, and take out the construction waste.
Advice! If you need contractors, there is a very convenient service for their selection. Just send in the form below a detailed description of the work that needs to be performed and you will receive offers with prices from construction teams and firms by mail. You can see reviews of each of them and photos with examples of work. It is FREE and non-binding.
Sep 2, 2015
The construction of a private house always begins with the preparation and pouring of the foundation. Arrangement of the base of the house is one of the most important and crucial stages of construction, it requires maximum attention and thoroughness when carrying out work.
When constructing a residential building, you can use the following types of foundations:
- pile,
- tape,
- monolithic.
For a certain type of building, one or another type of foundation is suitable. For example, a pile pile is necessary when the soil on the site is weak enough to organize other types of house foundations in it.
The strip foundation is good because it can be equipped in most types of soil without unnecessary preparatory work.
In the presence of "floating" soil - sand or so-called quicksand, it is recommended to use a monolithic or slab foundation.
For most of the country houses a strip foundation is selected.
Preparatory stage
Preparation, before pouring the foundation under the house, has great importance... At this stage, it is necessary to mark the site for the base of the house according to the drawing drawn up earlier. The depth and thickness of the foundation, its location on the site depends not only on the terrain, but also on the composition of the soil. For example, swampy or clayey soil requires a pile foundation, unstable soil requires a monolithic foundation, and strip foundations are suitable in the presence of mixed soil.
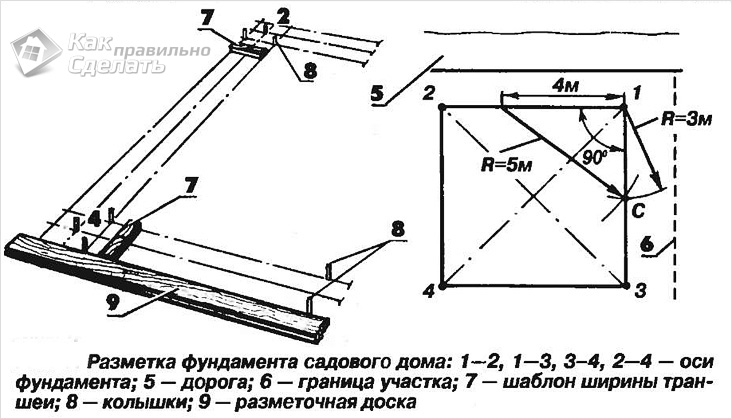
Foundation marking scheme
The markings are carried out with rope and pegs. Having selected the desired type of foundation and having carried out the markup according to the drawings, you can start organizing the holes for the foundation. For a pile foundation with round piles, it is necessary to use a manual or electric drill, a strip foundation - a shovel and a drill, if it is not possible to use special equipment. To obtain a monolithic base, you will need powerful construction equipment.
Pile foundation
After marking on the site, you can begin to organize holes for the foundation. For greater strength, their depth should be below the level of soil freezing. After pouring, the foundation usually subsides, and you can prevent cracking or any other deformation of the base of the house by building a sand cushion in each hole. To do this, the soil at the bottom of the hole must be tamped, poured about 15–20 cm of sand on top, spilled with water and tamped well as well.
Fill in the solution
The amount of concrete solution for the pile foundation can be calculated as follows: the area of \u200b\u200bthe support (the bottom of one hole) is multiplied by the height of the pile. The support area of \u200b\u200bone pillar is understood as the fourth of the diameter of the hole made in the ground in the square, multiplied by 3.14 (1 / 4πD 2). The height of one pile is the sum of the depth of the hole and the length of the pile that will be above the ground.
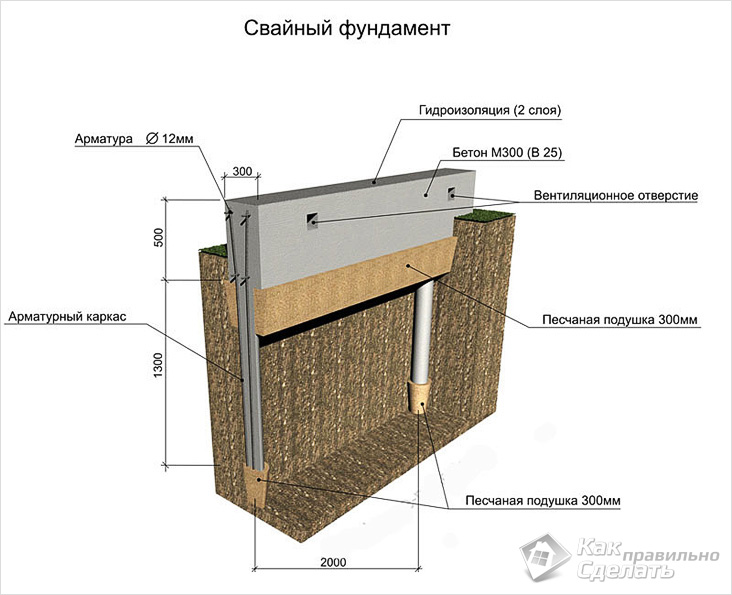
Pile - device diagram
Note! Concrete mortar it is necessary to prepare from cement grade not lower than M200. However, a truly solid foundation for a house can only be obtained with M400 cement. Attention should be paid to the quality of the sand - it should be fine-grained, without large stones. For a high-quality concrete solution, it is necessary to mix cement, sand, crushed stone and water in a proportion determined by the brand of cement used.
It is necessary to prepare the concrete solution in such an amount that it does not remain after completion construction works... First, the hole is filled by 10-15 cm. Fittings are placed in it - metal pipe or several metal rods at least 1 cm thick. The reinforcement will give the foundation additional strength. After placing the reinforcement in the prepared holes, the concrete is gradually poured to the very top.
Strip foundation
When arranging a strip foundation in a pre-marked area, trenches are equipped with a depth below the freezing level. Their width should be no more than 50-60 cm.
Tape
Before pouring the foundation under the house, settles sand pillow - not less than 15-20 cm thick; it should be spilled with water and well compacted. At the bottom of the foundation, the first portion of concrete mortar is poured - no more than 10-20 cm thick. A reinforced mesh is laid on the primary mortar, and concrete mortar is poured from above to the ground surface.
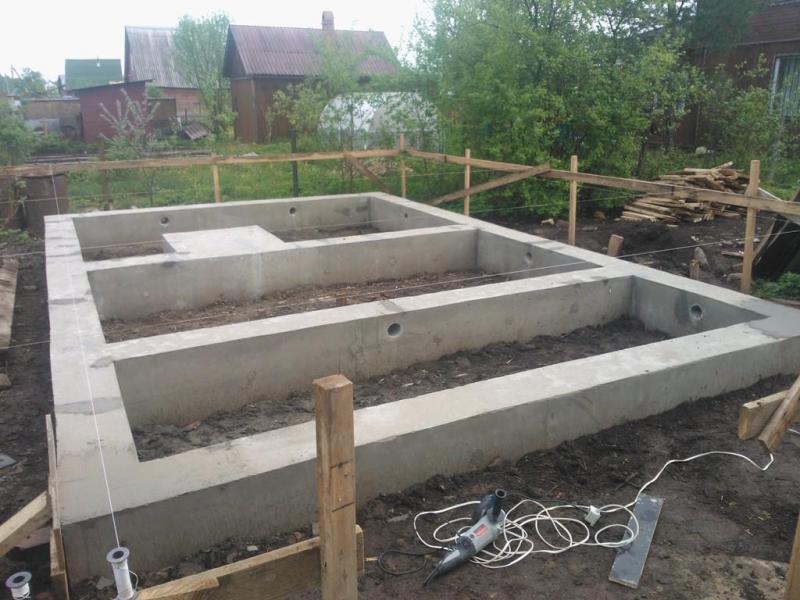
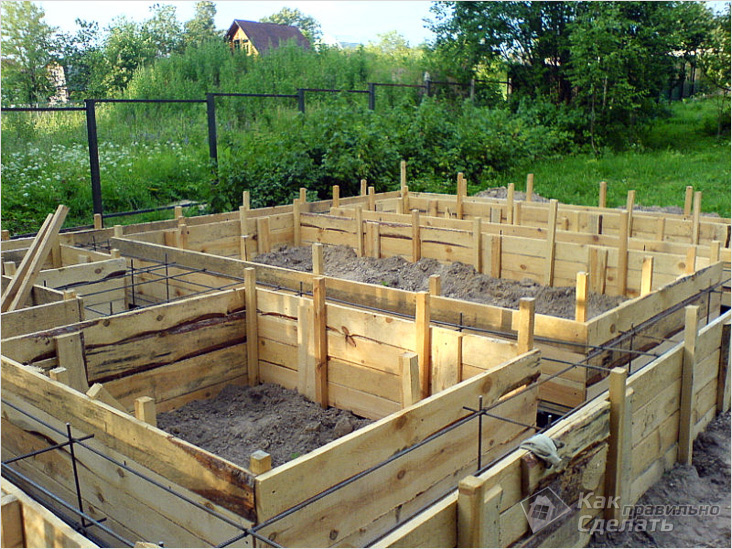
If the strip foundation is to protrude above the ground, it is necessary to construct the formwork from wooden planks in advance. The concrete solution must be poured into the formwork. Wooden formwork boards can only be removed after the concrete solution has dried.
Waterproof film
The most common support for a private house is tape structures made of reinforced concrete on a sand and gravel cushion. Unlike pile-driven ones, their construction does not require specialized equipment, and their installation is relatively inexpensive. In addition, in buildings with this type of support, it is possible to equip a basement room.
Foundation depth
The foundation in the form of a monolithic tape is erected only on dense soils that are able to withstand the weight of the building. Its depth can vary from 1.2 to 2.5 meters.The depth should be not less than the depth of freezing land in the area where construction is underway. When erecting heavy multi-storey buildings it is better to order calculations from specialists, since a mistake can be too expensive.
When calculating the depth of immersion of the foundation, many factors are taken into account:
1. Type of soil.
2. The depth of its freezing.
The depth of soil freezing in different regions of the Russian Federation
3. Proximity groundwater.
4. Terrain relief.
5. Design features of the house, planning of basements.
6. Maximum weight of the structure.
7. Availability near neighboring buildings.
When determining the maximum mass of a building, the weight of all structures is taken into account: not only walls, ceilings, rafters, roofs, but also windows, doors, finishing materials... The calculation also takes into account the weight of furniture and electrical appliances, the average weight of people who will be constantly in the building. The snow load is added to this amount, which is determined according to the standards depending on the type of roof and climatic conditions of the area.

Important! If there is a reservoir near the house or a close location of groundwater, in order to avoid flooding, it is better to build pile foundation or choose another place for construction. However, in this case, the construction of basements will have to be abandoned.
Building base width
The starting point for determining the width of the strip-type foundation is the total area of \u200b\u200bthe building. The calculation is carried out according to the formula:where S is the minimum base area;
H is the width of the building;
L is the length of the building;
X is the width of the tape that we need to know.
Let's say minimum widthwhich we calculated is 170 mm.
Important! Any foundation should be 100 mm wider than the walls of the building.
For example, if the wall thickness is 300 mm, that is, more than our calculated value, the width of our foundation should be 300 + 100 \u003d 400 mm. When arranging a basement, the width of the foundation tape can be determined using the following table.

Important! If it is planned to build basements, then the lower part of the sole is deepened 40 cm below the floor level.
Number of fittings
Based on the practice and requirements of SNiP, reinforcement of 12-16 mm is taken for this type of foundation. The longitudinal bars, on which the main load will act, must have the maximum thickness. For transverse, you can take 12 mm rods.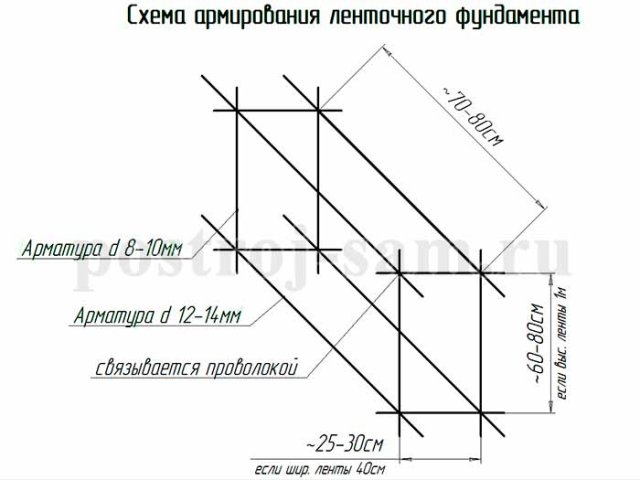
Bars running along the length must be stacked at a distance 5 cm from the top and bottom of the foundation... Since they take on the main load, they must be made of ribbed reinforcement. Vertical and transverse reinforcement does not carry such a load, therefore, in this case, smooth reinforcement can be used.
All rods are installed with a step of 0.5 m... With a given width of 400 mm, 4 longitudinal (two at the top and two at the bottom) bars will be enough. With a wider foundation strip or moving soil, these numbers increase.
Number of longitudinal reinforcement is determined by dividing the length of the longer side of the foundation by the lattice spacing. For cross-links, the calculation is carried out in a similar way. The number of vertical rods depends on the height of the foundation, which is multiplied by the number of crossings of the transverse and longitudinal rods.
Stages of building a foundation
1. Site preparation and marking. The site at the selected place is carefully cleaned of debris, large roots and leveled. Then a layer of vegetation is removed from it to a depth of 15-10 cm.In the presence of significant differences in height, it is more expedient to divide the foundation into sectors with different heights.
Initially, outer corners are marked, and then interior walls using pegs (beacons), then diagonals (equal) are extended from corner to corner. If the sides of such a rectangle are not equal, it is better to draw a sketch of the building on paper and find out which of the lighthouses is installed incorrectly.
2. Construction of a trench. With the help of an excavator, it is not difficult to get a trench of the required size, but in this case, it will not be possible to get perfectly flat walls. In addition, the collapse of dense layers of earth is possible, which can affect the stability of the foundation.
3. Sand and gravel pad. Unlike soil, sand and gravel are less susceptible to heaving, since they do not retain water. The use of a pillow eliminates uneven shrinkage of the base. Its layer should be at least 20 cm. Before pouring it is spilled with water and carefully compacted.
4. Formwork it is mounted from boards of 10-20 cm. Their thickness should be 2.5-4 cm. Opposite shields are connected with pins, and the corners are rigidly fixed.
5. Installation of fittings. It is better not to weld the reinforcement, but to tie it with a wire, because weak spots will appear in the welding places. It can be knitted by hand or using a special gun, which is filled with a coil of wire. It is more convenient to use a special hook for twisting.

Crochet pattern
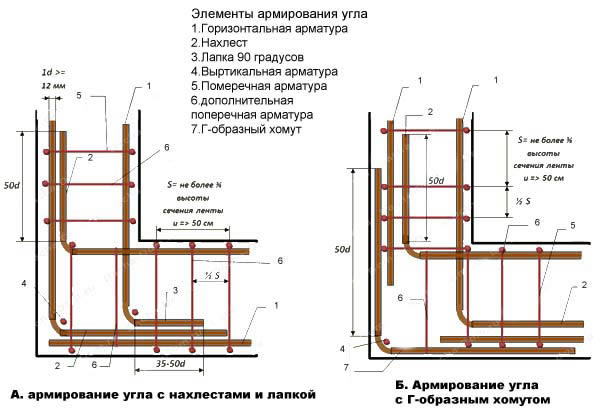
Reinforcement methods
6. Pouring concrete. Alignment. To achieve a monolithic tape of concrete, the mortar must be mixed as thoroughly as possible. For large volumes, you can use a ready-made solution.
For work, concrete M200-M400 is used. When using the M200 grade, the quality of the sand (its class) should be higher. The proportions of the solution can be calculated using the table below.

Pouring is carried out in layers of no more than 20 cm. After the trench is filled with concrete, it is trimmed with a bayonet shovel or by tapping on the frame of the reinforcement or formwork. However, after grasping, it is undesirable to touch it.
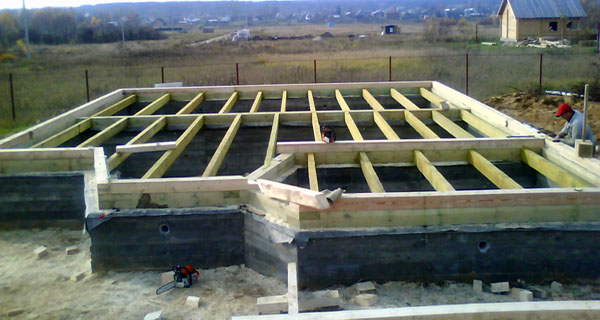
To prevent cracks from appearing on the foundation during the drying process, it is covered with a film. The formwork is removed 8-10 days after the last layer is laid.
Deep foundation


