You have private house or a cottage outside the city? Do you have to take out a full bucket of water from under the sink every time? Stop suffering! Drain your house with your own hands! It is quite real and quite simple. To do this, you need to be patient and use the following materials: pencil, tape measure, hacksaw for metal, iron concrete rings, sewer pipe, rubber gaskets, concrete floors, cement, sand, crushed stone, wood, shovel and gloves.
Preparatory work
And so let's get started. First, you need to determine where the wastewater will be collected. This is usually the place where the natural slope of the territory goes. And yet, if you have drinking water in a well or in a well on your site, you must exclude the ingress of wastewater there. Secondly, it is necessary to draw a draft of the sewerage system (your private house must have a project, use it), measure and make a list necessary materials and component parts for work. Measure with maximum accuracy, taking into account everything to the smallest detail so that you do not have to run to the store many times.
Are the materials ready? We begin assembly work.
Internal sewerage
First, we lay the pipes indoors. Better to take PVC materialbecause it's easier to work with. It is compatible with other building materials, it is lightweight, bends well, holds cement and connects quickly.

Saw it with a hacksaw at a 90 degree angle. We connect the short parts of the structure at each joint, inserting rubber gaskets, which will ensure tightness. Now we connect all the elements. We take the pipes for the toilet bowls. They should be large in diameter (100 millimeters). This is necessary in order not to burden the drain. The rest of the pipes should have a diameter of about 50-75 mm, through which water will flow quickly enough.

We install pipes with a slope of 2-5 mm for each meter of pipe to simplify the drainage of water. We take the pipe out of the house at a depth of about one to two meters, depending on how deeply the ground freezes, and then, with a slope of 5 mm per linear meter, we enter it into the sewer well. Now check if water flows well through them.
External sewerage
So we got to cesspool... It can be of several types and classifications, with or without a bottom, respectively, ecological or polluting the environment.
You can use a pit without a bottom only if the flow volume is small (within 1 cubic meter per day) and if the points with drinking water are not closer than 50 meters from it.
But if you want to protect yourself from fines and criminal liability, then it is better to make a sealed cesspool. It is good in that it eliminates problems, because they are pumped out with the help of professionals and special equipment. But this "pleasure" costs money.

Overflow sewerage in a private house
You can also build a sewage system with your own hands in a private house by processing wastewater, that is, a septic tank. In order to make a three-chamber septic tank, you must follow several rules:
The place for the septic tank is chosen lower than drinking water, at a distance of at least 50 m from the well.

Single chamber septic tank
- The fence should be at least two meters.
- There must be a place for the entry of sewage equipment.
- Dig a hole with a volume of more than 3 drainage rates per day.
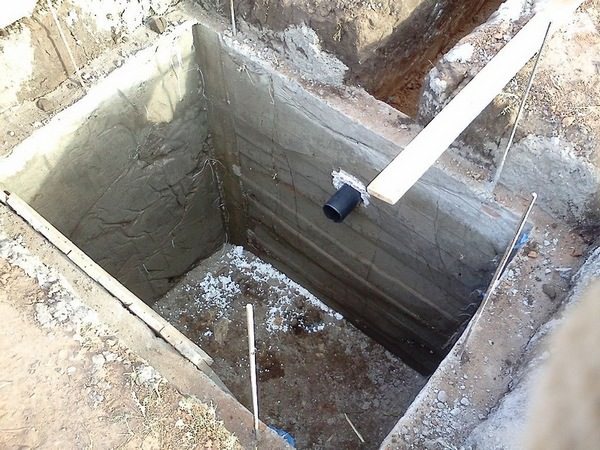
- Fill the bottom with a 15-20 cm concrete pad so that water does not seep into the ground.
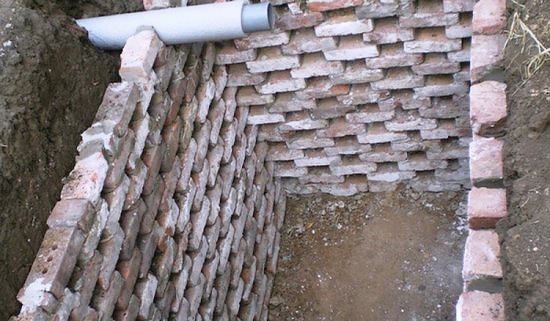
- For walls you can use reinforced concrete rings, ready-made plastic structures or lay them yourself out of bricks.
- At the end of the masonry, carefully seal all the seams.
- Finish the inner part of the walls of the well twice with bitumen.
- By the same principle, make a second camera, connecting them together.
- The third chamber will be the same, only without the bottom. At the bottom of the well, about 50 cm of sand and gravel are poured to filter the water.
Done. Now draining the water is not a problem for you. Your private house can have any of the three forms of sewerage offered by us. You just need to choose the most suitable option for your home and do it yourself.
To collect household waste in private homes or garden plots, a drain pit is required. Its construction is not difficult, so you can do it yourself, without the involvement of specialists. To create a drain pit with your own hands, you will need some knowledge, we talked about them in this article.
Sanitary restrictions
In order to avoid penalties and litigation with neighbors, the following sanitary and technical requirements should be taken into account when choosing a place for a drain pit:• a storage pit for household waste is located only on the territory of a private household; you have no right to post it outside of it; distance from the fence - from 1 m;
• in order to avoid the ingress of drains into drinking water in case of a leakage of the pit, it is necessary to place it at a distance (at a distance of 10 m) from the branch of the water supply; at least 20 m recede from the well from drinking water (on loams up to 30 m, sandstones - 50 m);
• the close location of such a pit, when it is drowned or washed out, can lead to the destruction of the foundation, therefore the distance from residential buildings (including neighboring ones) is 10-12 m;
• the depth of the pit depends on the occurrence of groundwater, the maximum depth is 3 m.
• when choosing a place for sewage treatment plant you should also take into account the possibility of access to it for special equipment for pumping.
• in order to avoid the appearance of an unpleasant smell in the house, do not place it near the windows - you should step back at least 5 m.
Sump distance
Violation of sanitary-technical norms is fraught with not only fines. In the event that a wastewater spill causes damage to the natural environment or the health of others, a criminal case may be opened against you (Article 250 of the Criminal Code).
Important! The construction of cesspools without a bottom is allowed only if the volume of domestic wastewater per day does not exceed one cubic meter. In all other cases, the container for collecting waste must be airtight.
Types of drain pits
For the construction of a storage tank for domestic wastewater, you can use the most different materials:• brick;
• concrete (including concrete rings);
• plastic;
• wood;
• rubber tires.

Brick drain pit
Due to their low tightness, wood and rubber tires are used only for the construction of small drainage structures. Most often, cesspools are built of concrete or brick.
Calculating storage capacity
The size of such a container depends on the number of residents, the number of installed plumbing fixtures, the presence of a shower or bath, a bath, a dishwasher, a washing machine, pumping frequency and other nuances. Generally accepted without further filtration is the rate of effluent per person in the amount of 30-50 liters (0.03-0.05 cubic meters) per day.Thus, provided that the drain pit is pumped out once a month, a family of 3 people will need at least:
0.03 x 3 x 60 (number of days in 1 month) \u003d 4.5 m3
Council. In case of unforeseen situations (for example, snow drifts and the impossibility of timely pumping out), it is better to make the size of the drive with a margin. Since the volume of one GAZ sewage truck averages 3.8-4 cubic meters. m, so as not to overpay for running the car, it is more reasonable to make the pits a multiple of this value.
Concrete drainage pit. Construction stages
1. Initially, the pit is prepared manually or with the help of an excavator. Usually its width is no more than a meter. The length of the cesspool is calculated depending on the volume of wastewater. For the convenience of pumping out, the bottom of the pit is best done with a slight slope.2. To prevent the walls from crumbling, they are leveled.
3. Pipes are supplied to the pit. In order for the wastewater to flow into the pit by gravity, it must be located at a certain slope. For pipes d160 mm, it is 10 mm per meter of passage; the slope of 100 mm pipes is 20 mm.
4. It is desirable that the drain pipes are located below the freezing level. Otherwise, they will have to be carefully insulated.

Pipe supply
6. Between the walls of the pit and the ground, it is better to make a hydraulic lock. For this, wet clay is poured and carefully compacted between the formwork and the ground. This must be done as the formwork is being erected.

Clay castle
7. It is advisable to waterproof the walls of the concrete pit using ordinary polyethylene film.
8. For the side parts of the structure, a standard formwork is being prepared. Since the concrete walls have a significant mass, the formwork is fixed as firmly as possible using self-tapping screws.
9. The structure must be reinforced. All metal rods are tied with wire.

Sump reinforcement
10. The thickness of the walls of the concrete cesspool is 25 cm.
11. In order to avoid the appearance of cold joints (places of "weakness" in the concrete), the walls are poured in only one step.
12. The mortar is mixed in a ratio of 1: 2: 3 (cement, sand, crushed stone). It should be fairly liquid. If you throw a small pebble into it, with a sufficient amount of liquid, it should be completely immersed in the solution.
13. In the process of pouring the solution should be periodically compacted with a shovel or vibration compactor (bayonet). Otherwise, voids will form in it, which will negatively affect the strength of the structure.

Compaction of concrete makes it stronger and prevents voids
14. In hot weather, to avoid cracking, drying concrete surface better cover with bags.
15. After the concrete has completely hardened (this occurs on average within a week), the pit is carefully waterproofed with bitumen. For this, the walls are first cleaned of irregularities. The bitumen is crushed into pieces, heated to a boil, then removed from the fire and gradually, in a thin stream, a small amount of kerosene, gasoline or diesel fuel is added to it (10 liters of bitumen will require a liter). This is done to make the bitumen more liquid. If not diluted, it will solidify almost immediately after removing it from the heat.

Heating bitumen over a fire
16. Do not overheat the bitumen or heat the mixture with gasoline, kerosene or diesel fuel, otherwise it will flare up. If the heated bitumen nevertheless catches fire, in order to extinguish the flame, immediately cover the container with plywood or a suitable lid.
17. For waterproofing, you can also purchase a ready-made solution of roofing bitumen mastic, but it will cost more.
18. The resulting mixture is applied to the walls with a brush. After the first layer has dried, another one is applied.
19. As a cover, you can use a reinforced concrete slab with a hatch for pumping out and cleaning.

Drain pit hatch
Council. In the drain pit, as a result of waste decay, methane is formed - a fairly explosive gas. It is removed by means of a ventilation pipe located in the pit lid. The diameter of such a pipe is 100 mm at a height of 600 mm.

Ventilation pipe device
Video: Drain pit: construction stages
All the comforts of human living are associated with three components: electricity, water and sewerage. The owners of "summer residences" - summer cottages, small country houses - try to equip their seasonal dwelling with maximum comfort. Providing it with electricity is the simplest task, almost every corner of Russia is electrified. Water supply is decided by the arrangement of wells or wells. The most difficult issue - the local sewerage device - also has a standard solution: a do-it-yourself drain pit is being built on the site.
A drain pit in a private house or in a country house is an elementary structure designed to collect and accumulate local sewage effluents. Household waste from toilets, kitchen sinks, washing machines and dishwashers is transported here through sewer pipes.
No sewage treatment facilities are foreseen on the eve of this simple collection of sewage effluents. As the pit is filled, it is cleaned by pumping out the contents. Depending on the method of cleaning, the accumulated sewage is removed by special machines - sewers, or, after processing with biological products, is used for watering plants and as fertilizer.
Types of drain pits
Drain pits are classified in relation to ground level and materials of manufacture.
In relation to ground level
On this basis, sewage waste collectors are divided into two groups:
- superficial;
- underground.
Surface sewage collectors
This option is only suitable for use in the warm season. It is used extremely rarely, since sewer network it is necessary in this case to lay on top. The required slope (from the "supplier" of wastewater - sink, toilet bowl, etc. - to the collector) can be provided only if all sources of wastewater are located above the inlet of the tank. It is advisable to arrange surface drainage tanks in areas with a high level of groundwater.
Underground drain pits
Underground structures for collecting sewage are the most common. Depending on the amount of drains, the design of the drain pit may or may not have a sealed bottom. Sanitary norms of Russia it is allowed to build pits without sealing the bottom if the daily volume of wastewater does not exceed 1 m 3.
In all other cases, a sealed underground reservoir is equipped.
By materials of manufacture
For the construction of the drain pit structure, the following materials can be used:
- ceramic brick;
- concrete (in the manufacture of a monolithic structure);
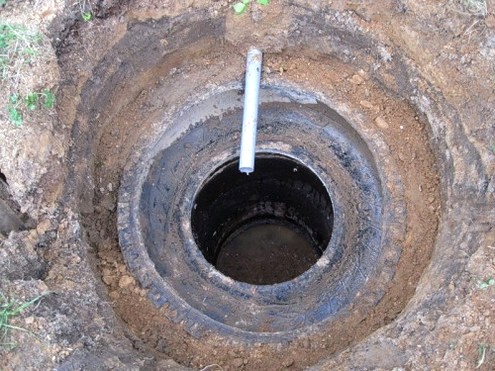
- used tractor tires;
- plastic;
- wood.
For the device of drain pits with your own hands, concrete rings are the most unsuitable option. For their installation, construction equipment is required - you cannot cope with heavy products manually.
The easiest and cheapest way to equip a drain pit in a private house or on summer cottage - decoration of its walls with tires. But such a design is unreliable in terms of tightness: there is a high risk of the liquid component of sewage drains getting into the soil.
Location - sanitary restrictions
Some homeowners believe that they can do whatever they want on their property, and they are deeply mistaken. Sanitary services are not asleep - they require strict adherence to the rules and regulations in force in the state, regardless of the type of property.
The location of the drain pit in a private house is also strictly regulated: the standards stipulate the minimum permissible distances from the waste storage tank to engineering structures, residential buildings and the boundaries of the site:
- to the water conduit (central) - 10 meters;
- to the underground gas pipeline - 5 meters;
- to the drinking well: 20 m - on clay soils, 30 m - on loam, 50 m - on sandstone and sandy loam;
- to a residential building (own and neighboring) - 10-12 meters;
- to the fence (site border) - 1 meter.
The maximum depth of the drainage pit is also regulated: it should not exceed 3 m, if the groundwater level allows it. These restrictions are contained in SanPiN 42-128-4690-88 and SNiP 30-02-97.
Important: Homeowners should be aware that non-compliance with sanitary requirements can be fraught with more than a fine - in case of damage to the health of others, a criminal case can be initiated.
Moreover, by doing drain pit at the dacha with your own hands, it must be located on the site in such a way that it is possible to organize unhindered access to it for special equipment at the time of pumping out.
Tip: Practice shows that it is better to place a drainage pit from the windows of residential premises at a distance of at least 15 meters.
Construction procedure
The device of a drain pit in a private house with your own hands, regardless of the choice of material, is carried out according to the general algorithm:
Explosive gas is generated in sewer tanks. To divert him ventilation is arranged... Its role is played by a pipe brought out through the pit cover. Its dimensions are regulated by building codes: diameter - 100 mm, height - at least 600 mm from ground level.
Choosing a way to clean the drain pit
Before you build a drain pit in a private house, you should decide a very important question: how you will clean it. The amount of work on the improvement of the site depends on this:
- if it is easier for you to periodically invite specialists with a sewage truck, take care of organizing an access road;
- if you are ready to clean yourself, purchase a plastic container with a sealed lid and find out in advance who will receive your waste. Do not forget about hand and respiratory protection. Better if it is a gas mask, but, at worst, a respirator will do. Of course, you can't do without rubber boots.
 When arranging a drain pit, you need to take care not only of how to dig it out, but also how to clean it
 Modern technologies make it possible to significantly simplify the process of cleaning the drain pit if it fills up quickly, or even make it practically waste-free. We are talking about microscopic helpers - capable of transforming wastewater into sufficiently pure water and a solid fraction suitable for use as fertilizer.
Bacteria not only decompose the contents of the drain, but they also work diligently to combat odors.
Just keep in mind, when deciding the question of how to clean the drain pit in a private house, that biological products should be chosen in accordance with the composition of the wastewater. Most bacteria cannot withstand contact with household chemicals: Detergents and detergents are detrimental to them. However, microorganisms that are resistant to aggressive environments are now being grown.
After the bacteria have worked hard, you will need to pump out the liquid component using a pump (it is completely harmless to humans, animals and plants) and remove solid sediment from the pit.
1.
2.
3.
If in multi-storey buildings the owners of real estate do not think about the question of what to do with the waste water and sewage, then for the owners of private households the problem of disposal of waste and sewage requires a permanent solution. They have no choice but to make a drain pit with their own hands. This option for arranging a sewage treatment plant is the simplest and most affordable when performing construction on its own.
Beginning the improvement of the personal plot with a water supply device and sewerage system, since staying in nature cannot be called comfortable if you have to carry drinking water from a well and, if necessary, run to nearby bushes.
There are several options for the disposal and processing of wastewater and sewage, but the most simple design is a cesspool. It is necessary to have knowledge of how to properly make a drainage pit without the help of specialists, so that in the future you will not have problems with its operation and the environmental situation in the area adjacent to the house.
Types of drain pits
Despite the simplicity of the design, the drain pits differ in the way they are implemented.They are:
- sealed;
- filtering;
- two-chambered.
When the pit is sealed, impurities do not contaminate the soil and groundwater... As a result, the ecological system will not be threatened by anything, as well as the sources of drinking water. The advantage of such a sewage treatment plant is that it can be used regardless of the hydrogeological conditions in the adjacent area.
![]()
But there are also disadvantages. Waste and sewage accumulated in the sealed container must be periodically pumped out, and calling the sewer is not a cheap service. The pumping frequency depends on the volume of the tank used.
In fact sanitary standards it is forbidden to build a local sewage system of this design: getting into the ground, untreated sewage can cause irreparable harm to the environment in this area. They can even be a source of contamination of drinking water sources, and this is already extremely dangerous for human health.
This option, if used at the present time, is only for summer cottages, since a small amount of water is required for the people living in them. It is recommended to build filter-type waste pits only on condition that the volume of wastewater during the day is no more than a cubic meter. When there is a small amount of wastewater, they manage to be recycled by natural decomposition.
Often, pits of this type are equipped during the construction of baths, steam rooms and for houses in which the separation of drains is provided. In the latter case, it is necessary to lay two sewer branches and build two drain pits on the site. The first of them, equipped with a filter type, receives waste water from a washing machine, a shower cabin, and a washbasin. These drains are considered to be relatively clean.
In the second pit of a sealed type, sewage from the toilet and water from the kitchen are sent.
Two-chamber drain pit... This solution to the problem of waste disposal is considered practical and reasonable.
The principle of operation of this treatment plant, shown in the photo, is as follows:
- a drain pit, consisting of two chambers, is connected in the upper part by an overflow, while the first of them is sealed, and the second is filtering;
- undivided drains initially enter the first of the chambers, sealed, and settle there (mechanically separated);
- solid particles sink down to the bottom, and less polluted water is poured into the next chamber;
- from another chamber, water is filtered into the soil;
- the waste collected in the first chamber must be pumped out from time to time. To reduce the amount of waste, special biological preparations are used. The strains of bacteria contained in them promote the processing of organic matter, which leads to a decrease in the amount of sewage.
How to make a drain pit correctly
Before making a drain pit in a private house, you need to design a construction plan. It is necessary to select the type of structure, the construction site and calculate the required volume of the tank.Of course, the amount of effluent is determined individually, but generally accepted norms also apply. For example, for a family that permanently resides in a house and has three members, a pit is built with a capacity of 6 cubic meters.
When calculating the volume of the container, the following points are taken into account:
- how affordable is the cost of services provided by the sewers;
- the volume of waste that the sewage equipment is capable of pumping out of the pit at a time.
When determining where to make a sump, a number of factors are taken into account:
- distance to the place of occurrence of soil water. It should be sufficient to dig a two-meter deep foundation pit (this is the minimum value). Read also: "".;
- the distance from the source of drinking water to the sump must be at least three tens of meters;
- you cannot make a cesspool on a slope;
- it is necessary to provide for the possibility of an entrance of special equipment designed to clean the pit from the drain;
- it is forbidden to make a sump in the immediate vicinity of a residential building and the fence of a neighboring site. Minimum distance to a residential building should be 5 meters.

Thus, before making a drain hole in your house, the place should be chosen very carefully in order to prevent contamination of the area surrounding the building, especially when the site is built up. In any case, the rules must be followed.
The choice of building materials for arranging a drain pit.
When creating a sealed cesspool, the following materials are used:
- concrete solution. First, the formwork is built, and then the solution is poured into it so that the thickness of the bottom and walls of the sump is at least 7 centimeters. Steel mesh is used for reinforcement;
- plastic tank. Arrangement of a cesspool with its use is considered an option with the lowest labor costs. First, a pit is dug out and a plastic container is already placed in it. So that it does not deform as a result of soil pressure on it and does not float during a flood, the bottom and walls of the ditch are concreted. In the process of pouring concrete into the bottom, special loops are laid to secure the tank with polymer straps;
- ceramic brick;
- concrete rings.
When a filter type drain pit is being built, you can:
- impose a brick on it, leaving a gap of 5 centimeters between the rows in a checkerboard pattern;
- install reinforced concrete rings for drainage wells with perforation in it;
- use car tires. They are stacked on top of each other, cutting off the lower rim on each tire;
- use used metal or plastic tanks or barrels. The bottom should be cut off in them, and holes should be made in the lower part to improve the filtration of drains.
We make a drain pit with our own hands
There is a certain order of how to make a drain pit with your own hands correctly.On initial stage prepare the pit and dig trenches for laying the supply pipes.
At the pit, the depth must be greater than the projected depth of the drainage pit, since space will be required for the drainage cushion. It is made from layers of sand and gravel, which are carefully tamped.
If you plan to equip a sealed pit, then the thickness of the layers should be 10-15 centimeters. On top of the pillow, either a reinforced concrete slab is laid, or a concrete screed is poured.
When equipping a filter pit, for better drainage purification, the minimum layer of crushed stone should be 20 centimeters. Thanks to this measure, the bottom is more long time will not silt.
Then you need to start strengthening the walls of the sump. For this, brickwork is performed, or plastic containers are used, or concrete rings are mounted.
In the event that a sealed sump is being built, waterproofing should be performed after the walls have been strengthened.
At the same time, the supply pipeline is connected to the container receiving the drains. It is necessary that the connection of the pipes to the tank be both leakproof and not rigid: then it will not collapse during ground movements. therefore, rubber couplings should be used for the connection.
About 40 centimeters from the surface of the earth, an overlap is made for the sump. Usually, a ready-made reinforced concrete slab with a hatch hole is used. If desired, it is quite possible to make such a slab yourself, having previously made the formwork. Also, the overlap can be built from boards, but it will not be durable.
In order to control the degree of filling of the tank and to pump out sewage in the ceiling, it is necessary to arrange a hatch. In addition, the cover should be mounted ventilation pipe for the removal of gases (including methane), which are formed in the process of decomposition of the solid content of wastewater. You can pour soil on top of the ceiling, but so that precipitation cannot get into the pit.
When the creation of a local sewage system is planned, for those home craftsmen who are new to this type of work, it will not be superfluous to know how to make a drain pit for servicing a suburban home ownership. Even if hired workers are engaged in the arrangement, it will be easier for the owner to monitor the quality of services.
Foreword
Many people solve the issue of draining a shower in the country in “old-fashioned ways”.
Required tools and materials
ArmatureConcrete mixerBituminous masticBulgarianBeamsBucketWaterNailsClipperPlaned boardDrillSewer pipesPencilExpanded clayBrushCuvetteShovelMaster OKMetal cornerHammerPerforatorSandRoofing materialRouletteSelf-tapping screwsExtensionLevelCementScrewdriver
Content
Many people solve the issue of draining a shower in the country in “old-fashioned ways”. Someone drains water for garden plantings, others drain the drain into the sewer, and some do not care about this problem at all, believing that it is enough to install a grate under the shower frame, and then all the waste water will seep into the ground. How to make a drain from a country shower competently and effectively?
Where to drain the water from the summer shower in the country?
Equally important when designing a summer shower is a drain for water drain. The easiest way is to connect the drain with a special gutter if it is located on the site. A tray made of galvanized sheet metal should be installed in the base of the summer shower. The shower tray will prevent soil from eroding under the shower.
There are several options for where to drain the water from the shower in the country: you can connect the drain to the central sewerage system, drain the water into the drainage pit, there are other ways.


Before making a drain for a shower in the country, if the pallet will be located directly on the ground, it is necessary to dig a small depression in the place where the building will be located. The pit should be covered with rubble, stones or completely concreted. Before concreting, this recess must be covered with roofing material so that the earth does not get wet. The pallet should be installed on, which can be used as large stones or other materials at hand.


Then it is necessary to connect the pallet to the gutter using a pipe laid in the trench. Sometimes a do-it-yourself shower for a shower in the country can be done together with a collection of soapy water located outside the shower stall. Its volume must be at least 200 liters. Not far from the summer shower, you should dig an ordinary hole. Its walls must be strengthened, otherwise they can collapse very quickly during operation. It is better to make the bottom and walls of the collector concrete, then the water will not be absorbed into the soil and erode it.


You can arrange a septic tank for a summer shower, but it should not be located directly under the shower stall itself, since due to large volumes of water it will start to fill with soapy water, and it will work worse. All this can lead to the destruction of the soil, and then the foundation of the summer shower stall. To preserve the soil and the structure itself, a drain for a summer shower must be built a few meters from the shower stall, and placed next to the drain. The drain from the summer shower should be on a slope so that it goes towards a drainage tank or trench.
It is recommended to lay out the drain bed for a summer shower with your own hands with a waterproof layer using a PVC film, which can be replaced with roofing felt or simply made a concrete screed with a gutter reinforced with a metal mesh.
It is not recommended to use clay for the installation of a water-resistant drainage layer, since over time it can erode and fill the drainage ditch. The drain must be constructed in such a way that it is ventilated. In this case, there will be no problems with unpleasant odors.
How to make a drain from a country shower based on a drainage well
How to make a summer shower drain the most in a simple way? The simplest drain for not too polluted water from a summer shower can be done on the basis of a drainage well. It is best to build it from an old steel barrel with a volume of 200 liters. The barrel should be buried in the ground.


To prevent the barrel from being pushed out of the ground in winter, it is recommended to install a special underground anchor that will prevent its pushing out. To do this, cut the fourth part of the barrel into petals and fold them out towards the bottom of the barrel. After installing it, these steel petals should be covered with a mixture of crushed stone and sand.


When the petals are cut out, it is necessary to make drainage holes along the entire surface of the barrel walls in a checkerboard pattern using an angle cutting machine. This work can only be done with goggles and heavy leather gloves.
A round hole should be cut in the bottom of the barrel, and then the sewer pipe nipple should be inserted into it, having treated the inside of the barrel with silicone sealant. While holding the branch pipe, you need to carefully pull the connecting sleeve on it. Subsequently, the main drain pipe will be connected to it.
The barrel must be placed with the petals down and carefully wrapped with geotextile, which is a special fabric that allows liquid to pass through, but retains soil particles inside the barrel.
Geotextiles can be secured using synthetic twine. Then the barrel should be placed on a separate sheet of geotextile and wrapped around its edges over the barrel petals. It remains only to dig a hole for the barrel with a diameter slightly larger than its own, lower the barrel into it and fill the hole with a mixture of rubble and sand. You get the simplest drain for a country shower in the form of a drainage well from an old steel barrel.


Such a drain can be supplemented with a septic tank in the form of a dead well, in which the water will settle and be processed by bacteria. Then the water will go to the drain, and the sediment will fall to the bottom. The overflow pipe should be arranged in such a way that liquid flows into it from the average height of the settler volume, where there are few suspended particles.
For water from a summer shower, 1-2 stages of cleaning will be enough. It will be saturated with the necessary elements, therefore it is allowed to use it for watering ornamental garden plants. Instead of a drainage system, a septic tank can be supplemented with a storage pit.
For better work such a structure at the entrance drain pipe it is recommended to arrange the filter from a fine mesh.
You should not place a summer shower drain in the country next to perennial plants with a deep root system. The roots can easily penetrate the pipes, forming plexuses there and blocking the cross-section of the pipes.


For a summer shower designed for 2-3 people, it is quite enough to arrange only a drainage ditch into which you need to bury sewer pipe large diameter, having previously made holes in it. In addition, it should be wrapped in geotextiles to prevent soil from clogging the holes. From above, the drainage ditch must be covered with sand, and then covered with soil.
The waste water from the summer shower can be discharged into a drain pit, the depth of which should be about 2 m. In order to prevent its walls from crumbling, it is recommended to put 6-8 old car tires with a diameter of 1 m in the pit. They will make the system stiff.


The drain pipe for draining the used water from the summer shower must be inserted into the pre-cut hole between the 3rd and 4th tires. To prevent water from stagnating, holes should be made along the sides of the tires.
If you intend to use a shower in cool weather, then it is recommended to lay the drain pipe in the ground to a depth of 1-1.2 m. The pit must be covered from above by creating an overlap of dense material.
This method of creating a drainage system from old tires or an inverted barrel is more suitable for a summer shower, which is used by no more than 2-3 people. With an economical use of water, such a drain system can last for a rather long time, especially with sandy soil.


